Specification Sheet
Page 1
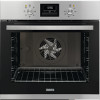
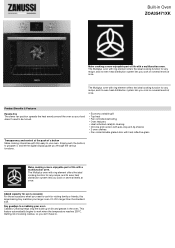
... with heat reflective glass Transparency and control at once. The Multiplus oven with a multifunction oven. It's 25% larger than the standard size. Product Benefits & Features Hassle-free The clever fan position spreads the heat evenly around the oven so your oven Catalytic Cleaning helps stop anti-tip shelves • 2 oven shelves • Fan cooled double glazed door with a multifunction oven. Built-in the oven. The Multiplus oven with ring element offers the ideal cooking...
... with heat reflective glass Transparency and control at once. The Multiplus oven with a multifunction oven. It's 25% larger than the standard size. Product Benefits & Features Hassle-free The clever fan position spreads the heat evenly around the oven so your oven Catalytic Cleaning helps stop anti-tip shelves • 2 oven shelves • Fan cooled double glazed door with a multifunction oven. Built-in the oven. The Multiplus oven with ring element offers the ideal cooking...
Specification Sheet
Page 2
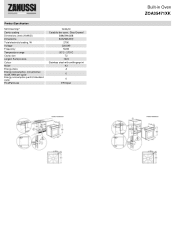
Product Specification Self-Cleaning? Cavity coating Dimensions (mm) (HxWxD) Dimensions Total electricity loading, W Voltage Frequency Temperature range Cavity size Largest Surface area Colour Noise Energy class Energy consumption, conventional mode, kWh per cycle Energy consumption per EU standard cycle ProdPartCode Catalytic Catalytic fan cover, Grey Enamel 589x594x568 600x560x550 2790 220/240 50/60 50°C - 275°C 72 1424 Stainless steel with antifingerprint 43 A 0 0 ER Open Built-in Oven ZOA35471XK
Product Specification Self-Cleaning? Cavity coating Dimensions (mm) (HxWxD) Dimensions Total electricity loading, W Voltage Frequency Temperature range Cavity size Largest Surface area Colour Noise Energy class Energy consumption, conventional mode, kWh per cycle Energy consumption per EU standard cycle ProdPartCode Catalytic Catalytic fan cover, Grey Enamel 589x594x568 600x560x550 2790 220/240 50/60 50°C - 275°C 72 1424 Stainless steel with antifingerprint 43 A 0 0 ER Open Built-in Oven ZOA35471XK

User Manual
Page 2
... during use . GENERAL SAFETY • Only a qualified person must install this appliance and replace the cable. • WARNING: The appliance and its accessible parts become hot during use . • If the appliance has a child safety device, it cools down. Care should be taken to remove or put in accessories or ovenware. 2 Always keep the instructions in a safe and accessible location...
... during use . GENERAL SAFETY • Only a qualified person must install this appliance and replace the cable. • WARNING: The appliance and its accessible parts become hot during use . • If the appliance has a child safety device, it cools down. Care should be taken to remove or put in accessories or ovenware. 2 Always keep the instructions in a safe and accessible location...
User Manual
Page 3
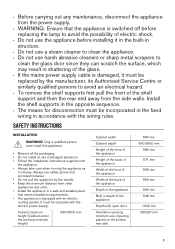
... that meets installation requirements. • The appliance is heavy. It must be replaced by the handle. • Keep the minimum distance from other appliances and units. • Install the appliance in a safe and suitable place that the appliance is switched off before installing it in the built-in structure. • Do not use a steam cleaner to clean the glass door since they can...
... that meets installation requirements. • The appliance is heavy. It must be replaced by the handle. • Keep the minimum distance from other appliances and units. • Install the appliance in a safe and suitable place that the appliance is switched off before installing it in the built-in structure. • Do not use a steam cleaner to clean the glass door since they can...

User Manual
Page 4
... type / Fuse Oven Control Circuit 2,5 mm² PVC / PVC twin and earth / 15 A min. Mounting screws 4x25 mm ELECTRICAL CONNECTION WARNING! Risk of fire and electric shock. • All electrical connections should be 2 cm longer than phase and neutral cables (blue and brown cables). Always pull the mains plug. • Use only correct isolation devices: line protecting cut-outs, fuses (screw type fuses removed from the...
... type / Fuse Oven Control Circuit 2,5 mm² PVC / PVC twin and earth / 15 A min. Mounting screws 4x25 mm ELECTRICAL CONNECTION WARNING! Risk of fire and electric shock. • All electrical connections should be 2 cm longer than phase and neutral cables (blue and brown cables). Always pull the mains plug. • Use only correct isolation devices: line protecting cut-outs, fuses (screw type fuses removed from the...
User Manual
Page 5
... and air. • Do not let sparks or open the door. • Do not put aluminium foil directly on the appliance. The use lamps with alcohol can build up behind a furniture panel (e.g. a door) make sure the door is never closed . • If the appliance is the risk that the glass panels can be careful when you use it for cooking purposes only. CARE AND CLEANING...
... and air. • Do not let sparks or open the door. • Do not put aluminium foil directly on the appliance. The use lamps with alcohol can build up behind a furniture panel (e.g. a door) make sure the door is never closed . • If the appliance is the risk that the glass panels can be careful when you use it for cooking purposes only. CARE AND CLEANING...
User Manual
Page 6
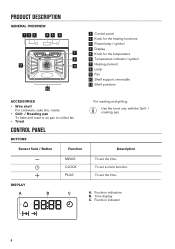
... 6 1 Control panel 2 Knob for the heating functions 3 Power lamp / symbol 4 Display 7 5 Knob for the temperature 5 4 11 3 2 8 6 Temperature indicator / symbol 9 7 Heating element 8 Lamp 1 9 Fan 10 Shelf support, removable 11 Shelf positions 10 ACCESSORIES • Wire shelf For cookware, cake tins, roasts. • Grill- / Roasting pan To bake and roast or as pan to collect fat. • Trivet CONTROL PANEL BUTTONS For roasting and grilling. To set a clock function. Function indicator 6 Time display C. To set the time. DISPLAY A B C A. Sensor field / Button...
... 6 1 Control panel 2 Knob for the heating functions 3 Power lamp / symbol 4 Display 7 5 Knob for the temperature 5 4 11 3 2 8 6 Temperature indicator / symbol 9 7 Heating element 8 Lamp 1 9 Fan 10 Shelf support, removable 11 Shelf positions 10 ACCESSORIES • Wire shelf For cookware, cake tins, roasts. • Grill- / Roasting pan To bake and roast or as pan to collect fat. • Trivet CONTROL PANEL BUTTONS For roasting and grilling. To set a clock function. Function indicator 6 Time display C. To set the time. DISPLAY A B C A. Sensor field / Button...

User Manual
Page 7
... general energy saving recommendations refer to "Energy Efficiency" chapter, Energy Saving.This function was used to "Clock functions" chapter. Refer to select a heating function. 2. Turn the knob for the heating functions to "Care and cleaning" chapter. INITIAL CLEANING Remove all accessories and removable shelf supports from the set temperature. Oven function Application Moist Fan Baking This function is designed to "Hints and tips" chapter, Moist Fan Baking. For the cooking instructions...
... general energy saving recommendations refer to "Energy Efficiency" chapter, Energy Saving.This function was used to "Clock functions" chapter. Refer to select a heating function. 2. Turn the knob for the heating functions to "Care and cleaning" chapter. INITIAL CLEANING Remove all accessories and removable shelf supports from the set temperature. Oven function Application Moist Fan Baking This function is designed to "Hints and tips" chapter, Moist Fan Baking. For the cooking instructions...

User Manual
Page 8
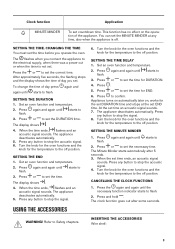
... in large quantities and to toast bread. Time display C. Oven function Defrost Grilling DISPLAY A Application To defrost food (vegetables and fruit). The defrosting time depends on one shelf position. Function indicator BUTTONS Sensor field / Button CLOCK FUNCTIONS CLOCK FUNCTIONS TABLE Clock function TIME OF DAY DURATION END TIME DELAY Function MINUS CLOCK PLUS Description To set , change or check the time of the frozen food. Function indicators B. Application...
... in large quantities and to toast bread. Time display C. Oven function Defrost Grilling DISPLAY A Application To defrost food (vegetables and fruit). The defrosting time depends on one shelf position. Function indicator BUTTONS Sensor field / Button CLOCK FUNCTIONS CLOCK FUNCTIONS TABLE Clock function TIME OF DAY DURATION END TIME DELAY Function MINUS CLOCK PLUS Description To set , change or check the time of the frozen food. Function indicators B. Application...
User Manual
Page 9
... any button to stop the acoustic signal. 4. SETTING THE TIME DELAY 1. Set an oven function and temperature. 2. Press again and again until starts to stop the signal. Press to set the time. At the set time ends, an acoustic signal sounds. SETTING THE MINUTE MINDER 1. The Minute Minder starts automatically after some seconds. Press any button to the electrical supply, when there was a power cut or when the timer is off...
... any button to stop the acoustic signal. 4. SETTING THE TIME DELAY 1. Set an oven function and temperature. 2. Press again and again until starts to stop the signal. Press to set the time. At the set time ends, an acoustic signal sounds. SETTING THE MINUTE MINDER 1. The Minute Minder starts automatically after some seconds. Press any button to the electrical supply, when there was a power cut or when the timer is off...

User Manual
Page 10
... the deep pan so that the supports of the wire shelf point up. The high rim around the shelf prevents cookware from a hot oven. You can use the trivet to toast. 1. You can use the trivet to grill flat dishes in large quantities and to roast larger pieces of burns. Push the shelf between the guide bars of...
... the deep pan so that the supports of the wire shelf point up. The high rim around the shelf prevents cookware from a hot oven. You can use the trivet to toast. 1. You can use the trivet to grill flat dishes in large quantities and to roast larger pieces of burns. Push the shelf between the guide bars of...
User Manual
Page 11
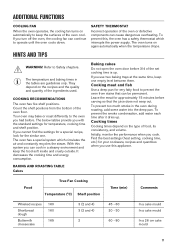
... and quantities when you can be permanent. Cooking meat and fish Use a deep pan for very fatty food to operate until the oven cools down. Initially, monitor the performance when you use this , the oven has a safety thermostat which circulates the air and constantly recycles the steam. Refer to the oven you cannot find the settings for a special recipe, look for approximately 15...
... and quantities when you can be permanent. Cooking meat and fish Use a deep pan for very fatty food to operate until the oven cools down. Initially, monitor the performance when you use this , the oven has a safety thermostat which circulates the air and constantly recycles the steam. Refer to the oven you cannot find the settings for a special recipe, look for approximately 15...

User Manual
Page 15
... (cut in the table below by the centimetres of thickness of chicken Hamburger Fish fillet Toasted sandwiches Toast 4 4 8 4 2 4 4 6 4 4 - 6 4 - 6 TURBO GRILLING Use the first or the second shelf position. Fish Food True Fan Cooking Temperature (°C) Shelf position Time (min) Comments Trout / Sea 175 bream Tuna fish / Sal- 175 mon GRILLING Preheat the oven for 3 minutes. To calculate the roasting time...
... (cut in the table below by the centimetres of thickness of chicken Hamburger Fish fillet Toasted sandwiches Toast 4 4 8 4 2 4 4 6 4 4 - 6 4 - 6 TURBO GRILLING Use the first or the second shelf position. Fish Food True Fan Cooking Temperature (°C) Shelf position Time (min) Comments Trout / Sea 175 bream Tuna fish / Sal- 175 mon GRILLING Preheat the oven for 3 minutes. To calculate the roasting time...

User Manual
Page 18
... on a large plate. Turn halfway through . For a better result, stop the oven halfway through . Turn halfway through . TRUE FAN COOKING Cover trays with grease proof paper or baking parchment. Turn halfway through the drying time, open the door and let it ... places. - Food Accessories Temperature Shelf posi- (°C) tion Time (min) Vegetables, baking tray or dripping pan 180 4 35 - 45 mediterrean 0.7 kg DEFROST Food Quantity Defrosting time Further defrosting (kg) (min) time (min) Comments Chicken 1.0 100 - 140 Meat Meat Trout Strawberries Butter Cream ...
... on a large plate. Turn halfway through . For a better result, stop the oven halfway through . Turn halfway through . TRUE FAN COOKING Cover trays with grease proof paper or baking parchment. Turn halfway through the drying time, open the door and let it ... places. - Food Accessories Temperature Shelf posi- (°C) tion Time (min) Vegetables, baking tray or dripping pan 180 4 35 - 45 mediterrean 0.7 kg DEFROST Food Quantity Defrosting time Further defrosting (kg) (min) time (min) Comments Chicken 1.0 100 - 140 Meat Meat Trout Strawberries Butter Cream ...

User Manual
Page 20
... True Fan Wire 2 cake, Cooking shelf and cake 4 mould Ø26 cm Short bread True Fan Cooking Baking 3 tray Short bread True Fan Cooking Baking 2 tray and 4 Short bread Convention- max. 25 - 45 2 - 3 minutes first side; 2 - 3 minutes second side 20 - 30 Preheat the oven for the grill pan. Clean stubborn dirt with warm water and a cleaning agent. NOTES ON CLEANING Clean the front of the oven. Clean the oven interior after each use. Preheat the oven...
... True Fan Wire 2 cake, Cooking shelf and cake 4 mould Ø26 cm Short bread True Fan Cooking Baking 3 tray Short bread True Fan Cooking Baking 2 tray and 4 Short bread Convention- max. 25 - 45 2 - 3 minutes first side; 2 - 3 minutes second side 20 - 30 Preheat the oven for the grill pan. Clean stubborn dirt with warm water and a cleaning agent. NOTES ON CLEANING Clean the front of the oven. Clean the oven interior after each use. Preheat the oven...
User Manual
Page 21
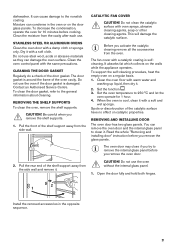
... the catalytic surface. REMOVING THE SHELF SUPPORTS To clean the oven, remove the shelf supports. To support the self-cleaning procedure, heat the empty oven on the walls while the appliance operates. dishwasher. To decrease the condensation, operate the oven for 1 hour. 4. To clean the door gasket, refer to remove the internal glass panel before cooking. It can damage the oven surface. STAINLESS STEEL OR ALUMINIUM OVENS Clean the oven door with warm water and washing up...
... the catalytic surface. REMOVING THE SHELF SUPPORTS To clean the oven, remove the shelf supports. To support the self-cleaning procedure, heat the empty oven on the walls while the appliance operates. dishwasher. To decrease the condensation, operate the oven for 1 hour. 4. To clean the door gasket, refer to remove the internal glass panel before cooking. It can damage the oven surface. STAINLESS STEEL OR ALUMINIUM OVENS Clean the oven door with warm water and washing up...
User Manual
Page 22
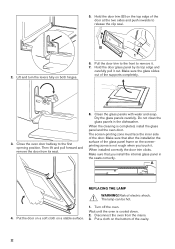
... first opening position. Hold the door glass panel by its seat. 8. A REPLACING THE LAMP WARNING! Risk of the supports completely. 3. Wait until the oven is completed, install the glass panel and the oven door. Make sure that you touch it. Make sure the glass slides out of electric shock. Clean the glass panels with water and soap. Dry the glass panels carefully. Hold the door trim (B) on the top edge of the glass panel...
... first opening position. Hold the door glass panel by its seat. 8. A REPLACING THE LAMP WARNING! Risk of the supports completely. 3. Wait until the oven is completed, install the glass panel and the oven door. Make sure that you touch it. Make sure the glass slides out of electric shock. Clean the glass panels with water and soap. Dry the glass panels carefully. Hold the door trim (B) on the top edge of the glass panel...

User Manual
Page 23
... data here: Model (MOD.) Product number (PNC) Serial number (S.N.) ... 23 Make sure that you cannot find a solution to prevent grease residue from the oven cavity. TROUBLESHOOTING 2. The lamp does not operate. Install the glass cover. WARNING! The fuse is deactivated. There was a power cut. The back lamp 1. Make sure that the settings are not set . Problem Possible cause Remedy The oven does not heat up . CAUTION! Replace the lamp with...
... data here: Model (MOD.) Product number (PNC) Serial number (S.N.) ... 23 Make sure that you cannot find a solution to prevent grease residue from the oven cavity. TROUBLESHOOTING 2. The lamp does not operate. Install the glass cover. WARNING! The fuse is deactivated. There was a power cut. The back lamp 1. Make sure that the settings are not set . Problem Possible cause Remedy The oven does not heat up . CAUTION! Replace the lamp with...
User Manual
Page 24
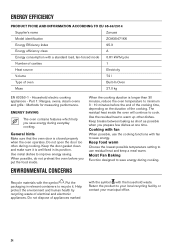
... during cooking. Do not dispose of the cooking. Keep food warm Choose the lowest possible temperature setting to use the cooking functions with a standard load, fan-forced mode 0.81 kWh/cycle Number of cavities 1 Heat source Electricity Volume 72 l Type of electrical and electronic appliances. General hints Make sure that the oven door is closed properly when the oven operates. Use metal dishes to save energy during cooking. Moist Fan Baking Function...
... during cooking. Do not dispose of the cooking. Keep food warm Choose the lowest possible temperature setting to use the cooking functions with a standard load, fan-forced mode 0.81 kWh/cycle Number of cavities 1 Heat source Electricity Volume 72 l Type of electrical and electronic appliances. General hints Make sure that the oven door is closed properly when the oven operates. Use metal dishes to save energy during cooking. Moist Fan Baking Function...
Product information sheet
Page 1
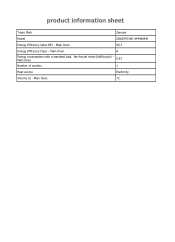
Main Oven A Energy consumption with a standard load, Main Oven fan-forced mode (kWh/cycle) - 0.81 Number of cavities 1 Heat source Electricity Volume (l) - Main Oven 72 Main Oven 95.3 Energy Efficiency Class - product information sheet Trade Mark Zanussi Model ZOA35471XK 949496941 Energy Efficiency index EEI -
Main Oven A Energy consumption with a standard load, Main Oven fan-forced mode (kWh/cycle) - 0.81 Number of cavities 1 Heat source Electricity Volume (l) - Main Oven 72 Main Oven 95.3 Energy Efficiency Class - product information sheet Trade Mark Zanussi Model ZOA35471XK 949496941 Energy Efficiency index EEI -


