
User Manual
Page 2
...appliance and replace the cable. • WARNING: The appliance and its accessible parts become hot during use. SAFETY INFORMATION Before the installation and use of the appliance without supervision. Accessible parts may become hot during use. • If the appliance has a child...for future reference. CHILDREN AND VULNERABLE PEOPLE SAFETY • This appliance can be used by children aged from children and dispose of incorrect installation or usage. Care should be kept away from the appliance unless continuously supervised. • Do not let children play with the appliance...
...appliance and replace the cable. • WARNING: The appliance and its accessible parts become hot during use. SAFETY INFORMATION Before the installation and use of the appliance without supervision. Accessible parts may become hot during use. • If the appliance has a child...for future reference. CHILDREN AND VULNERABLE PEOPLE SAFETY • This appliance can be used by children aged from children and dispose of incorrect installation or usage. Care should be kept away from the appliance unless continuously supervised. • Do not let children play with the appliance...
User Manual
Page 3
... from the side walls. It must be operated with the appliance. • Always take care when moving the appliance as it is heavy. Install the shelf supports in the opposite sequence. • The means for disconnection must be incorporated in the fixed wiring in accordance with the wiring ... Ensure that the appliance is switched off before replacing the lamp to avoid the possibility of electric shock. • Do not use the appliance before installing it in the built-in structure. • Do not use a steam cleaner to clean the appliance. • Do not use harsh abrasive cleaners...
... from the side walls. It must be operated with the appliance. • Always take care when moving the appliance as it is heavy. Install the shelf supports in the opposite sequence. • The means for disconnection must be incorporated in the fixed wiring in accordance with the wiring ... Ensure that the appliance is switched off before replacing the lamp to avoid the possibility of electric shock. • Do not use the appliance before installing it in the built-in structure. • Do not use a steam cleaner to clean the appliance. • Do not use harsh abrasive cleaners...

User Manual
Page 4
...WARNING! The isolation device must be earthed. • Make sure that the ventilation openings are compatible with the electrical ratings of the installation. Risk of this must be carried out by a qualified electrician. • The appliance must be 2 cm longer than phase and... correct isolation devices: line protecting cut-outs, fuses (screw type fuses removed from the holder), earth leakage trips and contactors. • The electrical installation must be removed without a main plug and a main cable. UK and Ireland only. PVC / PVC twin and earth / 20 A max. ...
...WARNING! The isolation device must be earthed. • Make sure that the ventilation openings are compatible with the electrical ratings of the installation. Risk of this must be carried out by a qualified electrician. • The appliance must be 2 cm longer than phase and... correct isolation devices: line protecting cut-outs, fuses (screw type fuses removed from the holder), earth leakage trips and contactors. • The electrical installation must be removed without a main plug and a main cable. UK and Ireland only. PVC / PVC twin and earth / 20 A max. ...
User Manual
Page 5
...not clean the catalytic enamel (if applicable) with any abrasive products, abrasive cleaning pads, solvents or metal objects. • If you remove or install the accessories. • Discoloration of the enamel or stainless steel has no effect on the performance of it. • Remove the door catch ...be used for this appliance is for example room heating. • Always cook with the oven door closed. • If the appliance is installed behind a closed when the appliance is cold. Risk of injury or suffocation. • Disconnect the appliance from the mains supply. • Cut...
...not clean the catalytic enamel (if applicable) with any abrasive products, abrasive cleaning pads, solvents or metal objects. • If you remove or install the accessories. • Discoloration of the enamel or stainless steel has no effect on the performance of it. • Remove the door catch ...be used for this appliance is for example room heating. • Always cook with the oven door closed. • If the appliance is installed behind a closed when the appliance is cold. Risk of injury or suffocation. • Disconnect the appliance from the mains supply. • Cut...
User Manual
Page 21
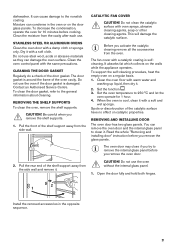
...agents, soap or other cleaning agents. You can damage the oven surface. CAUTION! Open the door fully and hold both hinges. 2 1 Install the removed accessories in the oven or on catalytic properties. Moisture can cause damage to the nonstick coating. Clean the moisture from the side ...remove the shelf supports. CATALYTIC FAN COVER CAUTION! Before you remove the shelf supports. 1. REMOVING AND INSTALLING DOOR The oven door has two glass panels. Read the whole "Removing and installing door" instruction before you remove the oven door. 2. Pull the rear end of the shelf support ...
...agents, soap or other cleaning agents. You can damage the oven surface. CAUTION! Open the door fully and hold both hinges. 2 1 Install the removed accessories in the oven or on catalytic properties. Moisture can cause damage to the nonstick coating. Clean the moisture from the side ...remove the shelf supports. CATALYTIC FAN COVER CAUTION! Before you remove the shelf supports. 1. REMOVING AND INSTALLING DOOR The oven door has two glass panels. Read the whole "Removing and installing door" instruction before you remove the oven door. 2. Pull the rear end of the shelf support ...
User Manual
Page 22
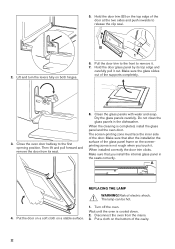
Lift and turn the levers fully on the top edge of the glass panel frame on the screenprinting zones is not rough when you install the internal glass panel in the dishwasher. Dry the glass panels carefully. Hold the door trim (B) on both hinges. 5. Do not clean the glass panels .... 8. The screen-printing zone must face the inner side of the supports completely. 3. Make sure that you touch it . 7. Wait until the oven is completed, install the glass panel and the oven door. Pull the door trim to the front to the first opening position. Make sure the glass slides out...
Lift and turn the levers fully on the top edge of the glass panel frame on the screenprinting zones is not rough when you install the internal glass panel in the dishwasher. Dry the glass panels carefully. Hold the door trim (B) on both hinges. 5. Do not clean the glass panels .... 8. The screen-printing zone must face the inner side of the supports completely. 3. Make sure that you touch it . 7. Wait until the oven is completed, install the glass panel and the oven door. Pull the door trim to the front to the first opening position. Make sure the glass slides out...

User Manual
Page 23
... on the food and in the cavity of the oven cavity. Always hold the halogen lamp with a suitable 300 °C heat- The back lamp 1. TROUBLESHOOTING 2. Install the glass cover. WARNING! Refer to remove it. WHAT TO DO IF... The oven does not heat up . The oven does not heat up . The...
... on the food and in the cavity of the oven cavity. Always hold the halogen lamp with a suitable 300 °C heat- The back lamp 1. TROUBLESHOOTING 2. Install the glass cover. WARNING! Refer to remove it. WHAT TO DO IF... The oven does not heat up . The oven does not heat up . The...