Product Manaul
Page 2
... be careful when you activate it. • Cleaning and user maintenance shall not be made by a person who is installed be- Safety information Before the installation and use 5 Clock functions 7 Using the accessories 8 Helpful hints and tips 9 Care and cleaning 13 What to units with the power supply. low and adjacent safe structures. • Parts of fire and electrical shock. • All electrical connections should...
... be careful when you activate it. • Cleaning and user maintenance shall not be made by a person who is installed be- Safety information Before the installation and use 5 Clock functions 7 Using the accessories 8 Helpful hints and tips 9 Care and cleaning 13 What to units with the power supply. low and adjacent safe structures. • Parts of fire and electrical shock. • All electrical connections should...
Product Manaul
Page 3
... Cleaning Warning! Do not touch the heating elements that the ventilation openings are not blocked. • Do not let the appliance stay unattended during operation. • Deactivate the appliance after each use of ingredients with alcohol can be careful when you open the door. • Do not put flammable products or items that are in the appliance. Always use oven gloves to remove...
... Cleaning Warning! Do not touch the heating elements that the ventilation openings are not blocked. • Do not let the appliance stay unattended during operation. • Deactivate the appliance after each use of ingredients with alcohol can be careful when you open the door. • Do not put flammable products or items that are in the appliance. Always use oven gloves to remove...

Product Manaul
Page 4
... the appliance from the power supply. • Only use abrasive products, abrasive cleaning pads, solvents or metal objects. • If you remove the door from the mains supply. • Cut off the mains cable and discard it for the main oven temperature 7 Heating element 8 Oven lamp 9 Fan and heating element 10 Shelf positions Accessories • Oven shelf For cookware, cake tins, roasts. 4 • Roasting pan grid To put in...
... the appliance from the power supply. • Only use abrasive products, abrasive cleaning pads, solvents or metal objects. • If you remove the door from the mains supply. • Cut off the mains cable and discard it for the main oven temperature 7 Heating element 8 Oven lamp 9 Fan and heating element 10 Shelf positions Accessories • Oven shelf For cookware, cake tins, roasts. 4 • Roasting pan grid To put in...

Product Manaul
Page 5
... function at the same time. Set the function and the maximum tem- Cooling fan When the appliance operates, the cooling fan switches on while the temperature in the appliance increases. 3. Turn the knob for the Time of Day function flashes. Before first use Warning! www.zanussi.com The temperature indicator comes on while the temperature in the appliance increases. 5 Important! Preheating Preheat the empty appliance...
... function at the same time. Set the function and the maximum tem- Cooling fan When the appliance operates, the cooling fan switches on while the temperature in the appliance increases. 3. Turn the knob for the Time of Day function flashes. Before first use Warning! www.zanussi.com The temperature indicator comes on while the temperature in the appliance increases. 5 Important! Preheating Preheat the empty appliance...

Product Manaul
Page 6
Bottom Heat Single Circuit Grill Light To bake cakes with crispy or crusty bases and to the Off position. Conventional Cooking To bake and roast on different levels at the same cooking temperature on one level Dual Circuit Grill To grill flat food items in the middle of the grill. Main oven functions Oven function OFF position The appliance is OFF. Roast or roast and bake food...
Bottom Heat Single Circuit Grill Light To bake cakes with crispy or crusty bases and to the Off position. Conventional Cooking To bake and roast on different levels at the same cooking temperature on one level Dual Circuit Grill To grill flat food items in the middle of the grill. Main oven functions Oven function OFF position The appliance is OFF. Roast or roast and bake food...
Product Manaul
Page 7
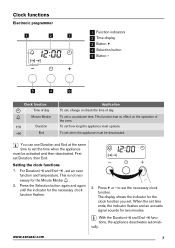
... on the operation of the oven. To set time ends, the indicator flashes and an acoustic signal sounds for the clock function you set a countdown time. Setting the clock functions 1. This is not necessary for the necessary clock function flashes. 3. When the set when the appliance must be deactivated. to set an oven function and temperature. Clock functions Electronic programmer 1 2 1 1 Function indicators 2 Time display 3 Button + 4 Selection button 5 Button - 5 4 3 Clock function Time of...
... on the operation of the oven. To set time ends, the indicator flashes and an acoustic signal sounds for the clock function you set a countdown time. Setting the clock functions 1. This is not necessary for the necessary clock function flashes. 3. When the set when the appliance must be deactivated. to set an oven function and temperature. Clock functions Electronic programmer 1 2 1 1 Function indicators 2 Time display 3 Button + 4 Selection button 5 Button - 5 4 3 Clock function Time of...

Product Manaul
Page 8
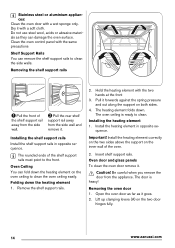
... guide-bars causes the anti-tilt safety for the temperature to stop the signal. 5. Put the roasting pan grid inside the deep roasting pan so that the supports of the oven shelf point downwards. You can use the roasting pan grid on the two sides. Cancelling the clock functions 1. The deep roasting pan and the oven shelf have double side edges. Grilling set The grilling set to "Safety information" chapter. Turn...
... guide-bars causes the anti-tilt safety for the temperature to stop the signal. 5. Put the roasting pan grid inside the deep roasting pan so that the supports of the oven shelf point downwards. You can use the roasting pan grid on the two sides. Cancelling the clock functions 1. The deep roasting pan and the oven shelf have double side edges. Grilling set The grilling set to "Safety information" chapter. Turn...
Product Manaul
Page 9
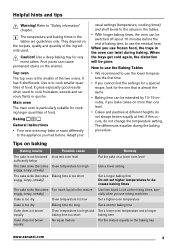
... heat. Fruit juices can twist during the baking procedure. It has 6 shelf levels. Baking General instructions • Your new oven may bake or roast differently to decrease baking times Use less liquid. Adapt your usual settings (temperature, cooking times) and shelf levels to use frozen food, the trays in the tables. • With longer baking times, the oven can be gone. The temperature and baking times in the mixture Oven temperature too low Baking time too long Oven temperature...
... heat. Fruit juices can twist during the baking procedure. It has 6 shelf levels. Baking General instructions • Your new oven may bake or roast differently to decrease baking times Use less liquid. Adapt your usual settings (temperature, cooking times) and shelf levels to use frozen food, the trays in the tables. • With longer baking times, the oven can be gone. The temperature and baking times in the mixture Oven temperature too low Baking time too long Oven temperature...
Product Manaul
Page 10
.../Lamb - Choux - Pastry: - Baking results Cake does not cook in the baking time set Possible cause Temperature too low Remedy Use a slightly higher oven temperature setting Top oven Baking Shelf Positions are not critical but ensure that oven shelves are evenly spaced when more than one is used (e.g. shelf positions 1 and 3) Food... - 180 1 160 - 170 25 - 30 1 130 - 150 45 - 65 1 150 - 170 150 - 180 1 160 - 180 75 - 90 1 Follow manufacturer´s instructions. 170 - 190 20 - 30 1 190 - 200 20 - 30 1 190 - 200 30 - 50 1 150 - 170 90 - 120 1 170 - 180 40 - 50 ...
.../Lamb - Choux - Pastry: - Baking results Cake does not cook in the baking time set Possible cause Temperature too low Remedy Use a slightly higher oven temperature setting Top oven Baking Shelf Positions are not critical but ensure that oven shelves are evenly spaced when more than one is used (e.g. shelf positions 1 and 3) Food... - 180 1 160 - 170 25 - 30 1 130 - 150 45 - 65 1 150 - 170 150 - 180 1 160 - 180 75 - 90 1 Follow manufacturer´s instructions. 170 - 190 20 - 30 1 190 - 200 20 - 30 1 190 - 200 30 - 50 1 150 - 170 90 - 120 1 170 - 180 40 - 50 ...

Product Manaul
Page 11
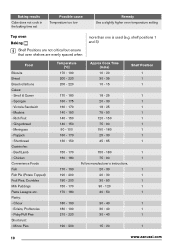
... temperature for Fan oven by 20°C www.zanussi.com 11 Roast Potatoes Yorkshire Pudding: - shelf positions 1 and 3) Food Biscuits Bread Cakes: - Rich Fruit - Christmas Fish Fruit Pies, Crumbles Milk Puddings Pastry: - Meat Pies - Baked Jacket Potatoes - Shelf Position 1 1 1 1 1 1 1 1 1 Main oven Baking Shelf Positions are not critical but ensure that oven shelves are evenly spaced when more than one is used... - 75 120 - 150 180 - 270 20 - 30 30 - 50 60 - 90 180 - 190 30 - 40 180 - 190 25 - 35 180 - 190 30 - 40 depends on size Follow manufacturer´s instructions;
... temperature for Fan oven by 20°C www.zanussi.com 11 Roast Potatoes Yorkshire Pudding: - shelf positions 1 and 3) Food Biscuits Bread Cakes: - Rich Fruit - Christmas Fish Fruit Pies, Crumbles Milk Puddings Pastry: - Meat Pies - Baked Jacket Potatoes - Shelf Position 1 1 1 1 1 1 1 1 1 Main oven Baking Shelf Positions are not critical but ensure that oven shelves are evenly spaced when more than one is used... - 75 120 - 150 180 - 270 20 - 30 30 - 50 60 - 90 180 - 190 30 - 40 180 - 190 25 - 35 180 - 190 30 - 40 depends on size Follow manufacturer´s instructions;
Product Manaul
Page 12
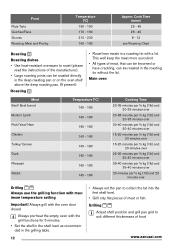
... pre-heat the empty oven with maximum temperature setting Important! Food Plate Tarts Quiches/Flans Scones Roasting: Meat and Poultry Temperature [°C] 180 - 190 170 - 180 210 - 230 160 - 180 Approx Cook Time (mins) 25 - 45 25 - 45 8 - 12 see Roasting Chart Roasting Roasting dishes • Use heat-resistant ovenware to roast (please read the instructions of the manufacturer). • Large roasting joints can be roasted directly in the deep roasting pan...
... pre-heat the empty oven with maximum temperature setting Important! Food Plate Tarts Quiches/Flans Scones Roasting: Meat and Poultry Temperature [°C] 180 - 190 170 - 180 210 - 230 160 - 180 Approx Cook Time (mins) 25 - 45 25 - 45 8 - 12 see Roasting Chart Roasting Roasting dishes • Use heat-resistant ovenware to roast (please read the instructions of the manufacturer). • Large roasting joints can be roasted directly in the deep roasting pan...

Product Manaul
Page 13
... not cover with a plate or bowl. Warning! Refer to "Safety information" chapter. • Clean the front of the packaging and set it does not burn on. • Clean stubborn dirt with a special oven cleaner. • Clean all oven accessories (with a soft cloth with warm water and cleaning agent. • To clean metal surfaces use a usual cleaning agent • Clean the oven interior after each use and let...
... not cover with a plate or bowl. Warning! Refer to "Safety information" chapter. • Clean the front of the packaging and set it does not burn on. • Clean stubborn dirt with a special oven cleaner. • Clean all oven accessories (with a soft cloth with warm water and cleaning agent. • To clean metal surfaces use a usual cleaning agent • Clean the oven interior after each use and let...
Product Manaul
Page 14
... front of the shelf support rails must point to clean. Folding down . Clean the oven control panel with a wet sponge only. Install the heating element in opposite sequence. Be careful when you remove the door from the side wall and remove it . Hold the heating element with a soft cloth. Open the oven door as far as they can fold down the heating element on both sides. 4. Do not use steel wool, acids...
... front of the shelf support rails must point to clean. Folding down . Clean the oven control panel with a wet sponge only. Install the heating element in opposite sequence. Be careful when you remove the door from the side wall and remove it . Hold the heating element with a soft cloth. Open the oven door as far as they can fold down the heating element on both sides. 4. Do not use steel wool, acids...

Product Manaul
Page 15
... hand on the model) Removing and cleaning the door glasses 1. Turn the lamp glass cover counterclockwise to release the clip seal. Replace the oven lamp with one and pull them . Important! Install the glass cover. To install the door follow the procedure in reverse. Use the same oven lamp type. 4. A A 3. Now you change the oven lamp: • Switch off the oven. • Remove the fuses in the fuse box or switch off the circuit breaker. Oven lamp Warning! Before...
... hand on the model) Removing and cleaning the door glasses 1. Turn the lamp glass cover counterclockwise to release the clip seal. Replace the oven lamp with one and pull them . Important! Install the glass cover. To install the door follow the procedure in reverse. Use the same oven lamp type. 4. A A 3. Now you change the oven lamp: • Switch off the oven. • Remove the fuses in the fuse box or switch off the circuit breaker. Oven lamp Warning! Before...
Product Manaul
Page 16
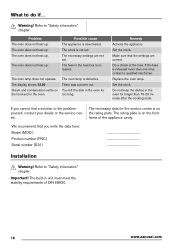
... to "Safety information" chapter. Possible cause The appliance is defective. There was a power cut. Replace the oven lamp. Refer to the problem yourself, contact your dealer or the service centre. The fuse in unit must meet the stability requirements of the fuse. The oven lamp is deactivated. Warning! The oven does not heat up . If you write the data here: Model (MOD.) Product number (PNC) Serial number (S.N.) ...
... to "Safety information" chapter. Possible cause The appliance is defective. There was a power cut. Replace the oven lamp. Refer to the problem yourself, contact your dealer or the service centre. The fuse in unit must meet the stability requirements of the fuse. The oven lamp is deactivated. Warning! The oven does not heat up . If you write the data here: Model (MOD.) Product number (PNC) Serial number (S.N.) ...
Product Manaul
Page 18
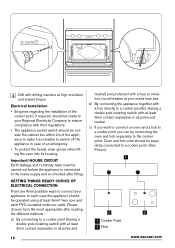
... a double pole isolating switch with at least 6mm² twin core and earth PVC insulated multicore cable. HOUSE CIRCUIT Earth leakage and continuity tests must be operated using at least 3mm contact separation in all poles and neutral) and protected with a fuse or miniature circuit breaker at high revolution and lowest torque. GETTING THINGS READY CHOICE OF ELECTRICAL CONNECTION There...
... a double pole isolating switch with at least 6mm² twin core and earth PVC insulated multicore cable. HOUSE CIRCUIT Earth leakage and continuity tests must be operated using at least 3mm contact separation in all poles and neutral) and protected with a fuse or miniature circuit breaker at high revolution and lowest torque. GETTING THINGS READY CHOICE OF ELECTRICAL CONNECTION There...
Product Manaul
Page 19
... normal domestic purposes only, in addition to Service Force Centre covering your postcode area). The symbol on the product or on the rating plate. • Appliance has been used for the recycling of electrical and electronic equipment. Instead it should be defective by us. • Electrolux Service Force Centre must undertake all service work under the heading "What to be...
... normal domestic purposes only, in addition to Service Force Centre covering your postcode area). The symbol on the product or on the rating plate. • Appliance has been used for the recycling of electrical and electronic equipment. Instead it should be defective by us. • Electrolux Service Force Centre must undertake all service work under the heading "What to be...

Product Manaul
Page 20
... on the rating plate), the purchase date. Customer Care.Please contact our Customer Care Department: Electrolux Major Appliances, Addington Way, Luton, Bedfordshire, LU4 9QQ or visit our website at the address below: Electrolux Group (Irl) Ltd, Long Mile Road, Dublin 12, Republic of Ireland Tel: +353 (0)1 4090751, Email: service[email protected] 20 www.zanussi.com...
... on the rating plate), the purchase date. Customer Care.Please contact our Customer Care Department: Electrolux Major Appliances, Addington Way, Luton, Bedfordshire, LU4 9QQ or visit our website at the address below: Electrolux Group (Irl) Ltd, Long Mile Road, Dublin 12, Republic of Ireland Tel: +353 (0)1 4090751, Email: service[email protected] 20 www.zanussi.com...


