
Product Manaul
Page 2
..., carefully read the supplied instructions. Contents Safety information 2 Safety instructions 3 Product description 5 Before first use 6 Daily use 6 Clock functions 8 Using the accessories 9 Safety information Additional functions 9 Helpful hints and tips 10 Care and cleaning 16 What to do if 19 Installation 20 Environment concerns 22 Subject to remove or put in accessories or ovenware. 2 www.zanussi.com Always use oven gloves to change without supervision. Accessible parts...
..., carefully read the supplied instructions. Contents Safety information 2 Safety instructions 3 Product description 5 Before first use 6 Daily use 6 Clock functions 8 Using the accessories 9 Safety information Additional functions 9 Helpful hints and tips 10 Care and cleaning 16 What to do if 19 Installation 20 Environment concerns 22 Subject to remove or put in accessories or ovenware. 2 www.zanussi.com Always use oven gloves to change without supervision. Accessible parts...
Product Manaul
Page 3
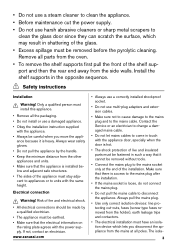
... not install or use multi-plug adapters and extension cables. • Make sure not to cause damage to the mains plug and to disconnect the appliance. ance because it cannot be removed without tools. • Connect the mains plug to clean the glass door since they can scratch the surface, which lets you move the appli- Electrical connection Warning! The isola- 3 Remove all parts...
... not install or use multi-plug adapters and extension cables. • Make sure not to cause damage to the mains plug and to disconnect the appliance. ance because it cannot be removed without tools. • Connect the mains plug to clean the glass door since they can scratch the surface, which lets you move the appli- Electrical connection Warning! The isola- 3 Remove all parts...
Product Manaul
Page 4
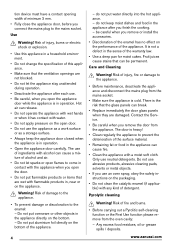
The use an oven spray, obey the safety instructions on the appliance. Do not put flammable products or items that the glass panels can break. • Replace immediately the door glass panels when they are damaged. Care and Cleaning Warning! Risk of fire and burns. • Before carrying out a Pyrolitic self-cleaning function or the First Use function please remove from the mains socket. • Make sure...
The use an oven spray, obey the safety instructions on the appliance. Do not put flammable products or items that the glass panels can break. • Replace immediately the door glass panels when they are damaged. Care and Cleaning Warning! Risk of fire and burns. • Before carrying out a Pyrolitic self-cleaning function or the First Use function please remove from the mains socket. • Make sure...
Product Manaul
Page 5
... cooking residues and construction materials, as described are strongly advised to the localized temperature changes in the vicinity Product description of all Pyrolytic Ovens when the Pyrolytic self cleaning program is in operation. • Non-stick surfaces on pots, pans, trays, utensils etc., can be damaged by the high temperature Pyrolytic cleaning operation of the appliance location during and after the Pyrolytic cleaning and first use...
... cooking residues and construction materials, as described are strongly advised to the localized temperature changes in the vicinity Product description of all Pyrolytic Ovens when the Pyrolytic self cleaning program is in operation. • Non-stick surfaces on pots, pans, trays, utensils etc., can be damaged by the high temperature Pyrolytic cleaning operation of the appliance location during and after the Pyrolytic cleaning and first use...
Product Manaul
Page 6
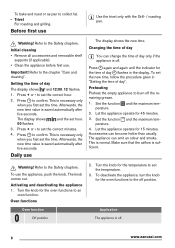
... only when you first set the time. Initial cleaning • Remove all accessories and removable shelf supports (if applicable). • Clean the appliance before first use the appliance, push the knob. The display shows and the set the correct minutes. 4. To bake and roast or as pan to confirm. Press to set hour. 00 flashes. 3. Before first use The display shows the new time. Important! This is...
... only when you first set the time. Initial cleaning • Remove all accessories and removable shelf supports (if applicable). • Clean the appliance before first use the appliance, push the knob. The display shows and the set the correct minutes. 4. To bake and roast or as pan to confirm. Press to set hour. 00 flashes. 3. Before first use The display shows the new time. Important! This is...
Product Manaul
Page 7
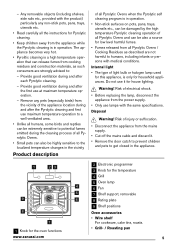
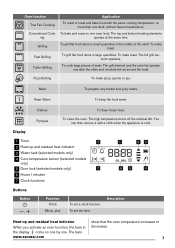
... air around the food. The grill element and the oven fan operate one oven level. Turbo Grilling To cook large pieces of the shelf. Pyrolysis To clean the oven. Description Heat-up and residual heat indicator 3 Water tank (selected models only) 4 Core temperature sensor (selected models only) 5 Door lock (selected models only) 7 6 Hours / minutes 7 Clock functions 1 23 65 4 Buttons Button , Function Clock Minus, plus To set the time. Oven function Application True Fan Cooking To roast or roast and bake...
... air around the food. The grill element and the oven fan operate one oven level. Turbo Grilling To cook large pieces of the shelf. Pyrolysis To clean the oven. Description Heat-up and residual heat indicator 3 Water tank (selected models only) 4 Core temperature sensor (selected models only) 5 Door lock (selected models only) 7 6 Hours / minutes 7 Clock functions 1 23 65 4 Buttons Button , Function Clock Minus, plus To set the time. Oven function Application True Fan Cooking To roast or roast and bake...
Product Manaul
Page 8
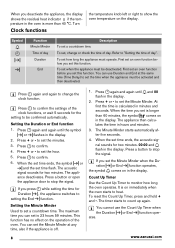
... the time in the display. To reset the Count Up Timer, press and hold + and -. The appliance deactivates. This function has no effect on immediately when the oven starts to stop the signal. Press a button to heat. When you deactivate the appliance, the display shows the residual heat indicator if the temperature in the display. 2. Turn Clock functions the temperature knob left or right to set the...
... the time in the display. To reset the Count Up Timer, press and hold + and -. The appliance deactivates. This function has no effect on immediately when the oven starts to stop the signal. Press a button to heat. When you deactivate the appliance, the display shows the residual heat indicator if the temperature in the display. 2. Turn Clock functions the temperature knob left or right to set the...
Product Manaul
Page 9
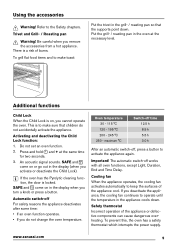
... items and to operate until the temperature in the oven at the same time for two seconds. 3. Activating and deactivating the Child Lock function: 1. Do not set an oven function. 2. SAFE and come on , you remove the accessories from a hot appliance. www.zanussi.com 9 The automatic switch-off works with all oven functions, except Light, Duration, End and Time Delay. There is locked. Oven temperature 30 - 115 °...
... items and to operate until the temperature in the oven at the same time for two seconds. 3. Activating and deactivating the Child Lock function: 1. Do not set an oven function. 2. SAFE and come on , you remove the accessories from a hot appliance. www.zanussi.com 9 The automatic switch-off works with all oven functions, except Light, Duration, End and Time Delay. There is locked. Oven temperature 30 - 115 °...
Product Manaul
Page 10
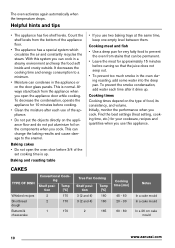
... Fan Cooking Shelf position 3 (2 and 4) 3 (2 and 4) Temp [°C] 160 160 2 165 Cooking time [min] 45 - 60 20 - 30 60 - 80 Notes In a cake mould In a cake mould In a 26 cm cake mould 10 www.zanussi.com This is up . Cooking times Cooking times depend on the door glass panels. Find the best settings (heat setting, cooking time, etc.) for approximately 15 minutes before carving so that can change the baking...
... Fan Cooking Shelf position 3 (2 and 4) 3 (2 and 4) Temp [°C] 160 160 2 165 Cooking time [min] 45 - 60 20 - 30 60 - 80 Notes In a cake mould In a cake mould In a 26 cm cake mould 10 www.zanussi.com This is up . Cooking times Cooking times depend on the door glass panels. Find the best settings (heat setting, cooking time, etc.) for approximately 15 minutes before carving so that can change the baking...

Product Manaul
Page 11
... cake (Apple pie) Conventional Cooking Shelf posi- el Biscuits / pastry - - three levels Meringues - els Plate tarts 2 180 Rich fruit cake 1 160 True Fan Cooking Shelf position 2 (left and right) Temp [°C] 160 2 150 ...baking tray 30 - 45 In a baking tray 30 - 35 In a baking tray 35 - 40 In a baking tray 35 - 45 In a baking tray 80 - 100 In a baking tray 80 - 100 12 - 20 25 - 35 In a baking tray1) In a baking tray1) In a baking tray 35 - 45 In a baking tray 45 - 70 110 - 120 In a 20 cm cake mould In a 24 cm cake mould www.zanussi.com 11 two lev- Temp...
... cake (Apple pie) Conventional Cooking Shelf posi- el Biscuits / pastry - - three levels Meringues - els Plate tarts 2 180 Rich fruit cake 1 160 True Fan Cooking Shelf position 2 (left and right) Temp [°C] 160 2 150 ...baking tray 30 - 45 In a baking tray 30 - 35 In a baking tray 35 - 40 In a baking tray 35 - 45 In a baking tray 80 - 100 In a baking tray 80 - 100 12 - 20 25 - 35 In a baking tray1) In a baking tray1) In a baking tray 35 - 45 In a baking tray 45 - 70 110 - 120 In a 20 cm cake mould In a 24 cm cake mould www.zanussi.com 11 two lev- Temp...

Product Manaul
Page 12
... a mould In a mould In a mould1) In a mould1) In a mould1) MEAT 12 www.zanussi.com Temp tion [°C] 1 190 Rye bread Bread rolls 1 190 2 190 Pizza 1 Scones 3 1) Preheat for 10 minutes. 230 250 200 True Fan Cooking Shelf position 1 Temp [°C] 190 1 180 2 (2 and 4) 180 1 230 - 250 3 190 Cooking time [min] Notes 60 - 70 30 - 45 25 - 40 10 - 20...
... a mould In a mould In a mould1) In a mould1) In a mould1) MEAT 12 www.zanussi.com Temp tion [°C] 1 190 Rye bread Bread rolls 1 190 2 190 Pizza 1 Scones 3 1) Preheat for 10 minutes. 230 250 200 True Fan Cooking Shelf position 1 Temp [°C] 190 1 180 2 (2 and 4) 180 1 230 - 250 3 190 Cooking time [min] Notes 60 - 70 30 - 45 25 - 40 10 - 20...
Product Manaul
Page 13
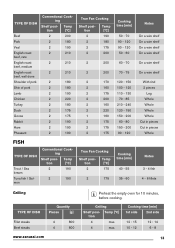
... a wire shelf On a wire shelf On a wire shelf On a wire shelf With rind 2 pieces Leg Whole Whole Whole Whole Cut in pieces Cut in pieces Whole Notes 3 - 4 fish 4 - 6 fillets Grilling TYPE OF DISH Quantity Pieces [g] Fillet steaks Beef steaks 4 800 4 600 www.zanussi.com Preheat the empty oven for 10 minutes, before cooking. TYPE OF DISH Beef Pork Veal English roast...
... a wire shelf On a wire shelf On a wire shelf On a wire shelf With rind 2 pieces Leg Whole Whole Whole Whole Cut in pieces Cut in pieces Whole Notes 3 - 4 fish 4 - 6 fillets Grilling TYPE OF DISH Quantity Pieces [g] Fillet steaks Beef steaks 4 800 4 600 www.zanussi.com Preheat the empty oven for 10 minutes, before cooking. TYPE OF DISH Beef Pork Veal English roast...

Product Manaul
Page 14
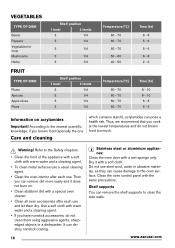
... Beef TYPE OF DISH Roast beef or fillet, rare Roast beef or fillet, medium Roast beef or fillet, well done 1) Preheat the oven. TYPE OF DISH Quantity Pieces [g] Sausages Pork chops Chicken (cut in 2) Kebabs Breast of veal Quantity 1 kg 1.5 - 2 kg Shelf position 1 1 Temperature [°C] 160 - 180 160 - 180 Time [min] 90 - 120 120 - 150 14 www.zanussi.com
... Beef TYPE OF DISH Roast beef or fillet, rare Roast beef or fillet, medium Roast beef or fillet, well done 1) Preheat the oven. TYPE OF DISH Quantity Pieces [g] Sausages Pork chops Chicken (cut in 2) Kebabs Breast of veal Quantity 1 kg 1.5 - 2 kg Shelf position 1 1 Temperature [°C] 160 - 180 160 - 180 Time [min] 90 - 120 120 - 150 14 www.zanussi.com

Product Manaul
Page 15
...Drying - Turn halfway through . True Fan Cooking Cover the oven shelves with baking parchment. www.zanussi.com 15 Turn halfway through . Lamb TYPE OF DISH Leg of lamb, roast lamb Saddle of lamb Quantity 1 - 1.5 kg 1 - 1.5 kg Shelf position 1 Temperature [°C] 150 - 170 1 160 - 180 Time [min...240 Fish (steamed) TYPE OF DISH Whole fish Quantity 1 - 1.5 kg Shelf position 1 Temperature [°C] 210 - 220 Time [min] 40 - 60 Defrosting TYPE OF DISH [g] Chicken Meat Meat Trout Strawberries Butter Cream Gateau 1000 1000 500 150 300 250 2 x 200 1400 Defrosting time [min] ...
...Drying - Turn halfway through . True Fan Cooking Cover the oven shelves with baking parchment. www.zanussi.com 15 Turn halfway through . Lamb TYPE OF DISH Leg of lamb, roast lamb Saddle of lamb Quantity 1 - 1.5 kg 1 - 1.5 kg Shelf position 1 Temperature [°C] 150 - 170 1 160 - 180 Time [min...240 Fish (steamed) TYPE OF DISH Whole fish Quantity 1 - 1.5 kg Shelf position 1 Temperature [°C] 210 - 220 Time [min] 40 - 60 Defrosting TYPE OF DISH [g] Chicken Meat Meat Trout Strawberries Butter Cream Gateau 1000 1000 500 150 300 250 2 x 200 1400 Defrosting time [min] ...
Product Manaul
Page 16
... - 70 60 - 70 Time [hr] 8 - 10 8 - 10 6 - 8 6 - 9 Information on . • Clean stubborn dirt with warm water and a cleaning agent. • To clean metal surfaces use a usual cleaning agent. • Clean the oven interior after each use. Warning! It can cause damage to the newest scientific knowledge, if you have nonstick accessories, do not brown food too much. Clean the oven control panel with a wet sponge...
... - 70 60 - 70 Time [hr] 8 - 10 8 - 10 6 - 8 6 - 9 Information on . • Clean stubborn dirt with warm water and a cleaning agent. • To clean metal surfaces use a usual cleaning agent. • Clean the oven interior after each use. Warning! It can cause damage to the newest scientific knowledge, if you have nonstick accessories, do not brown food too much. Clean the oven control panel with a wet sponge...
Product Manaul
Page 17
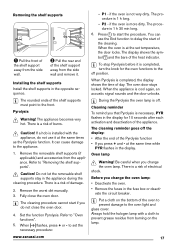
... circuit breaker. There is a risk of the shelf support away from the side wall and remove it is necessary, PYR flashes in the appliance during the cleaning procedure. Caution! When flashes, press + or - P1 - The procedure is completed, the display shows the time of the oven to prevent damage to set temperature, the door locks. To stop Pyrolysis before it . Cleaning reminder To remind you change...
... circuit breaker. There is a risk of the shelf support away from the side wall and remove it is necessary, PYR flashes in the appliance during the cleaning procedure. Caution! When flashes, press + or - P1 - The procedure is completed, the display shows the time of the oven to prevent damage to set temperature, the door locks. To stop Pyrolysis before it . Cleaning reminder To remind you change...
Product Manaul
Page 18
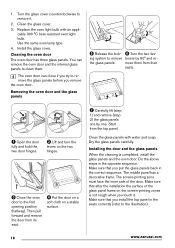
... hinges. 3 Close the oven door to remove it . Make sure that you remove the oven door. Replace the oven light bulb with water and soap. The oven door can remove the oven door and the internal glass panels to the illustration). 18 www.zanussi.com Clean the glass panels with an appli- The middle panel has a decorative frame. 1. Install the glass cover. Cleaning the oven door The oven door has three glass panels. You can close if you touch it . 2. Dry the glass panels carefully. Installing the door...
... hinges. 3 Close the oven door to remove it . Make sure that you remove the oven door. Replace the oven light bulb with water and soap. The oven door can remove the oven door and the internal glass panels to the illustration). 18 www.zanussi.com Clean the glass panels with an appli- The middle panel has a decorative frame. 1. Install the glass cover. Cleaning the oven door The oven door has three glass panels. You can close if you touch it . 2. Dry the glass panels carefully. Installing the door...
Product Manaul
Page 19
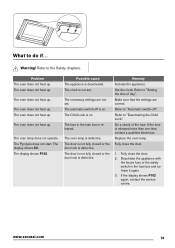
... door. 1. The oven does not heat up . The oven lamp does not operate. The display shows F102. The automatic switch-off ". Refer to the Safety chapters. If the display shows F102 again, contact the service centre. The oven does not heat up . The necessary settings are correct. Set the clock. Refer to "Setting the time of the fuse. Replace the oven lamp. The oven does not heat up . The fuse in the fuse box...
... door. 1. The oven does not heat up . The oven lamp does not operate. The display shows F102. The automatic switch-off ". Refer to the Safety chapters. If the display shows F102 again, contact the service centre. The oven does not heat up . The necessary settings are correct. Set the clock. Refer to "Setting the time of the fuse. Replace the oven lamp. The oven does not heat up . The fuse in the fuse box...
Product Manaul
Page 20
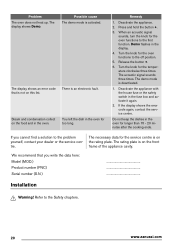
... the temperature clockwise three times. Turn the knob for too long. Installation Warning! The display shows an error code There is activated. Problem The oven does not heat up. Possible cause The demo mode is an electronic fault. Steam and condensation collect on the front frame of the appliance cavity. If you write the data here: Model (MOD.) Product number (PNC) Serial number (S.N.) ... The rating plate is on this list. The display...
... the temperature clockwise three times. Turn the knob for too long. Installation Warning! The display shows an error code There is activated. Problem The oven does not heat up. Possible cause The demo mode is an electronic fault. Steam and condensation collect on the front frame of the appliance cavity. If you write the data here: Model (MOD.) Product number (PNC) Serial number (S.N.) ... The rating plate is on this list. The display...
Product Manaul
Page 22
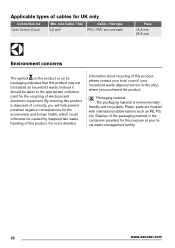
... consequences for UK only Connection via Oven Control Circuit Min. By ensuring this product. Plastic parts are marked with international abbreviations such as household waste. Applicable types of electrical and electronic equipment. Environment concerns The symbol on the product or on its packaging indicates that this product may not be caused by inappropriate waste handling of this product is environmentallyfriendly and...
... consequences for UK only Connection via Oven Control Circuit Min. By ensuring this product. Plastic parts are marked with international abbreviations such as household waste. Applicable types of electrical and electronic equipment. Environment concerns The symbol on the product or on its packaging indicates that this product may not be caused by inappropriate waste handling of this product is environmentallyfriendly and...


