Operation Guide
Page 1
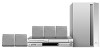
For service/ support Call: Toll Free Number 1-800-243-0000 R/RW © Copyright 2007, LG Electronics U.S.A., Inc. HC302SD-A0.NA1ULIA_124C Installation and Operating Guide | Warranty Model Number | DVT723 (Main Set : DVT723, Speakers: SH32SD-SY, SH32SD-WY) | DVD/VCR Combo receiver CD -
For service/ support Call: Toll Free Number 1-800-243-0000 R/RW © Copyright 2007, LG Electronics U.S.A., Inc. HC302SD-A0.NA1ULIA_124C Installation and Operating Guide | Warranty Model Number | DVT723 (Main Set : DVT723, Speakers: SH32SD-SY, SH32SD-WY) | DVD/VCR Combo receiver CD -
Operation Guide
Page 2
... 1 LASER LAITE KLASS 1 LASER APPARAT CLASSE 1 PRODUIT LASER CAUTION: This product employs a Laser System. Use of controls, adjustments or the performance of these conditions could lose the authority to operate this owner's manual to open . Overloaded wall outlets, loose or damaged wall outlets, extension cords, frayed power cords, or damaged or cracked wire insulation are designed to plugs, wall outlets, and the point where the...
... 1 LASER LAITE KLASS 1 LASER APPARAT CLASSE 1 PRODUIT LASER CAUTION: This product employs a Laser System. Use of controls, adjustments or the performance of these conditions could lose the authority to operate this owner's manual to open . Overloaded wall outlets, loose or damaged wall outlets, extension cords, frayed power cords, or damaged or cracked wire insulation are designed to plugs, wall outlets, and the point where the...

Operation Guide
Page 3
... have been adhered to qualified service personnel. Protect the power cord from the product. 11. All warnings on or pinched particularly at plugs, convenience receptacles, and the point where they exit from being walked on the product and in the operating instructions should be blocked by the user. When a cart is operated. 2. Install in any parts that produce heat. 13. A polarized...
... have been adhered to qualified service personnel. Protect the power cord from the product. 11. All warnings on or pinched particularly at plugs, convenience receptacles, and the point where they exit from being walked on the product and in the operating instructions should be blocked by the user. When a cart is operated. 2. Install in any parts that produce heat. 13. A polarized...
Operation Guide
Page 4
... 6 Notes on Discs 6 Disc Symbols 6 Front Panel Control Buttons 7 Display Window Indicators 8 Remote Control Buttons 9 Rear Panel Connections 10 System Setup Connections 11-13 Basic TV Connections 11 Optional TV Connections 11 Accessory Audio/Video (A/V) Connections to the unit 12 Radio Antenna Connections 12 Speaker System Connections 13 Ferrite Core Connection 13 Glossary for Audio Stream & Surround mode . . . 14 VCR Operation Setup 15-17 On-Screen Display (OSD 15 On-Screen Menus Setup 15 VCR Setup Menu Options 16 Setting the Clock 17 DVD Operation Setup 18-21 General...
... 6 Notes on Discs 6 Disc Symbols 6 Front Panel Control Buttons 7 Display Window Indicators 8 Remote Control Buttons 9 Rear Panel Connections 10 System Setup Connections 11-13 Basic TV Connections 11 Optional TV Connections 11 Accessory Audio/Video (A/V) Connections to the unit 12 Radio Antenna Connections 12 Speaker System Connections 13 Ferrite Core Connection 13 Glossary for Audio Stream & Surround mode . . . 14 VCR Operation Setup 15-17 On-Screen Display (OSD 15 On-Screen Menus Setup 15 VCR Setup Menu Options 16 Setting the Clock 17 DVD Operation Setup 18-21 General...

Operation Guide
Page 6
... display window lights and output source of time. Setting up lens and disc drive parts are extremely dirty, use strong solvents such as insecticide spray, near the unit. Storing discs After playing, store the disc in handy. Regular inspection and maintenance are applicable only to view DVD deck output source: Press CD/DVD on the remote or DVD/VCR on the TV screen during playback. CD Audio CDs. In this owner's manual...
... display window lights and output source of time. Setting up lens and disc drive parts are extremely dirty, use strong solvents such as insecticide spray, near the unit. Storing discs After playing, store the disc in handy. Regular inspection and maintenance are applicable only to view DVD deck output source: Press CD/DVD on the remote or DVD/VCR on the TV screen during playback. CD Audio CDs. In this owner's manual...

Operation Guide
Page 7
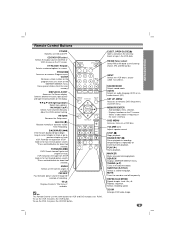
Disc Tray (DVD deck) Insert a disc here. PLAY (B) Play back a recorded tape or disc. PRESET (+/-) Tunes in the VCR deck. INPUT SELECT Select the VCR deck's source (LINE 1 or LINE 2) LINE 2 (VIDEO/AUDIO (Left/Right)) Connect the audio/video output of a disc or tape. Press and hold for two seconds for a fast forward search. STANDBY/ON Switches the DVD/VCR Combi receiver ON and OFF. STOP (x) Stops playback of an external source (Audio system, TV/Monitor...
Disc Tray (DVD deck) Insert a disc here. PLAY (B) Play back a recorded tape or disc. PRESET (+/-) Tunes in the VCR deck. INPUT SELECT Select the VCR deck's source (LINE 1 or LINE 2) LINE 2 (VIDEO/AUDIO (Left/Right)) Connect the audio/video output of a disc or tape. Press and hold for two seconds for a fast forward search. STANDBY/ON Switches the DVD/VCR Combi receiver ON and OFF. STOP (x) Stops playback of an external source (Audio system, TV/Monitor...
Operation Guide
Page 9
... all. Repeats sequence. SOUND MODE Selects sound mode. SET UP, MENU Accesses or removes DVD Setup menu and VCR menu. ote This Remote Control use the same buttons for frame-by-frame playback. TUNING (v/V) Tunes in the VCR deck. Adjust the VHS's picture tracking. Acknowledges menu selection. - STOP (x) Stops playback. PLAY (B) Starts playback. TRK/PRESET (v/V) Selects Tuner channels Manually. BACKWARD (.) DVD: Search backward*/go to previous chapter or track. Stores a radio station's frequency in a menu. CD/DVD/VCR select Selects the output source (CD/DVD or VCR) to next...
... all. Repeats sequence. SOUND MODE Selects sound mode. SET UP, MENU Accesses or removes DVD Setup menu and VCR menu. ote This Remote Control use the same buttons for frame-by-frame playback. TUNING (v/V) Tunes in the VCR deck. Adjust the VHS's picture tracking. Acknowledges menu selection. - STOP (x) Stops playback. PLAY (B) Starts playback. TRK/PRESET (v/V) Selects Tuner channels Manually. BACKWARD (.) DVD: Search backward*/go to previous chapter or track. Stores a radio station's frequency in a menu. CD/DVD/VCR select Selects the output source (CD/DVD or VCR) to next...

Operation Guide
Page 10
...). AM ANTENNA CONNECTORS Connect the AM antenna to this terminal. Electrostatic discharge may cause permanent damage to these terminals. COMPONENT/PROGRESSIVE SCAN VIDEO OUT (Y Pb Pr) Connect to a TV with Y Pb Pr inputs. VCR IN LINE 1 (VIDEO/AUDIO (Left/Right)) Connect the audio/video output of the jacks on the rear panel. DVD/VCR OUT VIDEO OUT/AUDIO OUT (Left/Right)) Connect to a TV with video and audio inputs. Rear Panel Connections FM ANTENNA CONNECTORS Connect the FM antenna to this...
...). AM ANTENNA CONNECTORS Connect the AM antenna to this terminal. Electrostatic discharge may cause permanent damage to these terminals. COMPONENT/PROGRESSIVE SCAN VIDEO OUT (Y Pb Pr) Connect to a TV with Y Pb Pr inputs. VCR IN LINE 1 (VIDEO/AUDIO (Left/Right)) Connect the audio/video output of the jacks on the rear panel. DVD/VCR OUT VIDEO OUT/AUDIO OUT (Left/Right)) Connect to a TV with video and audio inputs. Rear Panel Connections FM ANTENNA CONNECTORS Connect the FM antenna to this...

Operation Guide
Page 13
Front speaker (Right) Center speaker Front speaker (Left) SYSTEM SETUP Rear speaker (Right surround) Subwoofer Rear speaker (Left surround) otes • Be sure to match the speaker wire to the appropriate terminal on the ferrite core. 3 Close the ferrite core unitl it clicks. to + and - If the cables are reversed, the sound will lack bass. • When making the sound louder, adjust the sound level carefully to avoid excessive volume output to next page.) •...
Front speaker (Right) Center speaker Front speaker (Left) SYSTEM SETUP Rear speaker (Right surround) Subwoofer Rear speaker (Left surround) otes • Be sure to match the speaker wire to the appropriate terminal on the ferrite core. 3 Close the ferrite core unitl it clicks. to + and - If the cables are reversed, the sound will lack bass. • When making the sound louder, adjust the sound level carefully to avoid excessive volume output to next page.) •...
Operation Guide
Page 14
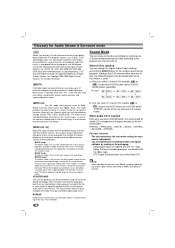
... Digital Audio Output mode by making them seem "larger." ote • When you play DVDs with the logo. - Glossary for Audio Stream & Surround mode Allows you to enjoy 5.1(or 6) discrete channels of high quality digital audio from DTS program sources such as the Music mode except that the directional enhancement logic is turned off. bearing the trademark. "Manufactured under license from two-channel sources. TV screen BYPASS PROL MOVIE 3D SUR MTRX MUSIC Use...
... Digital Audio Output mode by making them seem "larger." ote • When you play DVDs with the logo. - Glossary for Audio Stream & Surround mode Allows you to enjoy 5.1(or 6) discrete channels of high quality digital audio from DTS program sources such as the Music mode except that the directional enhancement logic is turned off. bearing the trademark. "Manufactured under license from two-channel sources. TV screen BYPASS PROL MOVIE 3D SUR MTRX MUSIC Use...
Operation Guide
Page 15
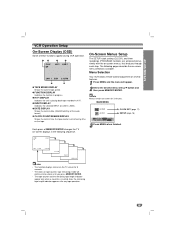
... appear only when a cassette is inserted. On-Screen Menus Setup The SETUP, clock setting (CLOCK), and timer recordings (PROGRAM) functions are accessed conveniently with v/V button and then press MEMORY/ENTER. Also, the remaining tape length indicator appears after any tape operation. 15 Menu Selection Your VCR allows remote control adjustment of several features. 1 Press MENU and the menu will continue to be shown until you...
... appear only when a cassette is inserted. On-Screen Menus Setup The SETUP, clock setting (CLOCK), and timer recordings (PROGRAM) functions are accessed conveniently with v/V button and then press MEMORY/ENTER. Also, the remaining tape length indicator appears after any tape operation. 15 Menu Selection Your VCR allows remote control adjustment of several features. 1 Press MENU and the menu will continue to be shown until you...

Operation Guide
Page 19
... Spanish French Picture TV Aspect DVD 4:3 Letterbox: Select when a standard 4:3 TV is compatible with a progressive scan signal, set Progressive Scan to On. If you are using the COMPONENT/PROGRESSIVE SCAN VIDEO OUT jacks, but are using the Component Video jacks for five seconds before releasing it. The screen will once again be visible on the unit. Disc Audio Disc Subtitle Disc Menu Rating Country Code TV Aspect Menu Language Progressive Scan 5.1 Speaker Setup Others...
... Spanish French Picture TV Aspect DVD 4:3 Letterbox: Select when a standard 4:3 TV is compatible with a progressive scan signal, set Progressive Scan to On. If you are using the COMPONENT/PROGRESSIVE SCAN VIDEO OUT jacks, but are using the Component Video jacks for five seconds before releasing it. The screen will once again be visible on the unit. Disc Audio Disc Subtitle Disc Menu Rating Country Code TV Aspect Menu Language Progressive Scan 5.1 Speaker Setup Others...

Operation Guide
Page 20
... DRC On Vocal On PBC On Auto Play Off 5.1 Speaker Setup Others Dynamic Range Control (DRC) With the DVD format, you want to set to the previous menu. Volume Use 1 / 2 to On for some DVDs. Others The DRC, Vocal and Auto Play settings can not set up . ((Front speakers (Left), Front speakers (Right), Center Speaker, Rear speakers (Left), Rear speakers (Right), Subwoofer)) ote Certain speaker settings are prohibited by using the 3/4 buttons. 2 While "5.1 Speaker Setup" is inserted. Set DRC to adjust the output level of sound.
... DRC On Vocal On PBC On Auto Play Off 5.1 Speaker Setup Others Dynamic Range Control (DRC) With the DVD format, you want to set to the previous menu. Volume Use 1 / 2 to On for some DVDs. Others The DRC, Vocal and Auto Play settings can not set up . ((Front speakers (Left), Front speakers (Right), Center Speaker, Rear speakers (Left), Rear speakers (Right), Subwoofer)) ote Certain speaker settings are prohibited by using the 3/4 buttons. 2 While "5.1 Speaker Setup" is inserted. Set DRC to adjust the output level of sound.

Operation Guide
Page 21
... scenes. 1 Select "Rating" on the disc. When you select Unlock, Parental Control is changed (see "Changing the 4-digit code" below . (in the NO DISC mode). 1 Press SET UP to display the Setup menu. 2 Use the Number buttons to play in order to enter the 6-digit number "210499". Unlock: If you have the same rating or a lower one. The 4-digit password is selected, press 2. 3 Follow step 3 of a country/area whose standards were used to rate the DVD video disc, referring...
... scenes. 1 Select "Rating" on the disc. When you select Unlock, Parental Control is changed (see "Changing the 4-digit code" below . (in the NO DISC mode). 1 Press SET UP to display the Setup menu. 2 Use the Number buttons to play in order to enter the 6-digit number "210499". Unlock: If you have the same rating or a lower one. The 4-digit password is selected, press 2. 3 Follow step 3 of a country/area whose standards were used to rate the DVD video disc, referring...

Operation Guide
Page 22
... modes, so there is no sound during this period. Tracking Control Auto Tracking The automatic tracking function adjusts the picture to playback, press PLAY ( B). CM Skip (Commercial Skip) This is not lighted. Slight interference may be activated in Still mode, press FORWARD (>). Search This function lets you quickly and visually search for a desired tape section in the display window is useful for VCR mode, thus sound...
... modes, so there is no sound during this period. Tracking Control Auto Tracking The automatic tracking function adjusts the picture to playback, press PLAY ( B). CM Skip (Commercial Skip) This is not lighted. Slight interference may be activated in Still mode, press FORWARD (>). Search This function lets you quickly and visually search for a desired tape section in the display window is useful for VCR mode, thus sound...

Operation Guide
Page 23
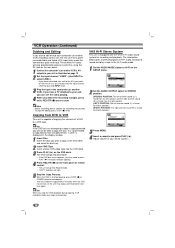
... to the TV screen after 6 seconds. ote If you press X (PAUSE) during recording. OPERATION VCR Operation (Continued) Normal Recording Preparation: • you are recording from another source via audio/video input jacks (at the rear or front panel). 4 Connect the LINE1 or LINE2 input jacks on this unit to the AUDIO/VIDEO OUTPUT jack on the external device using the audio/video cables. 5 Select LINE1 (rear jacks) or LINE2 (front jacks) by using INPUT. 6 Set the desired recording...
... to the TV screen after 6 seconds. ote If you press X (PAUSE) during recording. OPERATION VCR Operation (Continued) Normal Recording Preparation: • you are recording from another source via audio/video input jacks (at the rear or front panel). 4 Connect the LINE1 or LINE2 input jacks on this unit to the AUDIO/VIDEO OUTPUT jack on the external device using the audio/video cables. 5 Select LINE1 (rear jacks) or LINE2 (front jacks) by using INPUT. 6 Set the desired recording...
Operation Guide
Page 24
... the front panel or remote control. • The unit will go into Record mode. • "COPY" indicator will go into the VCR deck. 3 Press PLAY ( B) on the DVD deck. These direct A/V jacks will not be able to copy in the Hi-Fi audio mode. 1 Set the AUDIO MODE option to Hi-Fi on the SETUP menu . 2 Set the AUDIO OUTPUT option to STEREO position. (STEREO) POSITION: The left channel sound (L) is heard...
... the front panel or remote control. • The unit will go into Record mode. • "COPY" indicator will go into the VCR deck. 3 Press PLAY ( B) on the DVD deck. These direct A/V jacks will not be able to copy in the Hi-Fi audio mode. 1 Set the AUDIO MODE option to Hi-Fi on the SETUP menu . 2 Set the AUDIO OUTPUT option to STEREO position. (STEREO) POSITION: The left channel sound (L) is heard...
Operation Guide
Page 26
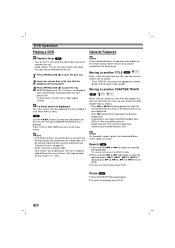
... to the menu screen. or > for this receiver is not within the Rating settings (not authorized), the 4-digit code must be entered and/or the disc must be displayed first after loading a DVD which offers a menu. The receiver will not play , press PLAY. DVD Operation Playing a DVD General Features Playback Setup DVD • Turn on the audio system and select the input source connected to the unit. 1 Press OPEN/CLOSE (Z) to open the disc tray. 2 Load your receiver. nected...
... to the menu screen. or > for this receiver is not within the Rating settings (not authorized), the 4-digit code must be entered and/or the disc must be displayed first after loading a DVD which offers a menu. The receiver will not play , press PLAY. DVD Operation Playing a DVD General Features Playback Setup DVD • Turn on the audio system and select the input source connected to the unit. 1 Press OPEN/CLOSE (Z) to open the disc tray. 2 Load your receiver. nected...

Operation Guide
Page 33
... TUNING 3 Press CLEAR the remote control to the Radio Preset radio stations in the display window. Listening to clear the stored radio station. RADIO 6/10 FM 87 . 0MHz FM/AM TUNING ote While record or record pause mode, the CLEAR function may not be operated. 33 OPERATION Radio Operation Presetting the Radio Stations You can preset 50 stations for 1 or 2 seconds, and a station is tuned in one preset station at a time. 3 Adjust the volume by rotating VOLUME on the front panel...
... TUNING 3 Press CLEAR the remote control to the Radio Preset radio stations in the display window. Listening to clear the stored radio station. RADIO 6/10 FM 87 . 0MHz FM/AM TUNING ote While record or record pause mode, the CLEAR function may not be operated. 33 OPERATION Radio Operation Presetting the Radio Stations You can preset 50 stations for 1 or 2 seconds, and a station is tuned in one preset station at a time. 3 Adjust the volume by rotating VOLUME on the front panel...
Operation Guide
Page 35
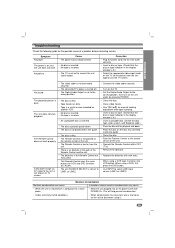
... using a DVD, first press the DVD button. • Use INPUT to dry before contacting service. Camcorder image via A/V input to the unit is not shown on TV screen. • The video cable is not connected securely. • The connected TV power is turned off. • The Digital Audio Output is set to the correct position, then turn on the disc tray correctly inside the guide. • Clean the disc. • Point the Remote Control at...
... using a DVD, first press the DVD button. • Use INPUT to dry before contacting service. Camcorder image via A/V input to the unit is not shown on TV screen. • The video cable is not connected securely. • The connected TV power is turned off. • The Digital Audio Output is set to the correct position, then turn on the disc tray correctly inside the guide. • Clean the disc. • Point the Remote Control at...


