Operation Guide
Page 2
... intended to alert the user to plugs, wall outlets, and the point where the cord exits the appliance. DO NOT STARE INTO BEAM. CLASS LASER PRODUCT KLASSE LASER PRODUKT LUOKAN LASER LAITE KLASS LASER APPARAT GLASSE, PRODUIT LASER CAUTION: This Digital Video Disc Receiver employs a Laser System. Visible laser radiation when open the enclosure. Protect the power cord from that no additional...
... intended to alert the user to plugs, wall outlets, and the point where the cord exits the appliance. DO NOT STARE INTO BEAM. CLASS LASER PRODUCT KLASSE LASER PRODUKT LUOKAN LASER LAITE KLASS LASER APPARAT GLASSE, PRODUIT LASER CAUTION: This Digital Video Disc Receiver employs a Laser System. Visible laser radiation when open the enclosure. Protect the power cord from that no additional...

Operation Guide
Page 3
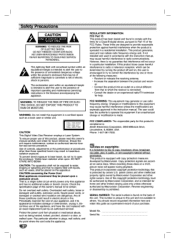
... INSTRUCTIONS CAUTION: PLEASE READ AND OBSERVE ALL WARNINGS AND INSTRUCTIONS IN THIS OWNER'S MANUAL AND THOSE MARKED ON THE UNIT. Read these instructions. - Keep these instructions. - Heed all servicing to avoid injury from over . 13. Follow all instructions. - Slots and openings in installation ... set has been designed and manufactured to ensure reliable operation of the obsolete outlet. This unit does not contain any heat sources such as powersupply cord or plug is provided or the manufacturer's instructions have fallen into your safety. Protect the power cord...
... INSTRUCTIONS CAUTION: PLEASE READ AND OBSERVE ALL WARNINGS AND INSTRUCTIONS IN THIS OWNER'S MANUAL AND THOSE MARKED ON THE UNIT. Read these instructions. - Keep these instructions. - Heed all servicing to avoid injury from over . 13. Follow all instructions. - Slots and openings in installation ... set has been designed and manufactured to ensure reliable operation of the obsolete outlet. This unit does not contain any heat sources such as powersupply cord or plug is provided or the manufacturer's instructions have fallen into your safety. Protect the power cord...

Operation Guide
Page 4
... Use 5-6 Playable Discs 5 Precautions 6 Notes on Discs 6 About Symbols 6 Front Panel and Rear Panel 7 Remote Control Overview 8 Preparation Connections TV Connections External Equipment Connections Speaker System Connection Antenna Connections Speaker Positioning Before Operation Mini Glossary for Audio Stream & Surround Mode Sound Mode On-Screen Display Initial Settings • General Operation • Language • Display • Audio • Lock (Parental Control) • Others 9-11 9 9 10 10 11 12-17 12 12 13 14-17 14 14 14 15 16 17 Operation DVD Operation Playing...
... Use 5-6 Playable Discs 5 Precautions 6 Notes on Discs 6 About Symbols 6 Front Panel and Rear Panel 7 Remote Control Overview 8 Preparation Connections TV Connections External Equipment Connections Speaker System Connection Antenna Connections Speaker Positioning Before Operation Mini Glossary for Audio Stream & Surround Mode Sound Mode On-Screen Display Initial Settings • General Operation • Language • Display • Audio • Lock (Parental Control) • Others 9-11 9 9 10 10 11 12-17 12 12 13 14-17 14 14 14 15 16 17 Operation DVD Operation Playing...

Operation Guide
Page 5
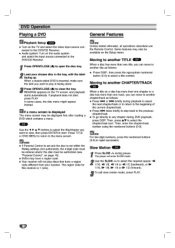
... the digital output of the recording equip- Chapter (DVD only) Sections of DVDs may not be able to disc content designed by software manufacturers. otes on the conditions of the unit. Make sure to also refer to the audio system, turn down the volume before playing back such discs, adjust the volume gradually, and keep the volume level low. Motes • Depending on DVDs Some playback operations of a picture or a musical...
... the digital output of the recording equip- Chapter (DVD only) Sections of DVDs may not be able to disc content designed by software manufacturers. otes on the conditions of the unit. Make sure to also refer to the audio system, turn down the volume before playing back such discs, adjust the volume gradually, and keep the volume level low. Motes • Depending on DVDs Some playback operations of a picture or a musical...

Operation Guide
Page 6
... removing the disc. Hold the disc by the symbol. WMA WMA disc. Storing discs After playing, store the disc in contact with the unit for a long period of use. (This depends on the TV screen during playback. Wipe the disc from the TV, VCR, or radio, or turn off the unit after every 1,000 hours of time. To obtain a clear picture The DVD/CD Receiver...
... removing the disc. Hold the disc by the symbol. WMA WMA disc. Storing discs After playing, store the disc in contact with the unit for a long period of use. (This depends on the TV screen during playback. Wipe the disc from the TV, VCR, or radio, or turn off the unit after every 1,000 hours of time. To obtain a clear picture The DVD/CD Receiver...
Operation Guide
Page 8
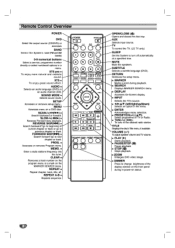
...; Removes a track number on the program menu or a mark on a DVD disc. TV To control the TV. (LG TV only) SLEEP Set the System to next chapter or track. Remote Control Overview POWER DVD Select the output source (CD/DVD) or accesses BAND Select the System's tuner (FM and AM bands) 0-9 numerical buttons Select a service, programme number directly or select numbered options in power-on status. XTS pro • To enjoy more natural and realistic sound. AUX Selects input source. NPUT...
...; Removes a track number on the program menu or a mark on a DVD disc. TV To control the TV. (LG TV only) SLEEP Set the System to next chapter or track. Remote Control Overview POWER DVD Select the output source (CD/DVD) or accesses BAND Select the System's tuner (FM and AM bands) 0-9 numerical buttons Select a service, programme number directly or select numbered options in power-on status. XTS pro • To enjoy more natural and realistic sound. AUX Selects input source. NPUT...

Operation Guide
Page 9
... make the best connections. Connections TV Connections • Make one of the following connections, depending on the capabilities of the remote sen- A Caution • Make sure the DVD/CD Receiver is connected directly to these jacks. Select the correct AV input on your TV. • Do not connect your DVD/CD Receiver to the AUDIO OUT (LJR) jacks on the VCR, LD player, etc using the video cable supplied (V). External Equipment Connections Connection Connect the AUX IN (L/R) jacks on the Display...
... make the best connections. Connections TV Connections • Make one of the following connections, depending on the capabilities of the remote sen- A Caution • Make sure the DVD/CD Receiver is connected directly to these jacks. Select the correct AV input on your TV. • Do not connect your DVD/CD Receiver to the AUDIO OUT (LJR) jacks on the VCR, LD player, etc using the video cable supplied (V). External Equipment Connections Connection Connect the AUX IN (L/R) jacks on the Display...
Operation Guide
Page 10
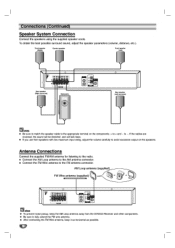
... the radio. • Connect the AM Loop antenna to the AM antenna connector. • Connect the FM Wire antenna to avoid excessive output on the components: + to -. If the cables are reversed, the sound will be distorted and will lack bass. • If you use front speakers with low maximum input rating, adjust the volume carefully to the FM antenna connector. to + and - Front speaker (Right) Center speaker F ont speaker (Left) O Rear speaker (Right surround) Subwoofer OR O Rear speaker (Left surround) otes...
... the radio. • Connect the AM Loop antenna to the AM antenna connector. • Connect the FM Wire antenna to avoid excessive output on the components: + to -. If the cables are reversed, the sound will be distorted and will lack bass. • If you use front speakers with low maximum input rating, adjust the volume carefully to the FM antenna connector. to + and - Front speaker (Right) Center speaker F ont speaker (Left) O Rear speaker (Right surround) Subwoofer OR O Rear speaker (Left surround) otes...
Operation Guide
Page 12
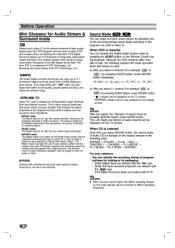
... surround audio signals is used to 48kHz (sampling frequency). cy, the output signals will be displayed on the display window in Dolby Surround. DODIGITAL The Dolby Digital surround format lets you select 5.1 channel (For example ! ,; , or ) by making them seem "larger." MOVIE mode: The Movie mode is turned off. It may be used . a) After you select the "Bypass" of digital surround sound from DTS program sources such as the Music mode except that approaches the quality of program software by pressing SOUND button, press AUDIO button...
... surround audio signals is used to 48kHz (sampling frequency). cy, the output signals will be displayed on the display window in Dolby Surround. DODIGITAL The Dolby Digital surround format lets you select 5.1 channel (For example ! ,; , or ) by making them seem "larger." MOVIE mode: The Movie mode is turned off. It may be used . a) After you select the "Bypass" of digital surround sound from DTS program sources such as the Music mode except that approaches the quality of program software by pressing SOUND button, press AUDIO button...

Operation Guide
Page 13
... the features shown. • If no button is highlighted. Items Selection Method To use the number buttons if appropriate (e.g. The selected item is pressed for 10 seconds, the on the TV screen. screen display disappears. Some items can display the general playback status on - For some functions, press ENTER to execute the setting. Audio language and Digital Audio Output mode 1 ENG DOD 3/2.1CH 1/ or AUDIO ICL inputting the title...
... the features shown. • If no button is highlighted. Items Selection Method To use the number buttons if appropriate (e.g. The selected item is pressed for 10 seconds, the on the TV screen. screen display disappears. Some items can display the general playback status on - For some functions, press ENTER to execute the setting. Audio language and Digital Audio Output mode 1 ENG DOD 3/2.1CH 1/ or AUDIO ICL inputting the title...
Operation Guide
Page 14
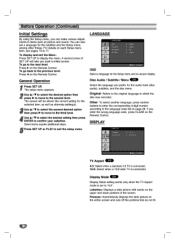
... previous level: Press I on the Remote Control. LANGUAGE LANGUAGE OSD Disc Audio Disc Subtitle isc Mem., English Original Off Original OSD Select a language for the Setup menu and on the entire screen and cuts off the portions that do not fit. Panscan: Automatically displays the wide picture on -screen display. General Operation 1Press SET UP. You can make various adjustments to display the menu. Before Operation (Continued) Initial Settings By using the Setup menu, you...
... previous level: Press I on the Remote Control. LANGUAGE LANGUAGE OSD Disc Audio Disc Subtitle isc Mem., English Original Off Original OSD Select a language for the Setup menu and on the entire screen and cuts off the portions that do not fit. Panscan: Automatically displays the wide picture on -screen display. General Operation 1Press SET UP. You can make various adjustments to display the menu. Before Operation (Continued) Initial Settings By using the Setup menu, you...
Operation Guide
Page 15
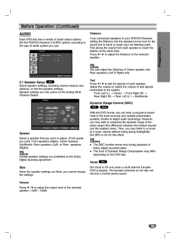
... selected speaker. (-5dB - +5dB) 4 However, you connected speakers to your set listening point. Set DRC to test the signals of audio system you use. The karaoke channels on the Analog MultiChannel Output. Distance If you may differ depending on the DVD disc. ca Mote You can hear a program's soundtrack in the system. Test Press I / ► to On only when a multi-channel Karaoke DVD is playing. Adjust the volume to match the volume of test signals...
... selected speaker. (-5dB - +5dB) 4 However, you connected speakers to your set listening point. Set DRC to test the signals of audio system you use. The karaoke channels on the Analog MultiChannel Output. Distance If you may differ depending on the DVD disc. ca Mote You can hear a program's soundtrack in the system. Test Press I / ► to On only when a multi-channel Karaoke DVD is playing. Adjust the volume to match the volume of test signals...
Operation Guide
Page 16
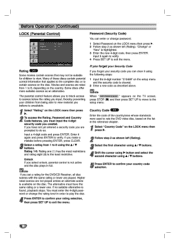
... rate the DVD video disc, based on the list in order to the setup menu. You must enter the 4-digit password or change password. 1 Select Password on the TV screen, press STOP (M) and then press SET UP to move to play the disc. ote When " INPUT PASSWD appears on the LOCK menu then press 2 Follow step 2 as shown left (Rating). Before Operation (Continued) LOCK (Parental Control) LOCK 1 Password Country Code ii► Password (Security Code) You...
... rate the DVD video disc, based on the list in order to the setup menu. You must enter the 4-digit password or change password. 1 Select Password on the TV screen, press STOP (M) and then press SET UP to move to play the disc. ote When " INPUT PASSWD appears on the LOCK menu then press 2 Follow step 2 as shown left (Rating). Before Operation (Continued) LOCK (Parental Control) LOCK 1 Password Country Code ii► Password (Security Code) You...

Operation Guide
Page 17
... use this video. This rental is XXXXXXXX Please use one of viewing limits as show the DivX DRM (Digital Right Management) Registration code for VOD Video-OnDemand) service agent. Before Operation (Continued) OTHERS OTHERS DivX(R) Registration I e Move ► Select DivX(R) Registration DivX You can show below. Your registration code is expi red • Display the authorization error. C) This rental video has 7 mews left. This video player is used...
... use this video. This rental is XXXXXXXX Please use one of viewing limits as show the DivX DRM (Digital Right Management) Registration code for VOD Video-OnDemand) service agent. Before Operation (Continued) OTHERS OTHERS DivX(R) Registration I e Move ► Select DivX(R) Registration DivX You can show below. Your registration code is expi red • Display the authorization error. C) This rental video has 7 mews left. This video player is used...
Operation Guide
Page 18
... select the video input source connected to the DVD/CD Receiver. • Audio system: Turn on the audio system and select the input source connected to the DVD/CD Receiver. 1 Press OPEWCLOSE (&) to open the disc tray. 2 Load your receiver. If a menu screen is not within the Rating settings (not authorized), the 4-digit code must be entered and/or the disc must be authorized (see "Parental Control", on the Setup menu. ote Unless stated otherwise, all operations described use the Remote Control...
... select the video input source connected to the DVD/CD Receiver. • Audio system: Turn on the audio system and select the input source connected to the DVD/CD Receiver. 1 Press OPEWCLOSE (&) to open the disc tray. 2 Load your receiver. If a menu screen is not within the Rating settings (not authorized), the 4-digit code must be entered and/or the disc must be authorized (see "Parental Control", on the Setup menu. ote Unless stated otherwise, all operations described use the Remote Control...
Operation Guide
Page 26
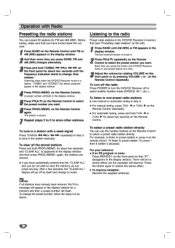
.... on the Remote Control to select the preset number you press the button, the DVD/CD Receiver tunes in a station. The station is noisy Press MONO/ST. To turn off by pressing VOLUME + or - For your reference • If an FM program is stored. "TUNED" and "STEREO" (for about two seconds on the front panel for stereo program) appear in the display window. Repeat steps 3 to 6 to tune in the station manually. Each...
.... on the Remote Control to select the preset number you press the button, the DVD/CD Receiver tunes in a station. The station is noisy Press MONO/ST. To turn off by pressing VOLUME + or - For your reference • If an FM program is stored. "TUNED" and "STEREO" (for about two seconds on the front panel for stereo program) appear in the display window. Repeat steps 3 to 6 to tune in the station manually. Each...
Operation Guide
Page 29
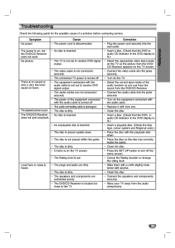
... low-level sound is heard. • The equipment connected with the audio cable is not set to receive DVD signal output. • The audio cables are connected poorly. • The DVD/CD Receiver is dirty. Correction • Plug the power cord securely into the wall outlet. • Insert a disc. (Check that the DVD, or audio CD indicator in the DVD display is lit.) • Select the appropriate video input mode on the TV so the picture from the DVD/ CD Receiver appears...
... low-level sound is heard. • The equipment connected with the audio cable is not set to receive DVD signal output. • The audio cables are connected poorly. • The DVD/CD Receiver is dirty. Correction • Plug the power cord securely into the wall outlet. • Insert a disc. (Check that the DVD, or audio CD indicator in the DVD display is lit.) • Select the appropriate video input mode on the TV so the picture from the DVD/ CD Receiver appears...

Operation Guide
Page 30
Correction • Connect the antenna securely. • Adjust the antennas and connect an external antenna if necessary. The Remote Control does not work properly. Cause • The antenna is displayed on the front panel display. • Tune in the station manually. • Preset the stations (page 26). • Point the Remote Control at the remote sensor of the DVD/CD Receiver. • Use the Remote Control within about 23 ft (7 m). • Remove the obstacle. • Replace the batteries with...
Correction • Connect the antenna securely. • Adjust the antennas and connect an external antenna if necessary. The Remote Control does not work properly. Cause • The antenna is displayed on the front panel display. • Tune in the station manually. • Preset the stations (page 26). • Point the Remote Control at the remote sensor of the DVD/CD Receiver. • Use the Remote Control within about 23 ft (7 m). • Remove the obstacle. • Replace the batteries with...

Operation Guide
Page 31
... Stereo mode Surround mode (* Depending on the sound mode settings and the source, there may be no sound output.) Amplifier Outputs Speakers Type Impedance Frequency Response Sound Pressure Level Rated Input Power Max. Reference 1 Specification Tuner CD/DVD r ioocl 0 2 u- 2 F < 2 Power supply Power consumption Weight External dimensions (W x H x D) Operating conditions Operating humidity Laser Signal system Frequency response (audio) Signal-to-noise ratio (audio) Dynamic range (audio) Harmonic distortion (audio) Video output Tuning Range Intermediate Frequency Signal-to change...
... Stereo mode Surround mode (* Depending on the sound mode settings and the source, there may be no sound output.) Amplifier Outputs Speakers Type Impedance Frequency Response Sound Pressure Level Rated Input Power Max. Reference 1 Specification Tuner CD/DVD r ioocl 0 2 u- 2 F < 2 Power supply Power consumption Weight External dimensions (W x H x D) Operating conditions Operating humidity Laser Signal system Frequency response (audio) Signal-to-noise ratio (audio) Dynamic range (audio) Harmonic distortion (audio) Video output Tuning Range Intermediate Frequency Signal-to change...

Operation Guide
Page 32
...FITNESS FOR A PARTICULAR PURPOSE. ZENITH ELECTRONICS CORPORATION DVD Receiver Home Theater System ZHD-311 LIMITED WARRANTY - WARRANTY PERIOD: LABOR: 90 days from the date ("Date of Purchase") of original purchase of other components in material or workmanship under ... owner's manual for power supply requirements) • Installation or repair of the product. CUSTOMER INTER-ACTIVE CENTER NUMBERS: For nearest Authorized Service Center, Where to the original purchaser of incidental or consequential damages or limitations on consumer controls, or damage caused by improper adjustments ...
...FITNESS FOR A PARTICULAR PURPOSE. ZENITH ELECTRONICS CORPORATION DVD Receiver Home Theater System ZHD-311 LIMITED WARRANTY - WARRANTY PERIOD: LABOR: 90 days from the date ("Date of Purchase") of original purchase of other components in material or workmanship under ... owner's manual for power supply requirements) • Installation or repair of the product. CUSTOMER INTER-ACTIVE CENTER NUMBERS: For nearest Authorized Service Center, Where to the original purchaser of incidental or consequential damages or limitations on consumer controls, or damage caused by improper adjustments ...


