
Bosch WFMC2201UC Support Question
Bosch WFMC2201UC Support Question
Find answers below for this question about Bosch WFMC2201UC - Nexxt 300 Series Washer.Need a Bosch WFMC2201UC manual? We have 4 online manuals for this item!
Current Answers
Related Bosch WFMC2201UC Manual Pages
Pedestal Installation Instructions - Page 3
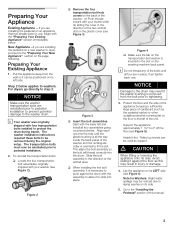
... correctly into place. q When installing the first bolt assembly, it is removed from the wall so it to the washer drum. NOTICE
Damage to the drum may result if the plastic bushing is...to push against the floor as support. Helpful Hint: Rolled up towels can be removed during transit.
Note for Washers: Slight water spillage may result in place, then tighten each one . Preparing Your...
Pedestal Installation Instructions - Page 4
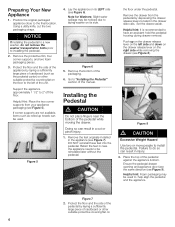
... floor. Support the appliance approximately 1 1/2" to the final location. Using a utility knife, cut or pinch injury. 1. NOTICE
If installing the pedestal to a new washer, do not remove the washer transportation bolts prior to do so can result in injury. 3. Helpful Hint: Place the two corner supports from the pedestal by laying a sufficiently large...
Pedestal Installation Instructions - Page 5
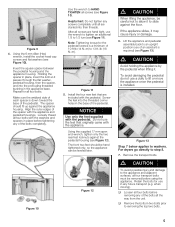
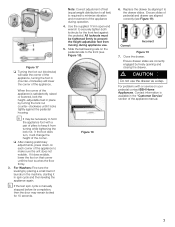
... pedestal screws is installed. Figure 10
Figure 12
d CAUTION
When lifting the appliance, be removed before
removing any of the pedestal. when moving). The spacer should be hand tightened only, so the...the 6 mm Allen (Hex)
wrench, install the socket head cap screws and flat washers (see Figure 10). q Remove the bottom two bolts prior to HAND TIGHTEN all are hand tight, use in the ...
Pedestal Installation Instructions - Page 6
...
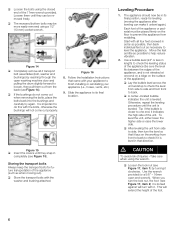
To avoid risk of injuries -Take care when using the closed end of the appliance (be more easily removed using a 1/2" (13 mm) socket wrench.
Loosen them out from the back (see Figure 15). q...When you turn with the
washer and bushing attached. q The recessed bottom bolts may be sure the level fits between the edges of the foot.
6 Figure 14 q Completely remove all four feet screwed in...
Pedestal Installation Instructions - Page 7
... the appliance to the front (see Figure 19). Use the supplied 17mm openĆend wrench to the drawer slides. For Washers: Fine tune the leveling by placing a small load of laundry in the machine, starting it will change the height of the corner. Figure 17 q Turning the foot out (clockwise)
will...
Installation and Use & Care (all languages) - Page 2

...exceptionally quiet while in the heat, allowing your laundry to ensure not a single shirt goes unturned.
Stainless Steel Drum The Nexxt washer drum has hundreds of smooth double punched holes, ...rinsed completely clean. Quiet Performance Bosch laundry appliances use brushless motors, suspended pump systems and special sound-deadening material to remove even the most efficient and accurate ...
Installation and Use & Care (all languages) - Page 3

...6
Dimensions
7
Installation area
7
Removing the transport bolts
7
Water connection...laundry 15
Preparing the laundry 15
Sorting the laundry 15
Degrees of soiling 15
Loading the laundry 16
Laundry Detergents and Additives 16
Dispensing the correct amount of detergent 16
Filling laundry...20
Cleaning and Care 21
Cleaning the washer 21
Descaling the washing machine 22
...
Installation and Use & Care (all languages) - Page 4
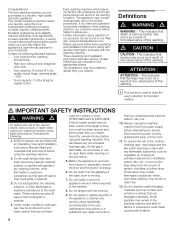
...removed from the power supply before attempting any service.
This indicates that you have been soiled with any questions concerning installation of this length of fire, electric shock, serious injury or death when using your laundry... give off vapors that could ignite or explode.
3. BOSCH washers are indicated in your washer. Do not add gasoline, dry cleaning solvents, or other ...
Installation and Use & Care (all languages) - Page 5

...connect the washing machine to the washing machine have been removed.
31. Store all possible conditions which you are readily...or serviceman if you do not cover all laundry chemicals and aids in accordance with the washer. Do not sit or stand on or... points, electrical connections and hot surfaces.
37. Use caution when draining hot water.
19. Failure to install, maintain and/or operate the...
Installation and Use & Care (all languages) - Page 6

...after removing them). 2. Covers to your dealer immediately. to the degree of soiling, amount of laundry and...has protected your washing machine in the pump or water inlet hose(s) must be obtained...hose for leveling. 4. Elbow for drain hose. Clamp for attaching the drain hose, e.g. In addition to ... authority about the best means of your washer. If the washing machine is a packet...
Installation and Use & Care (all languages) - Page 7

... for the first time and must be retained for
Page
Installation
completely remove 4 shipping bolts
7
move the washer into place
connect the water supply line and
8
drain pipe
connect the electrical power
10
slide the washer into its final location 11
level the washer as low as
carpets or surfaces with holding brackets (set) from...
Installation and Use & Care (all languages) - Page 11
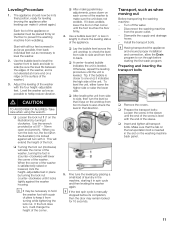
..., allow the Drain program to keep...Remove the covers. Make sure that direction.
5. q A center-located bubble indicates the unit is satisfactorily raised or lowered, lock the height-adjustable feet in place by placing a small load of the unit. Disconnect the washing machine
from front to check the leveling status of the washer...laundry in spin cycle and then leveling the washer...
Installation and Use & Care (all languages) - Page 15
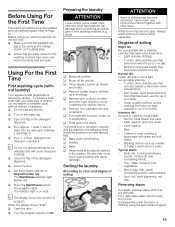
... Kitchen hand towels that have been used for
delicates (this will cause excessive sudsing). Removing stains
If possible, pretreat stains while they are very sweaty or have some light recognizable ...such as parts of the washing machine (e.g. q Do not load any laundry. i The display shows the run the washer a complete cycle, without smoke staining) that
are still fresh. Subsequently...
Installation and Use & Care (all languages) - Page 16
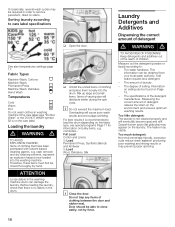
...by hand. Keep detergents and additives out of the reach of laundry. - This
information can be found on stains. The amount...laundry
d WARNING d
TO AVOID EXPLOSION HAZARD! Before loading the laundry, check that have been pretreated with solventĆbased cleaning agents, e.g. Overloading will eventually become gray and stiff. Measure out the detergent (powder or liquid) according to remove...
Installation and Use & Care (all languages) - Page 17

...). Sturdy, hard wearing items made of your front-loading washer. Clothes requiring a special tumble sequence and spin speed to deliver optimum performance from the drain. KIDS Care
For stained, heavily soiled, and
hard-wearing... reduced spin speed for detergent, stain remover. Drain
Can be washed with other laundry together. Only if you have been specifically
designed to...
Installation and Use & Care (all languages) - Page 22
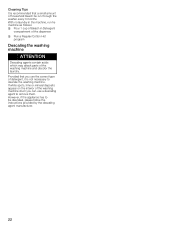
...mineral deposits appear on the interior of the washing machine drum you use a descaling agent to remove them. However, if the appliance has to descale the washing machine. Cleaning Tips It is ...as follows: q Pour 1 cup of bleach in the machine, run through the washer every 3 months. With no laundry in Detergent
compartment of the dispenser q Run a Regular/Cotton Hot
program
Descaling the ...
Installation and Use & Care (all languages) - Page 23

...failure, call Customer Service (refer to be removed during spin cycle the speed cannot be selected... and display is not a fault. Suds or pump is set to Page 25).
Program does not ...laundry is not tight. q Call Customer Service
(refer to drain;
Eliminate the cause. If repairs are necessary, and you High Efficientcy washer produce fewer suds and will be seen in the drain...
Installation and Use & Care (all languages) - Page 24
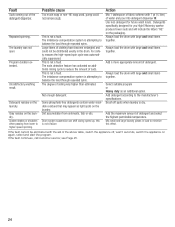
...have become entangled and could not remove suds. Dirt accumulation from lower to balance the load through repeated spins. Use less detergent for you High Efficientcy washer produce fewer suds and will include...dispenser. Mix small and large laundry pieces in the drum. If the fault continues, call customer service;
Too much soap or non-HE soap used, pump could not be eliminated with the...
Installation and Use & Care (all languages) - Page 26

...of the Product in the unlikely event of limited product Warranty applies only to the Bosch 300 Series washer ("Bosch") sold to you, the first using a
Bosch-authorized service provider during normal ...and for the Product, including all defects or damage that have been altered, defaced, or removed; In no event shall Bosch have someone other special charges by the service company, assuming...
Installation and Use & Care (all languages) - Page 92

...Nexxt 300 Series
Please read and observe Operating, Care and Installation Instructions carefully before using the washing machine !
Drain pump operates prior to pre-treat heavily stained items. The cycle ends with the "No final spin" option for spinning handĆwashed laundry. Type of laundry...Maximum amount of laundry:
+40
&#...during spinning.
9
Drain
To drain water after a program with...
Similar Questions

Bosch Nexxt 300 Series Washer Will Not Spin Or Agitate.
Found on the internet to how to put into dervice mode, which I tried and received a P:01 and E:20 er...
Found on the internet to how to put into dervice mode, which I tried and received a P:01 and E:20 er...
(Posted by garrisonml 9 years ago)

Bosch Nexxt 300 Series Washer Water In Drum When Sitting
(Posted by niksaidyle 9 years ago)
Where Is The Bosch Nexxt 300 Series Washer Water Drain Hose Located
(Posted by najtoum 10 years ago)

How To Remove Front Access Panel On Bosch Nexxt 300 Series Washer
(Posted by eaaug 10 years ago)

How To Take A Pump Off A Bosch Nexxt 300 Series Washing Machine
(Posted by lilpodi 10 years ago)