
Brother International PE-200 Support Question
Brother International PE-200 Support Question
Find answers below for this question about Brother International PE-200.Need a Brother International PE-200 manual? We have 1 online manual for this item!
Question posted by tsitsisamukange on August 28th, 2023
Stiffness And Failure To Start Sewing
machine is very stiff will not sew and reports tangled thread which is not there
Current Answers
Answer #1: Posted by SonuKumar on August 28th, 2023 10:42 AM
SonuKumar

Member since:
May 9th, 2021 Points: 16,627,790

Member since:
May 9th, 2021 Points: 16,627,790
https://www.manualslib.com/manual/355772/Brother-Pe-150.html?page=65#manual
https://www.manualslib.com/manual/355772/Brother-Pe-150.html?page=62#manual
Please respond to my effort to provide you with the best possible solution by using the "Acceptable Solution" and/or the "Helpful" buttons when the answer has proven to be helpful.
Regards,
Sonu
Your search handyman for all e-support needs!!
Answer #2: Posted by Anuj145 on August 28th, 2023 6:45 AM
Anuj145

Member since:
July 18th, 2023 Points: 23,490
Member since:
July 18th, 2023 Points: 23,490
It sounds like there might be a few issues with your Brother International PE-200 sewing machine. Here are some steps you can take to troubleshoot the stiffness and thread tangling problem:
- Clean and Oil: Make sure your machine is clean and well-oiled. Dust and lint can build up over time, causing stiffness. Refer to your machine's manual for instructions on cleaning and oiling.
- Thread Tension: Check the thread tension. Incorrect tension can cause thread tangling. Re-thread both the upper and lower threads, ensuring they are correctly threaded through the tension discs.
- Needle and Bobbin: Ensure you are using the correct needle for your fabric and that it's properly inserted. Also, make sure the bobbin is correctly wound and inserted into the bobbin case.
- Thread Quality: Poor-quality thread can lead to tangling. Try using a higher-quality thread, and make sure it's the right weight for your fabric.
- Presser Foot Pressure: Adjust the presser foot pressure according to your fabric. Heavy fabrics may require more pressure, while lightweight fabrics need less.
- Stitch Length: Check the stitch length setting. A very short stitch length can sometimes cause stiffness.
- Test Sewing: Try sewing on a scrap piece of fabric to see if the problem persists. This can help identify if the issue is with the machine or the specific project.
- Bobbin Tension: Check the bobbin tension. If it's too tight or too loose, it can lead to thread tangling. Adjust it as needed.
- Thread Path: Ensure the thread is passing through all the thread guides and tension discs correctly. Even a small misalignment can cause problems.
- Consult the Manual: If none of the above steps work, refer to your machine's manual for specific tips and, if necessary, contact Brother's customer support or a sewing machine technician for professional assistance.
By following these steps, you should be able to identify and resolve the stiffness and thread tangling issues with your machine.
Anuj
Answer #3: Posted by expertiq on August 28th, 2023 3:29 PM
expertiq

Member since:
May 29th, 2022 Points: 1,590
Member since:
May 29th, 2022 Points: 1,590
I'm sorry to hear about the trouble you're experiencing with your sewing machine. Stiffness and issues with starting can be frustrating, but let's work through this step by step to get you sewing smoothly again.
- Cleaning and Maintenance: First, ensure the machine is clean and well-maintained. Dust, lint, or debris can cause stiffness. Gently clean the bobbin area, feed dogs, and other moving parts. Also, oil the machine following the manufacturer's guidelines if required.
- Thread Tension: Incorrect thread tension can cause stiffness and threading issues. Check that the upper thread is correctly threaded through the tension disks and the bobbin is wound and inserted properly.
- Bobbin Area Check: Remove the bobbin and bobbin case. Check for any tangles or thread snags in this area. Even a small piece of thread can cause issues.
- Needle Condition: A bent or dull needle can cause stitching problems. Replace the needle with a new one that's compatible with your machine.
- Fabric and Thread Type: Ensure you're using the appropriate fabric and thread for your project. Using the wrong combination can lead to difficulties.
- Manual Assistance: With the machine turned off, gently hand-turn the handwheel towards you. This might help you identify where the stiffness is coming from. It could be a jam or resistance at a specific point.
- Thread Path Check: Check the threading path from the spool, through the tension disks, and to the needle. Make sure there are no knots, tangles, or thread caught in the path.
- Bobbin Tension: If your machine has adjustable bobbin tension, ensure it's correctly set. If it's too tight or too loose, it can cause stitching problems.
- Presser Foot Pressure: Some machines allow you to adjust the presser foot pressure. If it's too high, it could be causing stiffness. Adjust it as per the manual's instructions.
- Consult the Manual: If the above steps don't resolve the issue, consult your machine's manual. It might have specific troubleshooting tips and solutions for stiffness and starting problems.
- Professional Help: If the problem persists, it might be best to have a professional technician take a look. Sometimes, internal mechanisms might require expert attention.
Remember, patience is key. Go through each step carefully, and hopefully, you'll identify and fix the issue. Happy sewing!
sajith pushpakumara
Related Brother International PE-200 Manual Pages
Users Manual - English - Page 4
...
notice.
1 To fully enjoy all of the operation manual to keep your machine turns on the needle while sewing. Be sure to inspect and adjust the machine yourself. Always be used.
3. Benzene, thinner, and scouring powders can damage the case and machine, and should never be sure to turn off the main power switch...
Users Manual - English - Page 5
...frame 20 Fitting the embroidery frame to the machine 22 Removing the embroidery frame ...... 22 THREAD TENSION ADJUSTMENT....... 23 ADJUSTING THE LCD SCREEN ...starting point 45 Changing the pattern direction.......... 45 Mirror imazing patterns 46 Changing the size of characters and frame patterns 47 Changing thread density of the stitch on characters and some frame patterns ... 47 SEWING...
Users Manual - English - Page 6

... guide 4- Presser foot 9- Needle plate 11- MAIN POWER SWITCH AND CONNECTORS B- "START/STOP" BUTTON
EMBROIDERING USING A
EXTRA-SMALL FRAME (OPTIONAL)
EMBROIDERING USING A LARGE
FRAME (OPTIONAL)
3 Face plate 6- SELECTION KEYS C- CONTENTS
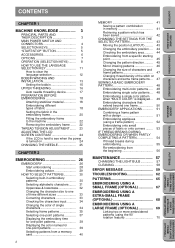
MACHINE KNOWLEDGE
EMBROIDERING MAINTENANCE
MACHINE KNOWLEDGE
PRINCIPAL PARTS AND THEIR DESCRIPTION
CHAPTER 1
4
6 5 C
7 8
31
2 15 12
11...
Users Manual - English - Page 7

When servicing the sewing machine, or when removing covers or changing lamps, the machine must be switched off and the plug removed from the socket-outlet. ...not modify the plug in a polarized outlet only one blade wider than the other). To reduce the risk of the machine must have the plug removed from the socket-outlet. -
For U.S.A. only This appliance has a polarized plug (one way...
Users Manual - English - Page 8

... a memory card for
embroidery patterns.
3
3 "MEMORY" KEY Use this key for saving or retrieving pattern
combinations in the machine.
4 "BASIC OPERATION" KEY
5
Use this key for more information on the display, press the "START/STOP" button to remember. EMBROIDERING MAINTENANCE
ERROR MESSAGE
TROUBLESHOOTING
PATTERNS
EMBROIDERING USING A SMALL
FRAME (OPTIONAL)
EMBROIDERING USING A
EXTRA...
Users Manual - English - Page 17

... USING A LARGE
FRAME (OPTIONAL)
14 Guide the thread through the small hole in the bobbin
5. Guide the thread through the machine and the bobbin winding guide as shown on hand before start your project. Push the bobbin shaft to the spoolend.
6. Remove the bobbin and continue sewing.
8. Set the bobbin into the shuttle as marked...
Users Manual - English - Page 19

...of the machine
2 Spool felt 3 Thread spool
NOTE This method keeps the thread from twisting as illustrated with metallic thread. 1. Guide the thread as it so that you start embroidering. ...14
home sewing machine needle.
1 Insert the extra spool pin into the hole on the machine following the number sequence.
4. Thread the needle using metallic thread, we recommend that the thread
winds off...
Users Manual - English - Page 26

.... 1 Top surface of the fabric 2 Reverse side of different thread, fabric or stabilizer fabric. CONTENTS
MACHINE KNOWLEDGE
EMBROIDERING MAINTENANCE
THREAD TENSION ADJUSTMENT
Use this procedure when changing the thread tension. Thread tension may need to check for the proper thread tension. To tighten the upper thread tension, adjust the dial to the
left.
* The standard position...
Users Manual - English - Page 31

... foot, and gently pull the end of the design. After threading the needle, pass the thread from the top to start the machine.
The machine will stop the machine and raise the presser foot again. After sewing 5 - 6 stitches, stop sewing when it has completed all the stitching with the current thread color. Lower the presser foot and press the...
Users Manual - English - Page 32
...OPTIONAL)
EMBROIDERING USING A
EXTRA-SMALL FRAME (OPTIONAL)
EMBROIDERING USING A LARGE
FRAME (OPTIONAL)
29
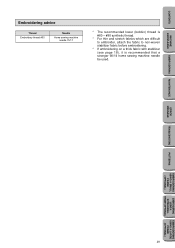
CONTENTS
MACHINE KNOWLEDGE
Embroidering advice
Thread Embroidery thread #50
Needle
Home sewing machine needle 75/11
* The recommended lower (bobbin) thread is #60 - #90 synthetic thread.
* For thin and stretch fabrics which are difficult to embroider, attach the fabric to non-woven...
Users Manual - English - Page 35

...A
1
2
3
4
6
5
7
8
1 Touch this key to have the machine sew a reinforcement stitch and stop for the changing of thread each time a new character is embroidered. (Refer to page 34.)
2 Touch this .... (Refer to page 32.) 6 Touch this key to change the character position, character size and thread density, or
if you would like to change the character size to one of three different sizes. ...
Users Manual - English - Page 46

B If you touch this key, the pattern will be used with some patterns. (Refer to the sewing start position. CONTENTS
MACHINE KNOWLEDGE
CHANGING THE SETTINGS FOR THE SELECTED PATTERN
Moving the position (LAYOUT)
The position for embroidering the pattern can be embroidered. 4 Indicates the current center ...
Users Manual - English - Page 51

....
48
EMBROIDERING USING A LARGE
FRAME (OPTIONAL) Raise the presser foot. 6.
Replace the upper thread with the next color and press the "START/STOP" button. CONTENTS
MACHINE KNOWLEDGE
EMBROIDERING MAINTENANCE
SEWING A BASIC EMBROIDERY PATTERN
Embroidering multi-color patterns (1) (2) (3) (2) (3)
When a pattern is selected it is finished. 5. Lower the presser foot. 4. The order...
Users Manual - English - Page 53

... then press the "START/STOP" button to embroider and you cannot embroider them all in large size
1. Input the remaining letters "DE", and then
touch "START/CENTER" to "START".
2. Example: ABCDE in the same frame. After this, touch "START/ CENTER" to switch to select "START". 4. When embroidering has finished, the machine will sew the finishing position automatically...
Users Manual - English - Page 54

... slightly larger than the original frame pattern.
2.
Making badges or decorative patches 1. CONTENTS
MACHINE KNOWLEDGE
EMBROIDERING MAINTENANCE
ERROR MESSAGE
TROUBLESHOOTING
EMBROIDERING APPLICATIONS
Combining a frame pattern with a design
1. After embroidering a frame pattern and the combined
design, sew an extra frame pattern on the outside pattern. Cut cleanly around the frame...
Users Manual - English - Page 58
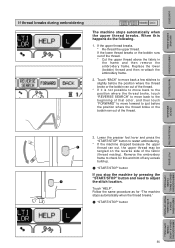
... because the upper thread ran out, the upper thread may be tangled on the reverse side of the thread. * Cut the upper thread above the fabric in the frame and then remove the embroidery frame. Touch "HELP". Remove the embroidery frame to check for "The machine stops automatically when the thread breaks."
1 "START/STOP" button
TROUBLESHOOTING
PATTERNS
EMBROIDERING...
Users Manual - English - Page 62

... caused by a tangled thread or embroidering with an alarm and error number on the LCD.
This message is displayed when the "START/STOP" button is pressed while the presser foot lever is displayed if the motor locks. This could be displayed after the display warns you with a bent needle. CONTENTS
MACHINE KNOWLEDGE
EMBROIDERING MAINTENANCE...
Users Manual - English - Page 66

... race or inner rotary hook.
8. CONTENTS
MACHINE KNOWLEDGE
EMBROIDERING MAINTENANCE
ERROR MESSAGE
TROUBLESHOOTING
Symptom
Probable cause
Remedy
5. The upper thread tension is tangled.
5. Decrease the upper thread tension using the upper thread tension dial.
2. A thread other than the designated
3. embroidery thread.
6. Thin or stretch fabric is not possible...
Users Manual - English - Page 67

... foot is not used. Turn the power on . ● To start
3.
Accordingly, if the upper thread is
not threaded, the machine will not operate even if the "START/STOP" button is not correctly inserted.
2. The needle is pressed. Change to the point where the machine went off during embroidery. This sound is normal and is in...
Users Manual - English - Page 69

... CONTENTS
One point mark embroidery pattern
MACHINE KNOWLEDGE
EMBROIDERING MAINTENANCE
1...001 2...800 3...900
1...704 2...800 3...900
1...205 2...339 3...900
1...339 2...205 3...900
1...339 2...800 3...900
1...205 2...001 3...900
1...001 2...800 3...900
1...205 2...800 3...900
1...307 2...019 3...900
Order of sewing
Embroidery thread color
1...307 2...800 3...900
1...001 2...800...
Similar Questions

Manual For Brother Snoopy Pe-200 Sewing Machine
do you have the manual for the brother PE-200 snoopy
do you have the manual for the brother PE-200 snoopy
(Posted by kwallzabaneh 1 year ago)

Manuale Ricamatrice Pe 200 Snoopy
Buongiorno ,non ho più il manuale di questa macchina ,potrei avere aiuto per averlo?Grazie
Buongiorno ,non ho più il manuale di questa macchina ,potrei avere aiuto per averlo?Grazie
(Posted by bergamosabina 2 years ago)

Need Disc From Pe-200
Where or how can I buy parts for my MACHINE?
Where or how can I buy parts for my MACHINE?
(Posted by silvis1707 10 years ago)

Sewing Machine Started Sewing Backwards On Anything Other Then A Straight Stitch
My brother just today started to sew backwards on the programmed stitches. The only stitch that work...
My brother just today started to sew backwards on the programmed stitches. The only stitch that work...
(Posted by chloedoxie 11 years ago)

The Thread Keeps Breaking When I Start Sewing
(Posted by Anonymous-58003 12 years ago)