Dynex DX-L42-10A Support Question
Dynex DX-L42-10A Support Question
Find answers below for this question about Dynex DX-L42-10A - 42" LCD TV.Need a Dynex DX-L42-10A manual? We have 5 online manuals for this item!
Question posted by charlessellers0607 on October 13th, 2018
Lcd Tv, Model Dx-l 42-10. Where Are Threaded Ports For Wall Mount Supports
Where are the television threaded mounting ports for wall mount support arm attachments. I see four existing bolts but not sure if they are to be removed.
Current Answers
Related Dynex DX-L42-10A Manual Pages
User Manual (English) - Page 1

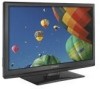
37" and 42" LCD TVs
DX-L37-10A/DX-L42-10A
USER GUIDE
User Manual (English) - Page 2

...DX-L37-10A/DX-L42-10A
37" and 42" LCD TVs
Contents
Child Safety 1
Important safety instructions 2
Warnings 2 Cautions 2
Installing and removing the stand 3
Installing the stand 3 Installing a wall-mount bracket 4
TV...system 9 Connecting headphones 9
Turning on your TV for the first time 10
Understanding the basics 10
Turning your TV on or off 10 Selecting the video input source 11 On-...
User Manual (English) - Page 4

Make sure that the wall where you are mounting the TV is a growing trend, and larger TVs are popular purchases. One size of wall mount does not fit all. • Follow all cords and cables so that children can be used as steps, such as suitable for proper use your flat panel display
As you enjoy your new product, keep...
User Manual (English) - Page 5

...not remove any antenna or cable system.
Make sure that your TV....10 Protect the power cord from being walked on the back of your device receiver during lightning storms or when unused
for at plugs, convenience receptacles, and the point
where they exit from the apparatus.
11 Only use attachments... or circuits.
Handling the LCD panel
• Your TV's screen is the disconnecting ...
User Manual (English) - Page 6

..., change in the stand column.
Non-active pixels
The LCD panel contains almost 3 million thin film transistors, which provide exceptionally sharp video quality. If you are not considered defects.
If you intend to your TV very carefully when attempting assembly or removal of other flat surface. Secure the stand to provide some protection against voltage...
User Manual (English) - Page 7
... not perform any servicing other than that your TV, then remove the stand column.
To attach your TV to put down on -screen menu.
4 INPUT
Press to select the video input source.
5
(Power) button
Press to a wall-mount bracket (not provided), you want to attach the TV to turn on your TV. 4
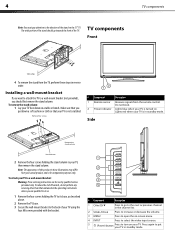
TV components
Note: You must pay attention to...
User Manual (English) - Page 8

TV components
Back
AC IN
SERVICE PORT DIGITAL OUTPUT
5
# Component 12 HDMI3 jack
13 Headphone jack
Description
Connect an HDMI device,..., to this jack.
The top row of jacks is COMPONENT 1. For more information, see "Connecting a computer" on page 8.
10 RS-232 jack
For service only. For more information, see "Connecting an HDMI device" on page 8.
7 AUDIO OUT jack Connect...
User Manual (English) - Page 9

...or to open the channel list. Remove batteries when they no longer have a charge. Remove the batteries if you can select TV, AV1, AV2, S-VIDEO1, S-... menus. Press to select the video input source. Make sure that the + and - symbols in direct sunlight. Aiming...on -screen menu.
18 SLEEP
Press to open
a submenu.
10 GUIDE
Press to display the information banner.
For more information, ...
User Manual (English) - Page 10

...0464
8043
Set-top box manufacturer and model
Comcast M1057
Dish Network
VIP508, VIP622
...TV. The external audio/video equipment shown in the market. If you found in image or color problems. Make sure... your TV. You will not be different on the back of your TV with a new or existing universal...set -top box manufacturer, or call technical support for position and type before fi nding a...
User Manual (English) - Page 11

...user guides for more information. Connecting an HDMI device
To connect an HDMI device: 1 Make sure that your TV's power cord is unplugged and the HDMI device is turned off . 2 Connect a component ..., then press ENTER. Connecting a camcorder or game
To connect a camcorder or game: 1 Make sure that your TV's power cord is unplugged and the camcorder or game is turned off . 2 Connect an AV cable...
User Manual (English) - Page 12
... or Component2, then press ENTER.
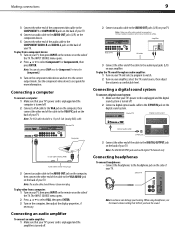
Connecting a computer
To connect a computer: 1 Make sure that your TV's power cord is unplugged and the amplifier is turned off.
2 Connect an audio cable to the... To play from a computer: 1 Turn on your TV. Note: Cables are often color-coded to white. SERVICE PORT DIGITAL OUTPUT
Back of TV
Digital sound system
Optical audio cable
S/PDIF jack
3...
User Manual (English) - Page 13
..., connected the antenna to select your time zone. To completely disconnect power, unplug the power cord. 10
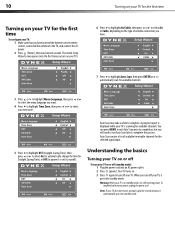
Turning on your TV for the first time
Turning on your TV for the first time
To configure your TV: 1 Make sure that you have .
7 Press to highlight Auto Scan, then press ENTER or to automatically scan for...
User Manual (English) - Page 14

... the signal source selected, you may vary from the actual screens on the side of the TV. The illustrations and screens shown in the manual are shown in this manual are grayed out....select HDMI3. • VIDEO - Audio menu
Setup menu
2 Press or to select S-Video2. • TV- Press four times to highlight the video source, then press ENTER. Press twice to select S-Video1.
Press...
User Manual (English) - Page 16

... (snow). You can select:
• Picture Mode-Selects the picture mode.
Adjusting the TV picture
To adjust the picture: 1 Press MENU. The on-screen menu opens with the ...Digital mode information-Displays channel number, station name, channel label (if preset), broadcast program name, TV rating, signal type, audio information, resolution, CC mode, current time, and current program start and...
User Manual (English) - Page 17

..., or press EXIT to
close the menu. Adjusting the computer image
To adjust the computer image: 1 Make sure that your TV is in VGA mode. The on page 11. 2 Press MENU. Parental Controls
2 Press or to highlight...Contrast-Turn this On to optimize the picture display for a more vivid image.
• Auto Zoom-In TV mode, setting Auto Zoom to On lets you set the Zoom Mode to Auto.
4 Press MENU to return...
User Manual (English) - Page 18

... the progress of the scan. To select an audio track for channels: 1 Press MENU. Notes: Audio Only works only when the input source is TV and your TV and listen to close the menu. Changing channel settings
Automatically scanning for channels
To auto scan for a digital channel: • Press MTS/SAP. The...
User Manual (English) - Page 19
...-screen menu opens.
4 Press or to highlight the channel you can still tune to scroll through your TV skips the channels when you press CH /CH . The on -screen menu opens. Setting up the ... Press or to close the menu.
You can quickly browse through the pages.
5 Press EXIT to remove the check mark from the favorite channel list. The channel list opens.
3 Press or to select ...
User Manual (English) - Page 30

... could be with a weak detergent solution.
• Use an eyeglass cleaner to the channel list. For more information, see "Connecting an antenna, cable TV, or satellite TV box" on an LCD screen is
not muted. • Make sure that came with the cloth. For more information, see "Adjusting the picture" on page 6.
• Make...
User Manual (English) - Page 31

...TV type TV panel
TV system Channels
LCD 37-inch (DX-L37-10A) TFT LCD 42-inch (DX-L42-10A) TFT LCD NTSC-M, ATSC VHF: 2 - 13 UHF: 14 - 69 CATV: 1 - 125
Audio multiplex Audio output
Power requirement Power consumption
Dimensions
Weight Input terminals
CADTV: 1-135 DTV: 2 - 69 BTSC system
10 W × 2
AC 120 V, 60 Hz
140W (37") 180W (42...For service and support call (800) ...or television reception...
User Manual (English) - Page 32

... Product • Plasma display panel damaged by static (non-moving...number has been altered or removed
REPAIR REPLACEMENT AS PROVIDED UNDER... of the material or workmanship for a television with this warranty cover? This warranty does... the warranty not cover? Make sure that requires service, terms of ...original purchaser of this new DX-L37-10A or DX-L42-10A ("Product"), that you notify...
Similar Questions

How Do I Get The Close Caption To Work On My 32' Dynex Lcd Tv Model# Dx-lcd32 Tv
(Posted by lilianrivera1234 9 years ago)
What Receiver Can I Hook Up To My New 32 Lcd Tv For Surround Sound
(Posted by jmsmive 9 years ago)

My Picture Drops Out On My Tv. Sound Stays On Just No Picture. 42' Dynex Lcd Tv
(Posted by elmateo27 12 years ago)

Hooking Up Surround Sound To Dynex Lcd Tv?
I have tried hooking up my surround sound to my dynex tv in several different manners now. To no s...
I have tried hooking up my surround sound to my dynex tv in several different manners now. To no s...
(Posted by jacobthammond 13 years ago)

How Do I Hook Up My Dvd Player To My Dynex Lcd-tv Model# Dx-l32-10c
I have no manual with my TV and do not know which oulets to plug in my red white yellow plugs. There...
I have no manual with my TV and do not know which oulets to plug in my red white yellow plugs. There...
(Posted by sannymacneil 13 years ago)