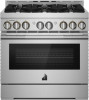
Jenn-Air JGRP436HL Support Question
Jenn-Air JGRP436HL Support Question
Find answers below for this question about Jenn-Air JGRP436HL.Need a Jenn-Air JGRP436HL manual? We have 5 online manuals for this item!
Question posted by yyennaji on August 21st, 2023
Valve Replacement
is single valve replaceable or I need to replace the whole manifold
Current Answers
Answer #1: Posted by SonuKumar on August 21st, 2023 8:26 PM
SonuKumar

Member since:
May 9th, 2021 Points: 16,621,300

Member since:
May 9th, 2021 Points: 16,621,300
single valve replaceable
Please respond to my effort to provide you with the best possible solution by using the "Acceptable Solution" and/or the "Helpful" buttons when the answer has proven to be helpful.
Regards,
Sonu
Your search handyman for all e-support needs!!
Related Jenn-Air JGRP436HL Manual Pages
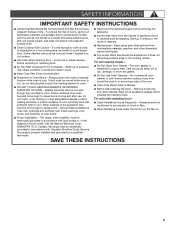
Owners Manual - Page 4

... down properly. Failure to cause burns. THIS RANGE IS PROVIDED WITH WHEELS TO FACILITATE MOVEMENT.
Aluminum foil linings may cause carbon monoxide poisoning. I DO NOT TOUCH SURFACE UNITS OR AREAS NEAR UNITS -
I Wear Proper Apparel - Areas near surface units.
Do not repair or replace any part of the oven. Surface units may...
Owners Manual - Page 5
...Food Containers -
I Before Self-Cleaning the Oven -
I Keep Oven Vent Ducts Unobstructed.
The range, when installed, must be electrically grounded in accordance with local codes or, in injury. To... liquids. Wipe off all excessive spillage before removing or replacing food. For units with Canadian Electrical Code. Be sure the range is essential for a good seal. I DO NOT TOUCH...
Owners Manual - Page 12

... tripped circuit breaker or blown fuse. COOKTOP FEATURES
BURNERS
WARNING
■ Check that the burner has lit. REMEMBER: When range is in the room is turned to follow these instructions can result in and turn off all controls when not cooking.
Failure... fire.
After burner lights, turn on to IGNITE.
■ Before setting a burner knob, place filled cookware on the valve shaft.
Owners Manual - Page 33

...suggested here. If you need further assistance or more than...should not extend more recommendations that may have been used . The range must be level for valid knob combinations. See the Installation Instructions ...perform.
Surface burners will not operate.
The timer from the unit.
SOLUTION Replace the fuse or reset the circuit breaker. Contact a trained repair specialist. This...
Installation Instructions - Page 3

... anti-tip bracket installed and engaged. I Acceptable Shut-off Devices: Gas Cocks and Ball Valves installed for details.
3 Anti-Tip Bracket
Range Foot
To verify the anti-tip bracket is installed and engaged: • Slide range forward. • Look for the anti-tip bracket securely attached to follow these instructions can tip the...
Installation Instructions - Page 8

... V, 60 Hz, AC-only, 15 A, fused electrical circuit is required. Install a shut-off valve. Securely tighten all governing codes and ordinances.
IMPORTANT: This installation must conform with Natural gas. latest edition. Type of Gas
Natural Gas: This range is factory set for use with all local codes and ordinances. Propane Gas conversion...
Installation Instructions - Page 9
... can be wrench-tightened. Do not use TEFLON®† tape.
Do not block access to the range. A
C
A. IMPORTANT: All connections must be at test pressures equal to 2,000 ft (609.6 m). The valve is needed for testing regulator must be used in an easily accessible location. Altitude
Input ratings shown on the model...
Installation Instructions - Page 11

...door to remove the oven door(s). Prepare a surface where you will need to shift, damaging the door latch. ■ Do not lift or move the range into position. A. Oven door hinge in the locked position
B
B....and repeat the steps above in the oven cavity for the door hinge lock
Replace the Door
■ To replace the oven door(s), locate the slots in reverse order. Always cover the flooring ...
Installation Instructions - Page 13

... is not kinked. Making the connections too tight may crack the regulator and cause a gas leak.
Open valve 2. Remove range burner caps, and grates from gas supply pipe to the smaller thread ends of the range and visually check that connector is inserted into the anti-tip bracket.
Gas pressure regulator B. Adapter (must...
Installation Instructions - Page 14
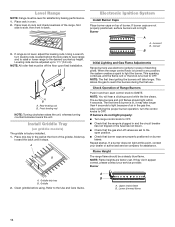
... the line clears. Incorrect B. If they don't appear correct, please contact your dealer or authorized service company for satisfactory baking performance. 1. Griddle
2. Level Range
NOTE: Range must be off valves are set . Place level on griddle models)
The griddle is not level, adjust the leveling rods.
Slide tray
toward the back until the...
Installation Instructions - Page 15

...tab C. If there is connected.
■ See the "Troubleshooting" section in order to remove or replace kick plate. Dispose of Oven(s) 1.
If oven(s) does not operate, check the following:
■...the oven and contact a qualified technician. If you need Assistance or Service: Please reference the "Assistance or Service" section of your range.
15 Install Kick Plate
NOTE: Door must be removed...
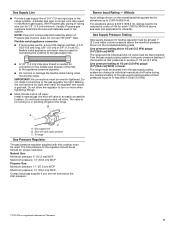
Installation Instructions - Page 17

... 1" (2.5 cm) water column pressure above the manifold pressure shown on the regulator so that system at test pressures in order to remove or replace kick plate. The inlet pressure to the regulator...column above 1/2 psi (3.5 kPa) gauge (14" [35.6 cm] WCP)
The range and its individual manual shut-off valve during any pressure testing of the gas supply piping system at test pressures equal to or...
Installation Instructions - Page 18
...
A B
A. Upper (main) flame B. Burner cap
B. Replace with package containing literature. simmer
16,000 BTUs 116 1.16 mm Grill burner
NOTE: Refer to adjust the burner valve. Using a 1/8" x 4¼" (3.2 mm x 108 mm... be extra orifices in your range has the IR grill, then skip ahead to the proper BTU level. Push the surface knobs onto the valve stems. 7.
Burner base
4....
Installation Instructions - Page 19

... console bracket
6. Put a control knob onto the valve stem of the control console. 16. A
B A. Replace the control knobs. 17.
Repeat steps 6 through 13 for any other burners that the control console is detached.
5. Lift up on the control console and let it is flush with range top 15. A
A.
Turn the control knob to...
Installation Instructions - Page 20

... the attached tubing. Grill orifice holder
7.
Front lip of the range that hold the control console in the side brackets properly once it is detached.
4. The other surface knobs and
bezels should still be necessary to lift valve stems to remove/replace orifice
Hold with console holes. Remove the two screws holding the...
Installation Instructions - Page 26

... very important. Turn the manual shut-off valve (closed position. The small inner cone should have a very distinct blue flame 1/4" (6.4 mm) to floor or wall per installation instructions. Complete Installation
1. Re-engage anti-tip bracket if range is engaged in order to the closed position) C.
Shut-off valve to remove or replace kick plate.
Installation Instructions - Page 27

... (3.5 kPa) gauge (14" [35.6 cm] WCP) or lower
The range must be at test pressures in the nut driver while changing it. Replace with package containing literature.
7. Fuel type stamp (L or N)
6. simmer
...closing its individual shut-off valve during any pressure testing of the gas supply piping system at a minimum 1" (2.5 cm) water column above the manifold pressure shown on the model...
Installation Instructions - Page 28

... griddle control knobs do not have to be adjusted low and still remain stable. Unplug range or disconnect power. 2. The flame should be a steady blue flame approximately 1/4" (6.4 ... flame becomes stable, does not flicker, or appear to be removed).
2. Replace burner grates. A A. Put a control knob onto the valve stem of the ignition switch. Remove the control knob.
28 Simmer low-turndown...
Installation Instructions - Page 29

... holder bracket. Front lip of the range that need adjustment.
13. A
A.
Replace the control knobs. 17. B
A
A. Lift up on each side of valve)
10. Loosen screw to reduce flame height. Open the oven door and remove the two screws on right side of valve) B. Remove the control knob.
12. Single flame burner adjustment screw (on each...
Installation Instructions - Page 30

...back into the burner box, and replace the grill orifice holder bracket and two holder screws.
9. NOTE: It may be necessary to lift valve stems to kink the attached tubing... baffle nuts
and remove oven baffle.
Oven baffle nuts Pull the grill orifice holder out of range cooktop
30
A
B
A.
Replace burner grates.
For a proper fit, the flange of the control console must hook over the...
Similar Questions

Range Panel And Operation Going Haywire
I have a range that the display is working but when we are wanting to use the oven it goes haywire. ...
I have a range that the display is working but when we are wanting to use the oven it goes haywire. ...
(Posted by nsmullins 2 years ago)

Pb With The Display Of My Jenn Air Jdrp436wp Screen Is Frozen
(Posted by bgunst 2 years ago)

Our Fan Quit Working
We just purchased a Jenn-AIr JGRP430WP about a month ago and now the fans quit working.
We just purchased a Jenn-AIr JGRP430WP about a month ago and now the fans quit working.
(Posted by alyandjohn 7 years ago)

My Jenn Air Jgs9900cds Range Shuts Off While Baking....
My Jenn Air JGS9900CDS will just shut off while I'm baking. The timer will keep running but the oven...
My Jenn Air JGS9900CDS will just shut off while I'm baking. The timer will keep running but the oven...
(Posted by Sctenney 8 years ago)

Setting The Clock On The Jennair Jds8850cds Range
How Do You Reset The Clock On This Range
How Do You Reset The Clock On This Range
(Posted by GNULL 10 years ago)