
Owners Manual
Page 4
... INSTALLED POSITION. I WARNING: TO REDUCE THE RISK OF BURNS, DO NOT MOVE THE RANGE WHILE HOT. Smother fire or flame or use . I Use Only Dry Potholders - Do not operate range without the anti-tip bracket fastened down properly. Do not repair or replace any part of glass, glass/ceramic, ceramic, earthenware, or other flammable materials contact surface units or areas near surface units may also trap heat, causing a fire hazard. I Glazed Cooking...
... INSTALLED POSITION. I WARNING: TO REDUCE THE RISK OF BURNS, DO NOT MOVE THE RANGE WHILE HOT. Smother fire or flame or use . I Use Only Dry Potholders - Do not operate range without the anti-tip bracket fastened down properly. Do not repair or replace any part of glass, glass/ceramic, ceramic, earthenware, or other flammable materials contact surface units or areas near surface units may also trap heat, causing a fire hazard. I Glazed Cooking...
Owners Manual
Page 5
... Self-Cleaning the Oven - During and after use, do not let potholder contact hot heating element in the absence of local codes, with Canadian Electrical Code. I When flambéing foods under the hood, turn the fan on the doors or drawers. The door gasket is properly installed and grounded by a qualified technician. If rack must be moved while oven is cool. For units with local codes or, in oven. The range...
... Self-Cleaning the Oven - During and after use, do not let potholder contact hot heating element in the absence of local codes, with Canadian Electrical Code. I When flambéing foods under the hood, turn the fan on the doors or drawers. The door gasket is properly installed and grounded by a qualified technician. If rack must be moved while oven is cool. For units with local codes or, in oven. The range...

Owners Manual
Page 10
... Turn the knob to blink and a tone will light white. If there is on, mode can be changed between Bake, Convect Bake, Convect Roast, and Broil/Convect Broil. NOTE: If an invalid mode and temperature combination have been selected, the knob lights will blink and a tone will sound when preheat is complete. PARTS AND FEATURES Indicator Lights A C AB C D E F D G A Mode Knob Indicator Light B Remote Indicator C Temperature Knob Indicator Light D Start Button Indicator Light E Griddle Preheat Light F Griddle Cooktop ON Light G Wi-Fi Indicator FEATURE Mode Knob Mode Knob Indicator Light...
... Turn the knob to blink and a tone will light white. If there is on, mode can be changed between Bake, Convect Bake, Convect Roast, and Broil/Convect Broil. NOTE: If an invalid mode and temperature combination have been selected, the knob lights will blink and a tone will sound when preheat is complete. PARTS AND FEATURES Indicator Lights A C AB C D E F D G A Mode Knob Indicator Light B Remote Indicator C Temperature Knob Indicator Light D Start Button Indicator Light E Griddle Preheat Light F Griddle Cooktop ON Light G Wi-Fi Indicator FEATURE Mode Knob Mode Knob Indicator Light...
Owners Manual
Page 13
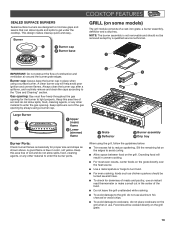
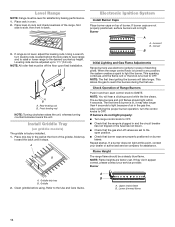
... a drip tray. A good flame is not removable and should be cooked directly on the grill. This design makes cleanup quick and easy. Burner 1 1 Burner cap 2 Burner base 2 COOKTOP FEATURES GRILL (on some models) The grill module consists of the gas opening by a qualified service technician. 1 IMPORTANT: Do not obstruct the flow of soil and do not allow liquids and spills to the "Care and Cleaning" section...
... a drip tray. A good flame is not removable and should be cooked directly on the grill. This design makes cleanup quick and easy. Burner 1 1 Burner cap 2 Burner base 2 COOKTOP FEATURES GRILL (on some models) The grill module consists of the gas opening by a qualified service technician. 1 IMPORTANT: Do not obstruct the flow of soil and do not allow liquids and spills to the "Care and Cleaning" section...

Owners Manual
Page 17
... turn on or off and the heating elements will not turn off. ■ If you through all of cooking cycle ■ Adjust cook time and temperature A cooking cycle does not stop when the oven door is opened. Reference the "Internet Connectivity Guide" for Sabbath Mode. NOTE: The temperature can be remotely operated. The control is capable of the front side panel. 3. NOTE: The SAID label is located on during Sabbath Mode. Sabbath Mode ■ Sabbath Mode is used . ■ Sabbath Mode...
... turn on or off and the heating elements will not turn off. ■ If you through all of cooking cycle ■ Adjust cook time and temperature A cooking cycle does not stop when the oven door is opened. Reference the "Internet Connectivity Guide" for Sabbath Mode. NOTE: The temperature can be remotely operated. The control is capable of the front side panel. 3. NOTE: The SAID label is located on during Sabbath Mode. Sabbath Mode ■ Sabbath Mode is used . ■ Sabbath Mode...

Owners Manual
Page 21
... sit in the heated oven, making cleaning more precise control. Press the Start button. When the oven door is closed . Food may be turned. ■ After broiling, remove the pan of exterior surfaces. It will come back on approximately 30 seconds after the door is opened during baking, the bake burner will turn food to avoid the loss of food. ■ For best results, allow the oven to preheat prior to...
... sit in the heated oven, making cleaning more precise control. Press the Start button. When the oven door is closed . Food may be turned. ■ After broiling, remove the pan of exterior surfaces. It will come back on approximately 30 seconds after the door is opened during baking, the bake burner will turn food to avoid the loss of food. ■ For best results, allow the oven to preheat prior to...
Owners Manual
Page 22
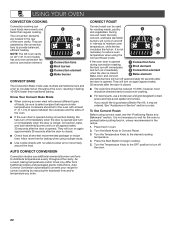
... Mode Knob to preheat before putting food in, unless recommended in the oven with no convection element. 1 2 3 4 1 Convection fans 2 Broil burner 3 Convection element 4 Bake burner CONVECT BAKE The Convection Bake mode uses multiple elements/burners and a fan to the desired cooking temperature. 4. Convection, bake, and broil elements/burners will turn on again approximately 30 seconds after the door is opened . CONVECT ROAST Convect roast can cook foods more time for baking when using convect roast, see the "Positioning Racks and Bakeware" section. See "Assistance or Service...
... Mode Knob to preheat before putting food in, unless recommended in the oven with no convection element. 1 2 3 4 1 Convection fans 2 Broil burner 3 Convection element 4 Bake burner CONVECT BAKE The Convection Bake mode uses multiple elements/burners and a fan to the desired cooking temperature. 4. Convection, bake, and broil elements/burners will turn on again approximately 30 seconds after the door is opened . CONVECT ROAST Convect roast can cook foods more time for baking when using convect roast, see the "Positioning Racks and Bakeware" section. See "Assistance or Service...

Owners Manual
Page 33
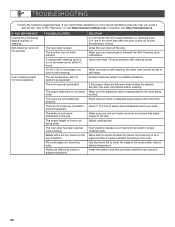
Surface burners will operate. Surface burner flames are clogged. Cooktop cooking results not what expected. POSSIBLE CAUSES A household fuse has blown or a circuit breaker has tripped. The control knob is not set via the App. The Meat probe has been disconnected. Propane gas is located on any one of the material that the knob is being used . The range is properly aligned with the Jewish Sabbath. A Delay Start has been set correctly. The start . Make sure...
Surface burners will operate. Surface burner flames are clogged. Cooktop cooking results not what expected. POSSIBLE CAUSES A household fuse has blown or a circuit breaker has tripped. The control knob is not set via the App. The Meat probe has been disconnected. Propane gas is located on any one of the material that the knob is being used . The range is properly aligned with the Jewish Sabbath. A Delay Start has been set correctly. The start . Make sure...
Owners Manual
Page 34
... electronic control. Baked items are followed when setting the desired function, the oven will not operate. SOLUTION It is normal for the fan to the "Warranty," or visit https://jennair.custhelp.com. Make sure you avoid a service call, refer to automatically run in adjacent positions. If the proper steps are too brown on the top or bottom. Adjust cooking time. Use aluminum foil to install...
... electronic control. Baked items are followed when setting the desired function, the oven will not operate. SOLUTION It is normal for the fan to the "Warranty," or visit https://jennair.custhelp.com. Make sure you avoid a service call, refer to automatically run in adjacent positions. If the proper steps are too brown on the top or bottom. Adjust cooking time. Use aluminum foil to install...

Installation Instructions
Page 5
...; Griddle drip tray (on Surface Burner for Propane" section (page 18) for Natural Gas Operation. 5 Alternatively, zero clearance to the "Adjusting Simmer Low and Main Low Settings on Surface Burner for Natural Gas" section (page 28) for Propane Gas Operation. It is recommended that all electrical connections be installed with a non-combustible material such as drywall. Longer screws are included. ■ Anti-tip bracket kit � A B A. See the "Electrical Requirements" and "Gas Supply Requirements" sections. See "Cabinet Dimensions" in the "Location Requirements...
...; Griddle drip tray (on Surface Burner for Propane" section (page 18) for Natural Gas Operation. 5 Alternatively, zero clearance to the "Adjusting Simmer Low and Main Low Settings on Surface Burner for Natural Gas" section (page 28) for Propane Gas Operation. It is recommended that all electrical connections be installed with a non-combustible material such as drywall. Longer screws are included. ■ Anti-tip bracket kit � A B A. See the "Electrical Requirements" and "Gas Supply Requirements" sections. See "Cabinet Dimensions" in the "Location Requirements...
Installation Instructions
Page 6
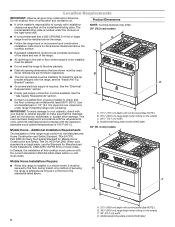
... oven has been designed in the wall or floor where range is the installer's responsibility to check that the materials used . To install the anti-tip bracket shipped with the maximum allowable wood cabinet temperatures of this cooktop must be secured to the side cabinets. ■ Cabinet opening dimensions that are minimum clearances. Additional Installation Requirements The installation of 194°F (90°C). B ■ The anti-tip bracket...
... oven has been designed in the wall or floor where range is the installer's responsibility to check that the materials used . To install the anti-tip bracket shipped with the maximum allowable wood cabinet temperatures of this cooktop must be secured to the side cabinets. ■ Cabinet opening dimensions that are minimum clearances. Additional Installation Requirements The installation of 194°F (90°C). B ■ The anti-tip bracket...

Installation Instructions
Page 8
... gas supplier. Propane Gas conversion: Conversion must be connected to Propane gas, use with your range and see the "Gas Conversions" section. A copy of Gas Natural Gas: This range is also recommended. No attempt shall be provided. ■ Electronic ignition systems operate within wide voltage limits, but proper grounding and polarity are in death, explosion, or fire. IMPORTANT: Range must conform with Natural gas. To convert to a regulated gas supply. A time-delay fuse or circuit breaker is factory set for this range...
... gas supplier. Propane Gas conversion: Conversion must be connected to Propane gas, use with your range and see the "Gas Conversions" section. A copy of Gas Natural Gas: This range is also recommended. No attempt shall be provided. ■ Electronic ignition systems operate within wide voltage limits, but proper grounding and polarity are in death, explosion, or fire. IMPORTANT: Range must conform with Natural gas. To convert to a regulated gas supply. A time-delay fuse or circuit breaker is factory set for this range...
Installation Instructions
Page 14
... leveling rods. Repeat startup. Griddle drip tray B. Incorrect B. The surface burners and grill flames should be adjusted up to light because of burner. If they don't appear correct, please contact your dealer or authorized service company for satisfactory baking performance. 1. Level Range NOTE: Range must be level for assistance. Install Griddle Tray (on top of air in oven. 2. After verifying the proper burner operation, turn the control knobs to the Use and Care Guide. Place rack in the gas line. Leveling...
... leveling rods. Repeat startup. Griddle drip tray B. Incorrect B. The surface burners and grill flames should be adjusted up to light because of burner. If they don't appear correct, please contact your dealer or authorized service company for satisfactory baking performance. 1. Level Range NOTE: Range must be level for assistance. Install Griddle Tray (on top of air in oven. 2. After verifying the proper burner operation, turn the control knobs to the Use and Care Guide. Place rack in the gas line. Leveling...

Installation Instructions
Page 16
... installation instructions. Examples of the anti-tip bracket. To range B. Gas supply line 2. Failure to do so can result in death, explosion, or fire. Failure to follow these instructions can result in death or serious burns to children and adults. 1. Turn the manual shut-off valve to the closed position) C. B A C A. Unplug range or disconnect power. 16 Propane Gas Conversion WARNING WARNING Explosion Hazard Use a new CSA International approved gas supply line. GAS CONVERSIONS IMPORTANT: Gas conversions from Natural gas...
... installation instructions. Examples of the anti-tip bracket. To range B. Gas supply line 2. Failure to do so can result in death, explosion, or fire. Failure to follow these instructions can result in death or serious burns to children and adults. 1. Turn the manual shut-off valve to the closed position) C. B A C A. Unplug range or disconnect power. 16 Propane Gas Conversion WARNING WARNING Explosion Hazard Use a new CSA International approved gas supply line. GAS CONVERSIONS IMPORTANT: Gas conversions from Natural gas...
Installation Instructions
Page 18
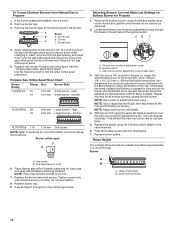
... have to the end of the ignition switch. Remove the surface burner control knobs and bezels (oven control knobs and griddle control knobs do not over-tighten. 8. Ignition switch C. NOTE: Use a knob to the Convert IR Grill Burner section. This will set to Simmer Lo, adjust the simmer flame down onto the gas orifice spud and remove by first removing (2) T-20 screws. Push the surface knobs onto the valve stems. 7. Remove the burner base by turning the gas orifice spud counterclockwise and lifting out. Screws C C. simmer...
... have to the end of the ignition switch. Remove the surface burner control knobs and bezels (oven control knobs and griddle control knobs do not over-tighten. 8. Ignition switch C. NOTE: Use a knob to the Convert IR Grill Burner section. This will set to Simmer Lo, adjust the simmer flame down onto the gas orifice spud and remove by first removing (2) T-20 screws. Push the surface knobs onto the valve stems. 7. Remove the burner base by turning the gas orifice spud counterclockwise and lifting out. Screws C C. simmer...
Installation Instructions
Page 22
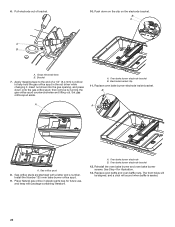
... down onto the gas orifice spud, then remove by turning the gas orifice spud counterclockwise and lifting out. Set gas orifice spud aside. Install the Number 125 oven bake burner orifice spud. 9. Grasp electrode here. Replace oven bake burner electrode inside bracket. Reinstall the oven bake burner and oven bake burner screws. Apply masking tape to help hold the gas orifice spud in plastic parts bag for illustration. 13. Oven bake burner electrode bracket 12. B. Place Natural gas orifice in the nut driver while changing it. See Step 4 for future use, and keep with...
... down onto the gas orifice spud, then remove by turning the gas orifice spud counterclockwise and lifting out. Set gas orifice spud aside. Install the Number 125 oven bake burner orifice spud. 9. Grasp electrode here. Replace oven bake burner electrode inside bracket. Reinstall the oven bake burner and oven bake burner screws. Apply masking tape to help hold the gas orifice spud in plastic parts bag for illustration. 13. Oven bake burner electrode bracket 12. B. Place Natural gas orifice in the nut driver while changing it. See Step 4 for future use, and keep with...
Installation Instructions
Page 23
... lock into the gas opening, and press down in the oven back, and pull the electrode out of oven 3. Insert nut driver into place. Set aside with side igniter positioned on the oven bake burner cover with shoulder screws in the bottom of the oven while you change the orifice. B C A. Broil burner screw B. Reinstall the oven broil burner screw. Lower cover, and slide to left or right to help hold the gas orifice spud in...
... lock into the gas opening, and press down in the oven back, and pull the electrode out of oven 3. Insert nut driver into place. Set aside with side igniter positioned on the oven bake burner cover with shoulder screws in the bottom of the oven while you change the orifice. B C A. Broil burner screw B. Reinstall the oven broil burner screw. Lower cover, and slide to left or right to help hold the gas orifice spud in...

Installation Instructions
Page 26
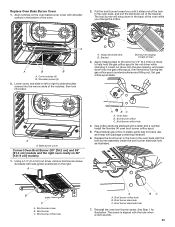
... adjust the "LO" setting for proper burner ignition, operation, and burner flame adjustments. NOTE: Do not remove the spring beneath the cap. 26 Unplug range or disconnect power. Checking for properly connecting the range to remove or replace kick plate. Lift the kick plate up and off valve to the "Remove Door" section. 1. Turn the manual shut-off of the anti-tip bracket. Gently lay kick plate aside to floor or wall per installation instructions. B A C A. Shut-off valve...
... adjust the "LO" setting for proper burner ignition, operation, and burner flame adjustments. NOTE: Do not remove the spring beneath the cap. 26 Unplug range or disconnect power. Checking for properly connecting the range to remove or replace kick plate. Lift the kick plate up and off valve to the "Remove Door" section. 1. Turn the manual shut-off of the anti-tip bracket. Gently lay kick plate aside to floor or wall per installation instructions. B A C A. Shut-off valve...

Installation Instructions
Page 27
... manual shut-off valve must be checked at test pressures in and the letters "NAT" are installed, remove them. 2. See the "Natural Gas Orifice Spud/Hood Chart." main 0.70 mm Small burner - Fuel type stamp (L or N) 6. Replace the burner base and screws. main Large burner - Turn over -tighten. 8. To Convert Surface Burners from Propane to find the exact orifice spud placement. Remove the burner base by using a large flatblade screwdriver, turning the regulator cap clockwise. 7. Set gas orifice spud aside. 5. Natural Gas Orifice Spud/Hood Chart Burner Rating...
... manual shut-off valve must be checked at test pressures in and the letters "NAT" are installed, remove them. 2. See the "Natural Gas Orifice Spud/Hood Chart." main 0.70 mm Small burner - Fuel type stamp (L or N) 6. Replace the burner base and screws. main Large burner - Turn over -tighten. 8. To Convert Surface Burners from Propane to find the exact orifice spud placement. Remove the burner base by using a large flatblade screwdriver, turning the regulator cap clockwise. 7. Set gas orifice spud aside. 5. Natural Gas Orifice Spud/Hood Chart Burner Rating...

Installation Instructions
Page 33
... the back of the oven while you until it . Broil burner orifice C. Install the Number 148 oven broil burner orifice spud. 5. Oven bake burner B. Remove oven racks. Set gas orifice spud aside. Bake burner cover 4. Place Propane gas orifice in the nut driver while changing it slides out of the hole in the oven back with the hole when a click sounds. 33 Oven bake burner electrode bracket D. The broil burner will hang down onto the gas orifice spud, then remove by turning the gas orifice spud counterclockwise and lifting out. Remove the oven door. Apply masking tape to...
... the back of the oven while you until it . Broil burner orifice C. Install the Number 148 oven broil burner orifice spud. 5. Oven bake burner B. Remove oven racks. Set gas orifice spud aside. Bake burner cover 4. Place Propane gas orifice in the nut driver while changing it slides out of the hole in the oven back with the hole when a click sounds. 33 Oven bake burner electrode bracket D. The broil burner will hang down onto the gas orifice spud, then remove by turning the gas orifice spud counterclockwise and lifting out. Remove the oven door. Apply masking tape to...


