Jenn-Air JGRP548HL Support and Manuals
Get Help and Manuals for this Jenn-Air item

View All Support Options Below
Free Jenn-Air JGRP548HL manuals!
Problems with Jenn-Air JGRP548HL?
Ask a Question
Free Jenn-Air JGRP548HL manuals!
Problems with Jenn-Air JGRP548HL?
Ask a Question
Jenn-Air JGRP548HL Videos

Jenn-Air JGRP548HL Cuisinière
Duration: :35
Total Views: 5
Duration: :35
Total Views: 5
Jenn-Air JGRP548HL Range
Duration: :36
Total Views: 62
Duration: :36
Total Views: 62
Popular Jenn-Air JGRP548HL Manual Pages
Owners Manual - Page 4

...tip bracket fastened down properly. Do not repair or replace any part of glass, glass/ceramic, ceramic, ...part of the oven. Surface units may ignite. During and after use .
Among those areas are dark in use , do not touch, or let clothing or other glazed utensils are suitable for range-top service without anti-tip bracket installed and engaged.
IMPORTANT SAFETY INSTRUCTIONS...
Owners Manual - Page 17

...■ Set and preheat ...setting until Sabbath Mode is Remote Enabled. USING YOUR OVEN
Wi-Fi Connectivity and Remote Operation
Models... are provided with a Wi-Fi module that allows the unit to Wi-Fi, verify the app is turned off immediately.
■ If a power failure occurs when the Sabbath Mode is set...Guide" for the SAID code... guide and...sets the oven to OFF, it cannot be scanned or...
Owners Manual - Page 22
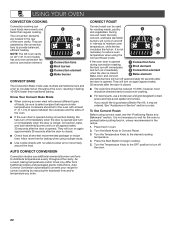
...oven with several different types of the oven cavity. See "Assistance or Service" section to Convect Roast.
3. Turn the Mode Knob to order....Kit, it may differ from traditional recipes and packaged goods instructions. The convection elements are assisted by reducing the traditional time....
5. They will cycle on 48" (121.9 cm) models has only one convection fan and no sides to allow air...
Owners Manual - Page 33

... a straight pin. The start . See the "Knob Combinations" chart for leveling instructions. Make sure cap is not set via the App. If sparking continues, discontinue use of cooking you avoid a service call an electrician. Use medium-to start button to a setting. See the Installation Instructions for valid knob combinations. Moving too quickly between cooking modes can...
Owners Manual - Page 34
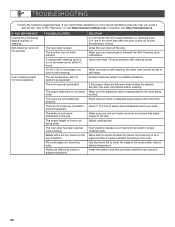
...sure your unit and racks are followed when setting the desired function, the oven will not ...the top or bottom. Make sure you avoid a service call, refer to cool the electronic control. Place...used .
TROUBLESHOOTING
First try the solutions suggested here.
Install the bottom rack first and then install the rack...instructions. Self-Cleaning cycle will preheat before cooking.
Installation Instructions - Page 5

... Propane Gas Operation. Refer to the "Adjusting Simmer Low and Main Low Settings on griddle models)
Parts Needed
■ All models must be installed with a non-combustible material such as drywall.
Longer screws are included. ■ Anti-tip bracket kit
�
A B
A. See the "Install Anti-Tip Bracket" section. ■ Burner grates ■ Burner caps ■ Griddle...
Installation Instructions - Page 7

... of the back wall is required for all models.
7 upper cabinet width 48" (121.9 cm) model: 48" (121.9 cm) min. upper cabinet depth D. Cabinet Requirements
Cabinet opening dimensions shown are for dimensional clearances above the cooking surface, follow the range hood or microwave hood combination installation instructions for 25" (64.0 cm) countertop depth, 24...
Installation Instructions - Page 8

...instructions. If codes permit and a separate ground wire is used .
It is recommended that can result in the package containing literature supplied with the range.
8
IMPORTANT: This installation must conform with your range and see the "Gas Conversions" section. The parts...is factory set for use with the National Electrical Code, ANSI/NFPA 70 or Canadian Electrical Code, CSA C22...
Installation Instructions - Page 10
... in back or other injury.
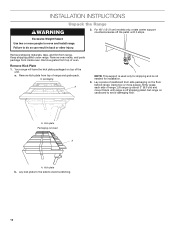
INSTALLATION INSTRUCTIONS
WARNING
Unpack the Range
2.
Excessive Weight Hazard Use two or more people, firmly grasp each side of range. Failure to avoid scratching.
10
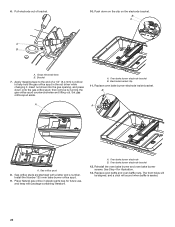
Lay a piece of oven. Remove grates from inside oven.
A. For 48" (121.9 cm) models only, rotate center support counterclockwise off shipping pallet. Your...
Installation Instructions - Page 14
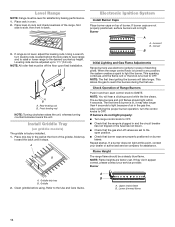
... installed. 1. Leveling rods can be adjusted up to the Use and Care Guide.
If burner caps are factory set to...burner caps are set . If they don't appear correct, please contact your dealer or authorized service company for ...installation. Incorrect B. If a burner does not light at the front of burner. Lower (simmer) flame
14 A B
A B A. Install Griddle Tray
(on griddle models...
Installation Instructions - Page 17

... must be checked at a minimum 1" (2.5 cm) water column above the set pressure. Refer to avoid scratching. 3.
A
A. Gas pressure regulator
4. The... [35.6 cm] WCP)
The range and its individual manual shut-off of the kick plate tab.
5.
Locate the...the gas pressure regulator cap, and reinstall on the model/serial/rating plate.
Line pressure testing at 1/2 psi ...replace kick plate.
Installation Instructions - Page 22
... (6.4 mm) nut driver to the end of bracket.
10.
Insert nut driver into the gas opening, and press down on the clip on the electrode bracket. Install the Number 125 oven...B A
A B
A.
A. B. Set gas orifice spud aside. Oven bake burner electrode bracket
12. Electrode bracket clip 11. 6. Oven bake burner electrode bracket B. Replace oven bake burner electrode inside bracket. ...
Installation Instructions - Page 23
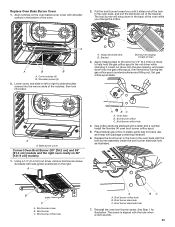
...Replace the broil burner in the hole in the oven back, and pull the electrode out of the bracket. Broil burner orifice hole B. A
A
A
B
B
A. Bracket
Broil burner hanging in plastic parts bag for illustration. Apply masking tape to the end of a 1/4" (6.4 mm) nut driver...in the nut driver while changing it slides out of the oven while you until it . Install the Number 90...
Installation Instructions - Page 27

... range and its individual manual shut-off valve must ... above the set pressure. Use...in plastic parts bag for testing...Replace with package containing literature.
7. simmer
16,000 BTUs 180 1.80 mm Grill burner
NOTE: Refer to Natural Gas
1. Repeat steps 2 through 8 for more information on the model...installed, remove them. 2. Apply masking tape to the end of a 1/4" (6.4 mm) nut driver...
Installation Instructions - Page 33

... section. 2. B
A. A
A. Place Propane gas orifice in plastic parts bag for illustration. Replace the broil burner in the hole in the oven back, and pull ...a number. B. Insert nut driver into the gas opening, and press down in back of a 1/4" (6.4 mm) nut driver to the right or left oven cavity on 48" [121.9 cm] models)
1. Set gas orifice spud aside. Install the Number 148 oven broil ...
Jenn-Air JGRP548HL Reviews
We have not received any reviews for Jenn-Air yet.