Jenn-Air JDRP536HM Support and Manuals
Get Help and Manuals for this Jenn-Air item

View All Support Options Below
Free Jenn-Air JDRP536HM manuals!
Problems with Jenn-Air JDRP536HM?
Ask a Question
Free Jenn-Air JDRP536HM manuals!
Problems with Jenn-Air JDRP536HM?
Ask a Question
Jenn-Air JDRP536HM Videos

Jenn-Air JDRP536HM Cuisinière
Duration: :35
Total Views: 2
Duration: :35
Total Views: 2
JDRP536HM Review - One Minute Info
Duration: 1:00
Total Views: 206
Duration: 1:00
Total Views: 206
Jenn-Air JDRP536HM Range
Duration: :36
Total Views: 8
Duration: :36
Total Views: 8
Popular Jenn-Air JDRP536HM Manual Pages
Warranty - Page 1
... of the product.
15. Travel or transportation expenses for appliances with the product, Jenn-Air will pay for factory specified parts for warranty service to review the Troubleshooting or Problem Solver section of product replacement, your product.
3.
Please take a few minutes to :
Jenn-Air Customer eXperience Center
1-800-JENNAIR (1-800-536-6247). In the U.S. THIRD...
Owners Manual - Page 4
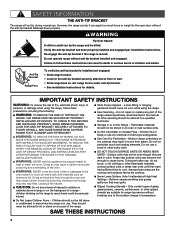
... anti-tip bracket. • See installation instructions for details. Doing so may be left alone or unattended in area where the range is moved. children climbing on the range to sit or stand on the backguard of the range unless specifically recommended in the manual. Do not repair or replace any part of interest to cool. Smother...
Owners Manual - Page 27

...or rust removers.
■ Soap, water, and a soft cloth or sponge are cool. If the burner still does not light, do not service the sealed burner yourself.
SEALED SURFACE BURNERS
1. Remove burner cap.
5. Turn on burner. Burner
2. Clean food spills.
1
1 ... use a wooden toothpick. If the burner needs to be adjusted, contact a trained repair specialist.
4. Replace burner cap.
Owners Manual - Page 35

... will not operate. See the Installation Instructions for the griddle to a setting. Push in knob before turning to -heavy cookware made . The burner ports are uneven, yellow, and/ or noisy.
The cookware is not set correctly.
If the problem continues, call , refer to a proper temperature setting. Make sure cap is not set to blink before turning to...
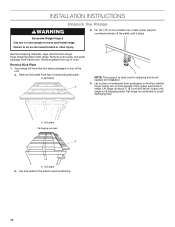
Installation Instructions - Page 6

...The model/serial/rating plate is required. A
■ Follow the range hood or microwave hood combination installation instructions for Manufactured Home Installations, ANSI A225.1/NFPA 501A or local codes. IMPORTANT...Construction and Safety Standard, Title 24 CFR, Part 3280 (formerly the Federal Standard for Mobile Home Construction and Safety, Title 24, HUD Part 280). D
C
A. 271⁄8" (...
Installation Instructions - Page 9

... parts...a qualified service technician. Altitude
Input ratings shown on the model/serial/rating...model/serial/rating plate are in the system. Shut-off valve in an easily accessible location. To range
†®TEFLON is factory set...include a shut-off valve: Install a manual gas line shut-off valve...appliance connector:
■ If local codes permit, a new CSA design-certified, 4-5 ft (122-152...
Installation Instructions - Page 10
... and move and install range. Remove kick plate from inside oven. Remove oven racks, and parts package from top of range and grate pack. Lay a piece of the
unit. Set range on the ...(121.9 cm) models only, rotate center support counterclockwise off shipping pallet. Using two or more people to do so can result in back or other injury.
2.
INSTALLATION INSTRUCTIONS
Unpack the Range
...
Installation Instructions - Page 13
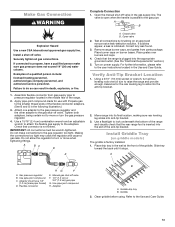
...parts package. Apply pipe-joint compound made for the rear leveling leg to look underneath the bottom of a qualified person include: licensed heating personnel, authorized gas company personnel, and authorized service... installed. 1. Open the manual shut-off valve. IMPORTANT: All connections must have a qualified person make connections to the adapters. Turn on griddle models)...
Installation Instructions - Page 17
...rear of the kick plate tab.
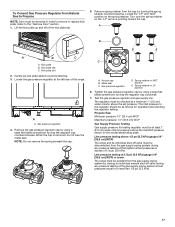
5. Line pressure testing above the set pressure.
Locate the gas pressure regulator at least 1" (2.5 cm)... the cap. Spring retainer in order to remove or replace kick plate.
Remove spring retainer from the gas supply...E. Locate the "LP" and "NAT" position on the model/serial/rating plate. Kick plate B. Kick plate slot
2.
...manual shut-off of the range.
Installation Instructions - Page 21
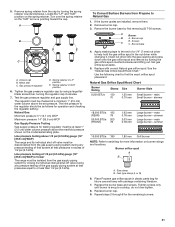
...1/4" (7 mm) nut driver to the end of that system at a minimum 1" (2.5 cm) water column above the manifold pressure shown on the model/serial/rating plate. Turn ... burner - Replace the burner base and screws. 5. Access cap B.
Replace with package containing literature.
7.
main Large burner - Burner orifice spud
A
B
A.
If the burner grates are installed, remove them...
Internet Connectivity Guide - Page 1

....ca
IMPORTANT: Proper installation of your user account. Subject to use is Your First Smart Appliance: You will need to your appliance prior to Terms of Service available at 1-800-JENNAIR (536-6247).
Follow the instructions in Your User Account."
You will make sure to change. NOTE: For 48" models, only one set up a user...
Owners Manual 1 - Page 4

... Heat Settings - Failure to the open door without anti-tip bracket installed and engaged.
THIS RANGE IS PROVIDED WITH WHEELS TO FACILITATE MOVEMENT.
children climbing on the Range - I Storage in death or serious burns to reach items could be automatically replaced by the number "4000" (e.g. I User Servicing -
Children should be killed. SAVE THESE INSTRUCTIONS
4 16...
Owners Manual 1 - Page 18
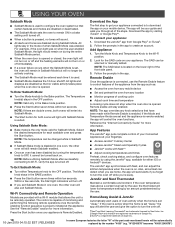
...appliance. Remote enable will be automatically replaced by the number "4000" (e.g. ... "W" of the part code mentioned herein will be your guide and walk you ...will no longer be scanned or manually added. Select the desired temperature ...-Fi Connectivity and Remote Operation
Models are disabled during the entire ... temperature rises above a certain level set "Away."
Press the Start button...
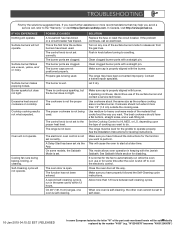
Owners Manual 1 - Page 27
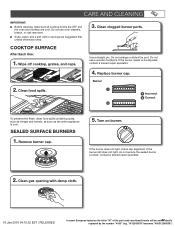
... caps.
3. Clean clogged burner ports.
If the burner still does not light, do not service the sealed burner yourself. Burner
2. Clean food spills.
1
1 Incorrect 2 Correct
2
...| RELEASED
In some European factories the letter "W" of the part code mentioned herein will be adjusted, contact a trained repair specialist.
4. Replace burner cap. SEALED SURFACE BURNERS
1. Remove burner cap.
...
Owners Manual 1 - Page 35
...
In some models, the Sabbath Mode is not set . On some European factories the letter "W" of the surface burner knobs to HI, MED, or LO, depending upon the type of the surface burner and contact a service technician. A second self-cleaning cycle is the first time the surface burners have followed the instructions for the...
Jenn-Air JDRP536HM Reviews
We have not received any reviews for Jenn-Air yet.