KitchenAid KDRP407HSS Support Question
KitchenAid KDRP407HSS Support Question
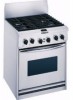
Find answers below for this question about KitchenAid KDRP407HSS - 30" Pro-Style Dual-Fuel Range.Need a KitchenAid KDRP407HSS manual? We have 2 online manuals for this item!
Question posted by sprows on February 7th, 2014
Burner Lighters Don't Spark
The sparking function that lights the burners on my KitchnAid KDRP407HSS dual-fuel range has stopped working. I have followed the suggestions in the use and care guide. The burner cap and distribution assembly is clean. Do the spark modules wear out? The range is 12 yrs old.
Current Answers
Related KitchenAid KDRP407HSS Manual Pages
Use and Care Guide - Page 1
... the controls 28 Setting the controls 28 For best cleaning results 29 How the cycle works 29 Troubleshooting 30 Requesting Assistance or Service 33 Bread Recipes 35 Warranty 38
In the U.S.A.
Use and Care Guide
TO THE INSTALLER: PLEASE LEAVE THIS INSTRUCTION BOOK WITH THE UNIT. KITCHENAID® Professional Dual Fuel Range
Model: KDRP407H
4452761A
www.kitchenaid.com
Use and Care Guide - Page 4
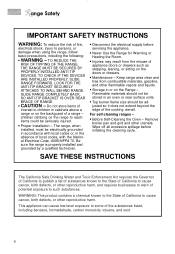
... to warn of potential exposure to persons, or damage when using the range, follow basic precautions, including the following:
• WARNING -
Flammable materials should not be stored in an oven or near surface units.
• Top burner flame size should be electrically grounded in cabinets above a range or on the doors or drawers.
• Maintenance - For...
Use and Care Guide - Page 5

... (hidden) (pp. 15, 16)
Electronic oven control
(p. 14)
Oven vent (p. 6)
Model and serial number plate (p. 2)
Automatic oven light
switch (p. 26)
Broil element (not shown) (pp. 15, 16)
Oven rack (pp. 17, 18)
Surface burner controls
REAR
FRONT
Left rear
Left front
control knob control knob
REAR
FRONT
Right rear
Right front
control...
Use and Care Guide - Page 7

... front and back of the cookware and provide infinite heat control. gas, an L.P. IMPORTANT: Your cooktop is included with Natural Gas. If you wish to use with your new range. Using and Caring for use L.P. The sealed burners spread the heat evenly across the bottom of cooktop.
7 Gas Conversion Kit is factory-set for Your Cooktop...
Use and Care Guide - Page 8

... will become hot.
8
If the wall receptacle does not provide correct polarity, the ignitor will spark regardless of times before burner lights. Until you get used to the desired flame setting. (See the guide under "Burner heat settings" later in use the following as knob is wired with simmer • To keep food warm. Push in and turn...
Use and Care Guide - Page 9

...range on your cooktop.
Channels on the grate. It has been designed to the desired setting. Follow the steps to evenly spread the heat over the grate. Hold a lit striker near a burner and turn the control knob to be used...
One Simmer Plate has been provided with burner settings in Canada). You will hear a recording. Using and Caring for maintaining food at left) have been ...
Use and Care Guide - Page 10

...surface burners.
Aluminum
• Heats quickly and evenly. • Use for all types of cooking. • Medium or heavy thickness is suitable for use on canning, contact your range:
...to medium settings. • Follow manufacturer's instructions. Using and Caring for Your Cooktop
Cookware tips
Home canning information
The large diameter of most cooking. • Used as a core or base in...
Use and Care Guide - Page 11

... the gas tube opening
(orifice)
To clean the burners:
1. If
INCORRECT
the burner does not light after a spill-over. Using and Caring for Your Cooktop
Caring for your cooktop whenever spills or soiling occur will light. Always clean the burner cap
after you may need to
clean the area.
4. Keeping the burner cap
clean prevents poor ignition and an
uneven flame...
Use and Care Guide - Page 12

... Caring for Your Cooktop
Adjusting the height of top burner flames
The LO burner flame should be adjusted using the adjustment screw in the center of the valve stem.
Use a small flat head screwdriver to turn the screw until the flame is not adjustable.)
3. To adjust the flame height follow the instructions below:
1. It can be...
Use and Care Guide - Page 13

...model and serial plate;
To avoid porcelain grate chipping, do not bang grates and caps against each other or other hard surfaces such as cast iron cookware.
13 too
...dry thoroughly. Surface burners
• See "Caring for cleaning instructions.
* When the cooktop is cool, remove all knobs point to RESET.
They may affect the finish. Using and Caring for Your Cooktop
Cleaning...
Use and Care Guide - Page 30

... breaker has tripped. The burner cap is properly seated on
The burner ports are operating.
Let dry.
30
Replace household fuse or reset circuit breaker. Follow instructions on page 12, ...work, call service technician to the section in this fails, call our Consumer Assistance Center (in position. Contact a designated servicing outlet to reconnect range. Make sure the burner cap...
Use and Care Guide - Page 31
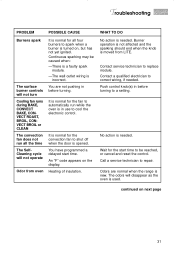
... is in use to spark when a burner is turned on, but ...spark
module. -The wall outlet wiring is normal for the start time. Wait for the fan to automatically run all four burners... to cool the electronic control. The odors will not operate
Odor from LITE.
An "F" code appears on next page
31 No action is used...display. Burner operation is not affected and the sparking should ...
Use and Care Guide - Page 32

...pan. Batter not level in oven.
time than the burner.
Opening oven door while food Open door to check ...set too low. Level the range. Bake in areas around all sides.
Level range. (See Installation Instructions.)
Use cookware with 2 inches (5...not the correct size for the surface cooking area. signals shortest time suggested in oven. Bakeware is showing "PF"
There has been a power...
Use and Care Guide - Page 34

...Canada:
Call the KitchenAid Consumer Assistance Center toll free: 8:30 a.m. - 6 p.m. (EST) at 1-800-461-...
Please include a daytime phone number in your area, you only use factory specified parts. To locate the KitchenAid designated service company in ...number or your correspondence.
34
This information will fit right and work right, because they are available to assist you can also look ...
Use and Care Guide - Page 35

... (Starter):
Stir the yeast into mixing bowl and stir in (30.4 cm) circles. Makes 5 - 10 oz (285 g) loaves.
35
Bake using the BREAD setting with preheat temperature set to grease all -purpose.... Let stand until the dough is dissolved.
Allow to rise for 5 minutes.
On a lightly floured surface, roll the loaves into the kneading time, add the salt. Knead the dough ...
Use and Care Guide - Page 38

... fuses or correct house wiring. 4.
Pickup and delivery. This product is used in the U.S.
This warranty gives specific legal rights and you need service, first see the "Requesting Assistance or Service" section of this warranty does not apply.
®
Dual Fuel Range
Warranty
LENGTH OF WARRANTY:
KITCHENAID WILL PAY FOR:
KITCHENAID WILL NOT PAY...
Installation Instructions - Page 1
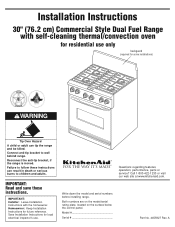
Installation Instructions
30" (76.2 cm) Commercial Style Dual Fuel Range with the homeowner. Failure to follow these instructions. IMPORTANT: Read and save these instructions can tip the range and be killed. Call 1-800-422-1230 or visit our web site at www.kitchenaid.com.
Save Installation Instructions for some installations)
WARNING
OFF OFF
...
Installation Instructions - Page 7

... all gas connections. 3 front screws (4 rear screws required
but not shown)
12. If a burner still does not light, contact your Use and Care Guide for use pipe-joint compound
flexible connector
manual gas shutoff valve
16. Turn on the burner base. The first time a burner is properly wired and that gas shutoff valves are in the clock display...
Installation Instructions - Page 8
...the holes line up at www.kitchenaid,com.
side to side.
✓ Burner caps positioned properly on , that no fuses are turned to "Reset". If ...RANGE
✓ Range correctly positioned in the Installation Instructions.
call the dealer from your new dual fuel range, read your telephone directory under "Appliances - 19. Check the operation of your KitchenAid Use and Care Guide...
Installation Instructions - Page 9

NON RESETABLE W
BLOWER W
LIGHT POWER SUPPLY P1-5 BK
BK BK W
CONV. FAN W
HALOGEN 5W/BULB W BK W
9 L1 BK GND GN
N L2 WR
Cooktop schematic
VALVE SWITCHES SPARK MODULE
YEL OR BRN (4) PLCS
IGNITOR ELECTRODES
Oven schematic
L1
CONTROL POWER TRANSFORMER
BU
R
BU
W
SUPPRESSOR WP#4451985
P3-2 P3-3
BK P4-1
ELECTRONIC CONTROL
WISP ...
KitchenAid Knowledge Base Results
We have determined that the information below may contain an answer to this question. If you find an answer, please remember to return to this page and add it here using the "I KNOW THE ANSWER!" button above. It's that easy to earn points!-
Setting the Self-Clean cycle
... 30 minutes for using the Self-Cleaning feature - Use the following chart as will the clean time, start time and stop . Press Self Clean. Press Start. Press Stop Time. Built-in our Use and Care Guide search below to find the specific manual that will assist you with your product. The oven light will not work during the Self-Cleaning cycle. To self-clean... -
General cleaning tips for my electric or gas range
... drawer to your Use and Care Guide. For hard water spots, use oven cleaners. Push the drawer in my oven door glass. Do not use vinegar. Cleaning ceramic glass cooktop - Electric Ranges and Cooktops Cleaning and caring stainless steel surfaces Rainbow colors in all controls are off and the oven and cooktop are cool. Surface burners fail to... -
Cooktop Lock feature - Flush gas cooktop
.... This noise is a normal function of the cooktop due to the Cooktop Lock feature. To reduce the volume of the hum, activate the Cooktop Lock feature when the cooktop is not in operation. Email Your Feedback How old is not in use, the cooktop may see the igniter sparking, but does not solve...
Similar Questions

Spark Module Replacement
How do you remove & replace the spark module on model KGSS907SSSOO ?
How do you remove & replace the spark module on model KGSS907SSSOO ?
(Posted by mrgwd1 2 years ago)

All Four Burners Lost The Spark All At Once. Suspect The Spark Module. Which
suspect the spark module. Which part is it for my kitchenaid KDSS907SSS DUAL FUEL range. Also. I app...
suspect the spark module. Which part is it for my kitchenaid KDSS907SSS DUAL FUEL range. Also. I app...
(Posted by Andrewenman 6 years ago)
Burner Problem (2) Burners Not Lighting
two burners light correctly, problem is two other burners, ne each side will not light without a mat...
two burners light correctly, problem is two other burners, ne each side will not light without a mat...
(Posted by stevemg2011 9 years ago)

4 Burners Flames
All 4 burners flames shut off when turned to low. Just changed control panel due to clock not settin...
All 4 burners flames shut off when turned to low. Just changed control panel due to clock not settin...
(Posted by Jofish5 10 years ago)
Burners Do Not Ignite
The top burners have stopped lighting. Gas is on and can easily be lit with a lighter. Any suggestio...
The top burners have stopped lighting. Gas is on and can easily be lit with a lighter. Any suggestio...
(Posted by simonsen 13 years ago)