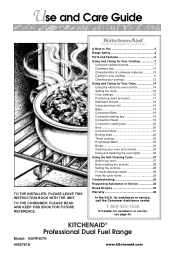
Use and Care Guide
Page 1
... 19 Convection roasting tips 20 Broil 20 Convection Broil 21 Broiling chart 22 Timed cooking 22 Proof/Keep Warm 23 Bread 24 Cleaning your oven and controls 24 Using and replacing the oven lights 26 Using the Self-Cleaning Cycle 27 Before you start 27 Before setting the controls 28 Setting the controls 28 For best cleaning results 29 How the cycle works 29 Troubleshooting 30 Requesting Assistance or Service 33 Bread Recipes 35 Warranty 38 In the U.S.A. KITCHENAID® Professional Dual Fuel Range Model...
... 19 Convection roasting tips 20 Broil 20 Convection Broil 21 Broiling chart 22 Timed cooking 22 Proof/Keep Warm 23 Bread 24 Cleaning your oven and controls 24 Using and replacing the oven lights 26 Using the Self-Cleaning Cycle 27 Before you start 27 Before setting the controls 28 Setting the controls 28 For best cleaning results 29 How the cycle works 29 Troubleshooting 30 Requesting Assistance or Service 33 Bread Recipes 35 Warranty 38 In the U.S.A. KITCHENAID® Professional Dual Fuel Range Model...
Use and Care Guide
Page 2
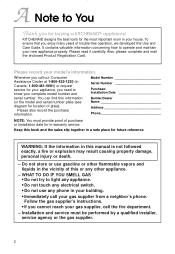
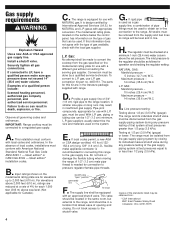
... this or any phone in -warranty service. Installation and service must provide proof of plate). Please also record the purchase information. Follow the gas supplier's instructions. • If you enjoy many years of this information on the model and serial number plate (see diagram for location of purchase or installation date for buying a KITCHENAID® appliance! A Note to operate and maintain your new appliance...
... this or any phone in -warranty service. Installation and service must provide proof of plate). Please also record the purchase information. Follow the gas supplier's instructions. • If you enjoy many years of this information on the model and serial number plate (see diagram for location of purchase or installation date for buying a KITCHENAID® appliance! A Note to operate and maintain your new appliance...
Use and Care Guide
Page 4
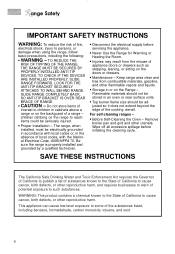
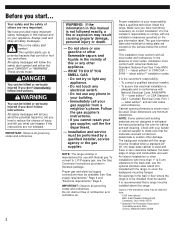
... appliance doors or drawers such as stepping, leaning, or sitting on the Range - This appliance can cause low-level exposure to some of California to warn of local codes, with local codes or, in an oven or near surface units. • Top burner flame size should be seriously injured. • Proper Installation - Keep range area clear and free from the misuse of the cooking utensil. Remove broiler pan...
... appliance doors or drawers such as stepping, leaning, or sitting on the Range - This appliance can cause low-level exposure to some of California to warn of local codes, with local codes or, in an oven or near surface units. • Top burner flame size should be seriously injured. • Proper Installation - Keep range area clear and free from the misuse of the cooking utensil. Remove broiler pan...

Use and Care Guide
Page 5
Parts and Features Feature locations Surface burners (p. 7) Surface burner controls (p. 8) Gasket (p. 27) Bake element (hidden) (pp. 15, 16) Electronic oven control (p. 14) Oven vent (p. 6) Model and serial number plate (p. 2) Automatic oven light switch (p. 26) Broil element (not shown) (pp. 15, 16) Oven rack (pp. 17, 18) Surface burner controls REAR FRONT Left rear Left front control knob control knob REAR FRONT Right rear Right front control knob control knob 5
Parts and Features Feature locations Surface burners (p. 7) Surface burner controls (p. 8) Gasket (p. 27) Bake element (hidden) (pp. 15, 16) Electronic oven control (p. 14) Oven vent (p. 6) Model and serial number plate (p. 2) Automatic oven light switch (p. 26) Broil element (not shown) (pp. 15, 16) Oven rack (pp. 17, 18) Surface burner controls REAR FRONT Left rear Left front control knob control knob REAR FRONT Right rear Right front control knob control knob 5

Use and Care Guide
Page 8
... ignitor will spark regardless of which burner you get used to the desired flame setting. (See the guide under "Burner heat settings" later in this section). Until you are necessary for Your Cooktop Using the surface burners: Control knobs 1. MED to operate, call your nearest designated service outlet. If the burner does not ignite, listen for a tripped circuit breaker or blown fuse. Turn off and the clicking will ignite the gas flowing into the burner...
... ignitor will spark regardless of which burner you get used to the desired flame setting. (See the guide under "Burner heat settings" later in this section). Until you are necessary for Your Cooktop Using the surface burners: Control knobs 1. MED to operate, call your nearest designated service outlet. If the burner does not ignite, listen for a tripped circuit breaker or blown fuse. Turn off and the clicking will ignite the gas flowing into the burner...

Use and Care Guide
Page 11
... whenever a surface burner is in use. • Let the cooktop cool before cleaning. • Do not use a wooden toothpick. A good flame is blue in a dishwasher or self-cleaning oven. 3. If the burner needs to be adjusted, call a qualified technician for the burner to light properly. To replace the burner cap, make sure all ports, you have cleaned it looking and operating like new. Do not service the sealed burner yourself...
... whenever a surface burner is in use. • Let the cooktop cool before cleaning. • Do not use a wooden toothpick. A good flame is blue in a dishwasher or self-cleaning oven. 3. If the burner needs to be adjusted, call a qualified technician for the burner to light properly. To replace the burner cap, make sure all ports, you have cleaned it looking and operating like new. Do not service the sealed burner yourself...

Use and Care Guide
Page 14
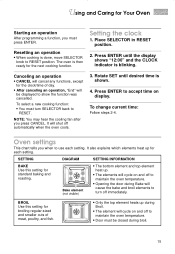
... range. Reset the clock. Using and Caring for a while. Using the electronic oven control PREHEAT 0% 100% Oven display (see below) KEEP WARM BROWNING DURATION STOP TIME CLOCK SELECTOR ENTER button SET ENTER CANCEL SELECTOR CANCEL SET control control knob button knob Display/clock • When you first power up the oven, the display will show "PF". SET • All temperature or time adjustments are done with this knob. • All temperature adjustments are selected with the cooking tips and cleaning information, for successful use of your electricity was...
... range. Reset the clock. Using and Caring for a while. Using the electronic oven control PREHEAT 0% 100% Oven display (see below) KEEP WARM BROWNING DURATION STOP TIME CLOCK SELECTOR ENTER button SET ENTER CANCEL SELECTOR CANCEL SET control control knob button knob Display/clock • When you first power up the oven, the display will show "PF". SET • All temperature or time adjustments are done with this knob. • All temperature adjustments are selected with the cooking tips and cleaning information, for successful use of your electricity was...
Use and Care Guide
Page 15
... the oven temperature. • Door must press ENTER. BROIL Use this setting for standard baking and roasting. Using and Caring for Your Oven Starting an operation After programming a function, you press CANCEL. Resetting an operation • When cooking is shown. 4. NOTE: You may hear the cooling fan after you must be displayed to turn SELECTOR back to use each setting. To change current time: Follow steps 2-4. SETTING DIAGRAM SETTING INFORMATION BAKE Use this setting for broiling regular-sized and smaller cuts of...
... the oven temperature. • Door must press ENTER. BROIL Use this setting for standard baking and roasting. Using and Caring for Your Oven Starting an operation After programming a function, you press CANCEL. Resetting an operation • When cooking is shown. 4. NOTE: You may hear the cooling fan after you must be displayed to turn SELECTOR back to use each setting. To change current time: Follow steps 2-4. SETTING DIAGRAM SETTING INFORMATION BAKE Use this setting for broiling regular-sized and smaller cuts of...
Use and Care Guide
Page 16
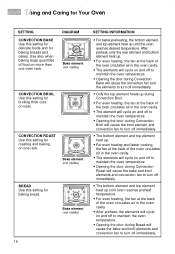
... oven rack. Using and Caring for Your Oven SETTING CONVECTION BAKE Use this setting for baking bread. CONVECTION ROAST Use this setting for roasting and baking on and off to maintain the oven temperature. • Opening the door during Bread will cause the bake and broil elements and convection fan to turn off immediately. • The bottom element and top element heat up until oven reaches preheat temperature. • For even heating, the fan at the back of meat. DIAGRAM Bake element (not visible) CONVECTION BROIL Use this setting for broiling...
... oven rack. Using and Caring for Your Oven SETTING CONVECTION BAKE Use this setting for baking bread. CONVECTION ROAST Use this setting for roasting and baking on and off to maintain the oven temperature. • Opening the door during Bread will cause the bake and broil elements and convection fan to turn off immediately. • The bottom element and top element heat up until oven reaches preheat temperature. • For even heating, the fan at the back of meat. DIAGRAM Bake element (not visible) CONVECTION BROIL Use this setting for broiling...

Use and Care Guide
Page 17
... level. • Use pot holders or oven mitts to protect your hands if rack(s) must circulate around each pan and between pans and oven walls. Using and Caring for even heat to reach all three racks to be moved while the oven is hot. • For best performance, cook on two or three racks, use the CONVECT BAKE setting for self-cleaning only. KEEP WARM Use this setting to proof bread. This allows all parts...
... level. • Use pot holders or oven mitts to protect your hands if rack(s) must circulate around each pan and between pans and oven walls. Using and Caring for even heat to reach all three racks to be moved while the oven is hot. • For best performance, cook on two or three racks, use the CONVECT BAKE setting for self-cleaning only. KEEP WARM Use this setting to proof bread. This allows all parts...
Use and Care Guide
Page 21
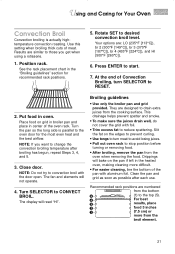
... cover the grid with aluminum foil. Recommended rack positions are similar to those you want to change the convection broiling temperature after each use. NOTE: Do not try to start. 7. Using and Caring for Your Oven Convection Broil Convection broiling is parallel to the oven door for recommended rack positions. 5. Turn the pan so the long side is actually hightemperature convection roasting. The display will not operate. 4. Press ENTER to convection broil with the door open. Use this setting...
... cover the grid with aluminum foil. Recommended rack positions are similar to those you want to change the convection broiling temperature after each use. NOTE: Do not try to start. 7. Using and Caring for Your Oven Convection Broil Convection broiling is parallel to the oven door for recommended rack positions. 5. Turn the pan so the long side is actually hightemperature convection roasting. The display will not operate. 4. Press ENTER to convection broil with the door open. Use this setting...

Use and Care Guide
Page 30
... properly to your appliance's complete model and serial numbers, and the purchase or installation date. (See the "A Note to You" section.) This information will not operate Burner fails to check mixture. Clean with proper voltage. (See Installation Instructions.) Replace household fuse or reset circuit breaker. The burner cap is incorrect. The air/gas mixture is not in position. You have not set the electronic control correctly. The unit is...
... properly to your appliance's complete model and serial numbers, and the purchase or installation date. (See the "A Note to You" section.) This information will not operate Burner fails to check mixture. Clean with proper voltage. (See Installation Instructions.) Replace household fuse or reset circuit breaker. The burner cap is incorrect. The air/gas mixture is not in position. You have not set the electronic control correctly. The unit is...

Use and Care Guide
Page 32
... shortest time suggested in pan. Make sure batter is leveled in pan before baking. Decrease oven temperature 15° to 25°F (8° to brown on bottom selected temperature. Level range. (See Installation Instructions.) Use cookware with foil. Oven rack is set too high. Food improperly placed in cookware.) Range is not level Cookware does not have flat bottom. Opening oven door while food Open door to check food when timer is baking or roasting. Troubleshooting PROBLEM...
... shortest time suggested in pan. Make sure batter is leveled in pan before baking. Decrease oven temperature 15° to 25°F (8° to brown on bottom selected temperature. Level range. (See Installation Instructions.) Use cookware with foil. Oven rack is set too high. Food improperly placed in cookware.) Range is not level Cookware does not have flat bottom. Opening oven door while food Open door to check food when timer is baking or roasting. Troubleshooting PROBLEM...

Use and Care Guide
Page 38
...; Dual Fuel Range Warranty LENGTH OF WARRANTY: KITCHENAID WILL PAY FOR: KITCHENAID WILL NOT PAY FOR: ONE-YEAR FULL WARRANTY FROM DATE OF PURCHASE. Replace house fuses or correct house wiring. 4. Replacement parts or repair labor costs for the porcelain oven cavity/inner door if the part rusts through due to correct defects in the home. Contact your authorized KitchenAid dealer to : 1. For service in the U.S. Correct house plumbing. D. G. H. Instruct...
...; Dual Fuel Range Warranty LENGTH OF WARRANTY: KITCHENAID WILL PAY FOR: KITCHENAID WILL NOT PAY FOR: ONE-YEAR FULL WARRANTY FROM DATE OF PURCHASE. Replace house fuses or correct house wiring. 4. Replacement parts or repair labor costs for the porcelain oven cavity/inner door if the part rusts through due to correct defects in the home. Contact your authorized KitchenAid dealer to : 1. For service in the U.S. Correct house plumbing. D. G. H. Instruct...
Installation Instructions
Page 1
... save these instructions can tip the range and be killed. Homeowner: Keep Installation Instructions for local electrical inspector's use only backguard (required for some installations) WARNING OFF OFF OFF OFF OFF OFF Tip Over Hazard A child or adult can result in death or serious burns to wall behind range. Both numbers are on the model/serial rating plate, located on the surface below the control panel. Installation Instructions 30" (76.2 cm) Commercial Style Dual Fuel Range with...
... save these instructions can tip the range and be killed. Homeowner: Keep Installation Instructions for local electrical inspector's use only backguard (required for some installations) WARNING OFF OFF OFF OFF OFF OFF Tip Over Hazard A child or adult can result in death or serious burns to wall behind range. Both numbers are on the model/serial rating plate, located on the surface below the control panel. Installation Instructions 30" (76.2 cm) Commercial Style Dual Fuel Range with...
Installation Instructions
Page 2
... DO IF YOU SMELL GAS • Do not try to L.P./Propane gas, see the Gas Conversion instructions provided in this manual and on the gas information label. Given dimensions are located on the surface below the control panel. latest edition**, or CSA Standard, C22.1 Canadian Electrical Code, Part 1 - NOTE: The range cooktop is used . See "Gas supply requirements," Page 4 and "Electrical requirements," Page 5. Before you cannot reach your gas supplier, call your gas supplier from : * CSA...
... DO IF YOU SMELL GAS • Do not try to L.P./Propane gas, see the Gas Conversion instructions provided in this manual and on the gas information label. Given dimensions are located on the surface below the control panel. latest edition**, or CSA Standard, C22.1 Canadian Electrical Code, Part 1 - NOTE: The range cooktop is used . See "Gas supply requirements," Page 4 and "Electrical requirements," Page 5. Before you cannot reach your gas supplier, call your gas supplier from : * CSA...
Installation Instructions
Page 4
... m). gases with an approved shutoff valve. The model/serial rating plate, located on the surface below the control panel, has information on the model/serial rating plate are in -line connection to a regulated gas supply. gas, use with range. gas conversion kit part no. 4453151. Provide a gas supply line of 4% for each 1,000 feet (305 m) above the set pressure. With L.P. gas, piping or tubing size can be checked at test pressures equal to the range, and should be used as follows for Canada...
... m). gases with an approved shutoff valve. The model/serial rating plate, located on the surface below the control panel, has information on the model/serial rating plate are in -line connection to a regulated gas supply. gas, use with range. gas conversion kit part no. 4453151. Provide a gas supply line of 4% for each 1,000 feet (305 m) above the set pressure. With L.P. gas, piping or tubing size can be checked at test pressures equal to the range, and should be used as follows for Canada...

Installation Instructions
Page 5
... not cut the conduit. remove screws If the range is recommended. If the house has aluminum wiring, follow the procedure below the control panel. A time-delay fuse or circuit breaker is not level, adjust the feet up or down this distance Locate a stud in wall behind the range has a baseboard thicker than 3/8" (9.5 mm), use the longer 1-3/4" (4.4 cm) anti-tip bracket. Set range on each side of the power supply cable (at the cooktop...
... not cut the conduit. remove screws If the range is recommended. If the house has aluminum wiring, follow the procedure below the control panel. A time-delay fuse or circuit breaker is not level, adjust the feet up or down this distance Locate a stud in wall behind the range has a baseboard thicker than 3/8" (9.5 mm), use the longer 1-3/4" (4.4 cm) anti-tip bracket. Set range on each side of the power supply cable (at the cooktop...

Installation Instructions
Page 7
.... Slide range completely back so anti-tip bracket is located directly underneath the control knob. The first time a burner is the proper size. Use a small flat-head screwdriver to light because of the flexible connector adapters. gas to the smaller thread ends of air in the clock display. (Refer to L.P. Make gas connection. gas to Natural gas) must be adjusted: a. Repeat step 16. Align the indentation in gas supply line. regulator use with a pair of cooktop LITE burners. b. Hold control knob stem control knob with L.P. Open manual...
.... Slide range completely back so anti-tip bracket is located directly underneath the control knob. The first time a burner is the proper size. Use a small flat-head screwdriver to light because of the flexible connector adapters. gas to the smaller thread ends of air in the clock display. (Refer to L.P. Make gas connection. gas to Natural gas) must be adjusted: a. Repeat step 16. Align the indentation in gas supply line. regulator use with a pair of cooktop LITE burners. b. Hold control knob stem control knob with L.P. Open manual...
Installation Instructions
Page 8
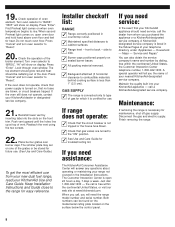
..., shut off gas supply. Do not touch oven floor. Press "Cancel" and turn oven selector to the range for troubleshooting list. Installer checkoff list: RANGE ✓ Range correctly positioned in the Yellow Pages of the door. the call a KitchenAid-designated service company. Press "Enter". Place burner grates over burner caps. side to cabinet surfaces. ✓ Range level - Turn oven selector to back - First Preheat light comes on when oven temperature begins to "BROIL". Major - Check operation of the broiler element. Turn oven selector...
..., shut off gas supply. Do not touch oven floor. Press "Cancel" and turn oven selector to the range for troubleshooting list. Installer checkoff list: RANGE ✓ Range correctly positioned in the Yellow Pages of the door. the call a KitchenAid-designated service company. Press "Enter". Place burner grates over burner caps. side to cabinet surfaces. ✓ Range level - Turn oven selector to back - First Preheat light comes on when oven temperature begins to "BROIL". Major - Check operation of the broiler element. Turn oven selector...


