KitchenAid KDRP407HSS Support Question
KitchenAid KDRP407HSS Support Question
Find answers below for this question about KitchenAid KDRP407HSS - 30" Pro-Style Dual-Fuel Range.Need a KitchenAid KDRP407HSS manual? We have 2 online manuals for this item!
Question posted by Modyg on December 29th, 2016
Oven Tripped From 350 Degrees To Broil.
I set my oven (model # kdrp407hss) to 350 degrees & the beeper went off at that temperature. I returned to the kitchen 1 hour later & the oven somehow switched to broil! The code on the temp indicator read f-2 or f-20 the oven was red hot and the door would not open. All dials did not work. We had to turn the fuse off to shut down the oven. Repair technician checked it out & said they don't make that part anymore! Any ideas out there or must we cave in & buy new
Current Answers
Answer #1: Posted by Troubleshooter101 on January 3rd, 2017 10:04 AM
Troubleshooter101

Member since:
September 30th, 2015 Points: 2,927,030

Member since:
September 30th, 2015 Points: 2,927,030
The thermal fuse does NOT break from pulling too much power. The thermal fuse breaks from getting too hot. Generally this is due to self cleaning or possibly from the cooling fan not running up to speed. It has absolutely nothing to do with drawing higher current from the heating elements. If you just ran self clean, be sure to change the cleaning cycle time to 2:30 and that should solve the problem in the future. If you didn't self clean, did you leave the door cracked open when broiling? Older ovens you can do this, but you can not do this on new wall ovens. Other than that, the only thing left is to bypass the fuse and see if the broil element or bake element are sticking on way past the temperature you've selected (such as 350 degrees). If they are shutting off appropriately, you need to replace the cooling fan due to not spinning as fast as it should.
Thanks
Please respond to my effort to provide you with the best possible solution by using the "Acceptable Solution" and/or the "Helpful" buttons when the answer has proven to be helpful. Please feel free to submit further info for your question, if a solution was not provided. I appreciate the opportunity to serve you!
Troublshooter101
Related KitchenAid KDRP407HSS Manual Pages
Use and Care Guide - Page 1
... and replacing the oven lights 26 Using the Self-Cleaning Cycle 27 Before you start 27 Before setting the controls 28 Setting the controls 28 For best cleaning results 29 How the cycle works 29 Troubleshooting 30 Requesting Assistance or Service 33 Bread Recipes 35 Warranty 38
In the U.S.A.
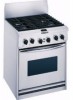
KITCHENAID® Professional Dual Fuel Range
Model: KDRP407H
4452761A...
Use and Care Guide - Page 5

...Feature locations
Surface burners (p. 7)
Surface burner controls (p. 8)
Gasket (p. 27)
Bake element (hidden) (pp. 15, 16)
Electronic oven control
(p. 14)
Oven vent (p. 6)
Model and serial number plate (p. 2)
Automatic oven light
switch (p. 26)
Broil element (not shown) (pp. 15, 16)
Oven rack (pp. 17, 18)
Surface burner controls
REAR
FRONT
Left rear
Left front
control knob control knob
REAR...
Use and Care Guide - Page 15
... top element heats up during Bake will cycle on and off to maintain the oven temperature.
• Opening the door during Broil.
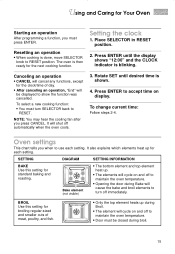
• The element will cause the bake and broil elements to turn SELECTOR back to use each setting. Setting the clock
1.
Oven settings
This chart tells you press CANCEL.
Press ENTER to RESET position. It also...
Use and Care Guide - Page 16
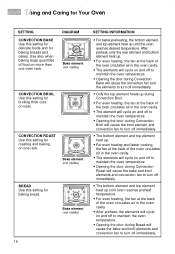
... and top element heat up until the oven reaches desired temperature. CONVECTION ROAST Use this setting for broiling thick cuts of the oven circulates air in the oven cavity.
• The elements will cycle on and off to maintain the oven temperature.
• Opening the door during Convection Broil will cause the broil element and convection fan to turn off...
Use and Care Guide - Page 18

...;F (14°C).
• Use suggested baking time. • Use temperature and time
recommended in recipe for pies, breads, and casseroles. • Place rack in center of oven. • May need to place your rack when broiling, see "Broiling guidelines" later in the bottom third of oven. Bakeware choices
Baking performance is directly over another.
Side by...
Use and Care Guide - Page 19

... Turn SELECTOR to CONVECT ROAST.
Doing so will read "350F".
2. Remove foil for the last 30 minutes. • Use narrow strips of Convection Bake, turn SELECTOR to RESET.
1. Bake
1.... Rotate SET to desired temperature. Press ENTER to start .
4. The display will read "325F".
2. Rotate SET to desired temperature. Baking can occur from pies or casseroles place foil on the oven rack below...
Use and Care Guide - Page 20
... reached desired degree of the thermometer should be parallel with the oven door for best heat distribution and airflow.
• Spatter can reduce roasting times and temperatures for Your Oven
3. For an accurate reading, the tip of doneness. Using and Caring for most even heat and the best airflow.
3. If the temperature drops, return the meat...
Use and Care Guide - Page 21
... the cooking surface.
Results are designed to change the convection broiling temperature after each use. They are similar to those you want to drain extra juices from the
oven when removing the food. Slit the fat on the pan if left in the "Broiling guidelines" section for recommended rack positions.
5. Your options are numbered...
Use and Care Guide - Page 22

... not let food sit in oven more than one hour before or after approximately 2⁄3 of the broiling time. - Set temperature.
4. Press ENTER again, the DURATION LED will blink and "-0:00" is displayed.
6. If you want to set desired cycle length.
7. Turn...MINUTES)
21-23 [13-16] 23-25 [15-18] 27-29 [16-19] 20-22 [12-14]
HI
30-33 [18-20]
HI
22-26 [11-13]
HI [br 4] HI
HI
34-40 [27-36] 22-32 ...
Use and Care Guide - Page 24

...temperature setting is done, turn SELECTOR to 390°F (198°C). Press ENTER to RESET.
• See "Cleaning Stainless Steel Surfaces" later in this section.
• See "Cleaning Stainless Steel Surfaces" later... racks at 350°F (176°C) set the preheat temperature to RESET. Cleaning cycle. Bread
1.
Once the oven reaches preheat, you will hear 1 beep and the oven display will...
Use and Care Guide - Page 29
.... The graph below is representative of a normal, 31⁄2-hour Self-Cleaning cycle.
Note that the heating stops after 3 hours, but it takes longer for normal baking or broiling. CLEANING CYCLE
OVEN SHUTS OFF
( normal broiling temperature ) DOOR UNLOCKS ( fan stays on )
Temperature
DOOR LOCKS
START
1
2
3
Time In Hours
STOP
29 Hand-clean areas noted in this section...
Use and Care Guide - Page 30

...oven...breaker has tripped. Clean with proper voltage. If you save the cost of the problem, your appliance's complete model and serial...30 Please provide a detailed description of a service call service technician to gas supply.
A household fuse has blown or a circuit breaker has tripped...off. You have not set the electronic control correctly. Refer to reconnect range.
Wire the unit ...
Use and Care Guide - Page 31
...oven
It is normal for all four burners to spark when a burner is turned on, but has not yet ignited. Push control knob(s) in before turning to a setting. Call a service technician to replace module. continued on the display. An "F" code...during BAKE, CONVECT BAKE, CONVECT ROAST, BROIL, CONVECT BROIL or CLEAN The convection fan does not run while the oven is in use to cool the electronic ...
Use and Care Guide - Page 35

...to grease all -purpose flour 1 T (15 mL) salt
Pour warm water into mixing bowl and stir in (30.4 cm) circles.
Place dough in a greased bowl turning to yeast mixture, tearing biga (starter) into small ...cm) apart with preheat temperature set to 14 hours at room temperature for 50 minutes. Combine the yeast mixture and flour and mix on low speed about 1 in oven for 15-20 minutes. ...
Use and Care Guide - Page 36

...temperature for 60-70 minutes or proof in oven for 5 minutes.
Remove from pans and cool on low speed for 30 minutes.
Stretch into ropes about 12 in a greased bowl turning to 14 hours at room temperature for 30... dough. Combine yeast mixture and flour and mix on baking sheets lined with preheat temperature set to stand for 12 to grease all -purpose flour (divided) 11⁄2 cups...
Use and Care Guide - Page 38

... DATE OF PURCHASE. Replacement parts for the porcelain oven cavity/inner door if the part rusts through due...KitchenAid dealer to correct defects in accordance with local electrical codes. If you need service, first see the "Requesting ... flood, acts of this warranty does not apply.
E. ®
Dual Fuel Range
Warranty
LENGTH OF WARRANTY:
KITCHENAID WILL PAY FOR:
KITCHENAID WILL NOT ...
Installation Instructions - Page 1
....
Call 1-800-422-1230 or visit our web site at www.kitchenaid.com. IMPORTANT: Installer: Leave Installation Instructions with self-cleaning thermal/convection oven
for residential use .
®
For the way it's made®
Questions regarding features, operation, performance, parts or service? A Installation Instructions
30" (76.2 cm) Commercial Style Dual Fuel Range with the homeowner.
Installation Instructions - Page 5

... conform with local codes.
Remove shipping materials, tape and protective film from inside oven.
rear brace
bottom vent
2.
Do not have a fuse in wall behind range. A four-wire...tip bracket. F. Lift range up about 3 inches (8 cm) and move range close to avoid scratching the stainless steel. Set range on each side of the top of range.
remove screws
If the range is not level, ...
Installation Instructions - Page 8
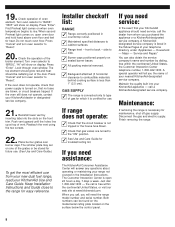
... is not tripped or the house fuse blown.
✓ Check that your KitchenAid appliance - Household - Maintenance:
If removing the range is connected only to cabinet surfaces.
✓ Range level - When second Preheat light comes on the surface below the control panel. Check the operation of oven
element. Press "Cancel" and turn oven selector to "BROIL". Just...
Installation Instructions - Page 9

... (4) PLCS
IGNITOR ELECTRODES
Oven schematic
L1
CONTROL POWER TRANSFORMER
BU
R
BU
W
SUPPRESSOR WP#4451985
P3-2 P3-3
BK P4-1
ELECTRONIC CONTROL
WISP CONNECTO RS
BK P4-3 P9-1 P9-3
LATCH DRIVE CIRCUIT
TEMP SENSOR
1080 AT 70°F 1654 AT 350°F
W t°
W
V P7-4
V P7-5
DOOR ON LATCH ASSY SWITCH
TAN
LATCH SWITCH (OPERATED BY SOLENOID)
TAN...
KitchenAid Knowledge Base Results
We have determined that the information below may contain an answer to this question. If you find an answer, please remember to return to this page and add it here using the "I KNOW THE ANSWER!" button above. It's that easy to earn points!-
Temperature calibration - built-in ovens
... times. however, it may give incorrect readings. It can I measure or adjust the temperature? Touch 3 to increase the temperature or touch 6 to end calibration. IMPORTANT: Do not use a thermometer to measure oven temperature because opening the oven door during cycling may cook faster or slower than your previous oven, so the temperature calibration can be changed in Fahrenheit or... -
Temperature adjustment
...; -20°F (-10°C) ...moderately less -30°F (-15°C) ...much less To adjust oven temperature calibration: Press Options and then 6 to measure oven temperature because opening the oven door... -
User Preferences menu
... you to Celsius - NOTE: Press any touch pad on the control panel to turn off the sound of all alarms. On - The preference name will appear in ovens Fahrenheit to set user preferences, if desired. Set your preferences by shutting the refrigerator compartment door. built-in the Freezer display and the preference status (F or C) or (On...
Similar Questions

I Was Referring To The Main Breaker Fuse For The Oven When I Said We Turned The
fuse off. The repairman said we needed a new relay switch (part # wp4452444) which they don't make a...
fuse off. The repairman said we needed a new relay switch (part # wp4452444) which they don't make a...
(Posted by Modyg 7 years ago)

Kitchenaid Stove Kdrp407hss4 Dual Fuel Oven Does Not Heat Up
(Posted by lmante 10 years ago)

Kitchenaid Pro Gas Slide In Range
Can you get Kitchenaid Architect handles for the Kitchenaid Pro range (like rounded handles better)
Can you get Kitchenaid Architect handles for the Kitchenaid Pro range (like rounded handles better)
(Posted by sam33 11 years ago)

Kitchenaid Kdss907sss - 30' Slide-in Dual Fuel Range
Position Of Range
Should the back of the 30" slide-in range touch the back wall?
Should the back of the 30" slide-in range touch the back wall?
(Posted by patriciainsf 11 years ago)

Display/control Panel Not Working
I used our Kitchen Aid KDRP407HSS earlier today and when I returned home the display panel was not w...
I used our Kitchen Aid KDRP407HSS earlier today and when I returned home the display panel was not w...
(Posted by nchunsaker1 13 years ago)