
Ricoh Pro 907EX Support Question
Ricoh Pro 907EX Support Question
Find answers below for this question about Ricoh Pro 907EX.Need a Ricoh Pro 907EX manual? We have 3 online manuals for this item!
Question posted by allancwardy on August 8th, 2014
How To Email A Copy On A Pro 907ex
The person who posted this question about this Ricoh product did not include a detailed explanation. Please use the "Request More Information" button to the right if more details would help you to answer this question.
Current Answers
Answer #1: Posted by freginold on September 9th, 2014 4:29 PM
freginold

Member since:
December 20th, 2011 Points: 23,253,885

Member since:
December 20th, 2011 Points: 23,253,885
This article will walk you through setting up scanning to email:
- How to set up scan to email on a Ricoh Aficio MP series copier
This article will show you how to save email addresses to the address book, once you have scanning to email set up:
- How to add an email address to a Ricoh Aficio MP series copier
Here are instructions for how to scan to email once you have it all set up:
- Press the Scanner button
- Place your original(s) in the document feeder or on the glass
- Select the Email tab, if it isn't already selected
- Select a destination from the list of programmed destinations, or enter a new one using the Manual Entry button
- Press the Start button
If this answer helped you to solve your problem and/or answer your question, please let us know by clicking on the “Helpful” icon below. If your question wasn’t answered to your satisfaction, feel free to resubmit your question with more information. Thank you for using HelpOwl!
Related Ricoh Pro 907EX Manual Pages
Quick Start Guide - Page 11
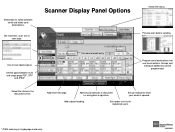
... security features to switch between multi and single page PDF, TIFF
and JPEG*
Select file stored in single page mode only.
Set file types between email and folder scan destinations.
encryption & signature. Preview scan before sending. Groups and
individual addresses can be programmed. Add subject heading.
For manual...
Quick Start Guide - Page 12

Basic Scanning
1. Select [E-mail] or [Folder] Tab 3. Your display may vary depending on Glass 5. Select destination [email address or folder location
4. Press [Start]
(Note: Screenshots are provided for reference purposes only. At copier Screen Press [Scanner]
2. Place Originals in Feeder or on your operating system and device.)
Troubleshooting Guide - Page 6
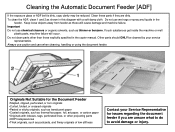
... for issues regarding the document feeder if you are dirty. Cleaning the Automatic Document Feeder [ADF]
If the exposure glass or ADF belt is dirty, copy clarity may be cleaned by your Service Representative for the Document Feeder
•Stapled, clipped, perforated, or torn originals •Curled, folded, or creased originals...
Troubleshooting Guide - Page 7

... or organic solvents, such as shown in this manual. Cleaning the exposure Glass
Maintaining Your Machine If the exposure glass or ADF belt is dirty, copy clarity may be cleaned by your copies there is something on your service
representative.
Troubleshooting Guide - Page 21
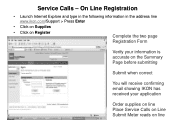
... Register
Complete the two page
Registration Form
Verify your information is accurate on the Summary Page before submitting
Submit when correct
You will receive confirming email showing IKON has received your application
Order supplies on line Place Service Calls on Line Submit Meter reads on line
Quick Start Guide - Page 2
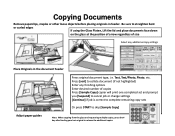
... edges
If using the Glass Platen, Lift the lid and place documents face down
on the glass at the position of arrow regardless of copies Press [Sample Copy] copier will print one completed set and prompt you [Suspend] to cancel job or change settings [Continue] if job is correct to complete remaining...
Quick Start Guide - Page 3

Enter your job is added and continue until all the pages for your job settings including the desired number of copies. 4. Press the [#] key to keep the page order and output multiple complete copies.
2.
Place the first part of pages being fed in the feeder (or on the glass) press (Start) key 5. You...
Quick Start Guide - Page 4

... .
ROTATE SORT- Use Stack when setting multiple pages in a multi-page original. groups together copies of each page in the document feeder and requiring the same copy number count per page to maintain page order - the machine assembles copies as [Collate]. Same as sets in the Sort/Shift Sort order, separating the first...
Quick Start Guide - Page 7

Duplex Copying (2 Sided Output)
Place Originals in Feeder Landscape orientation or Portrait orientation
Select
or
Select
You can select these options from the main copier panel
Press OK Enter desired options Select copy count Press START
Quick Start Guide - Page 8

... When the booklet finisher is installed, Users can choose different size pager for 5 or more pages. output documents from 2 Sided to 1 Sided Copy 2 face forwarding pages of a book to copy 2 face forwarding pages of placing 2, 4, 8 or pages on panel Duplex - 1 sided+2 Sided 2 Sided+ 2 Sided Combine - Book - Combine multiple pages on single pages...
Quick Start Guide - Page 9

You cannot use the Bypass tray with this option to combine multiple single pages or 2 sided pages for multiple pages copied on each side of these options are available from the main copier panel. Combine Pages
Use this option. Originals can be copied in portrait or landscape orientation.
Some of a page.
Quick Start Guide - Page 10

...
Press [Book - 1 sided] for single pages
Outputs 2 single pages for the right and left and right pages and place front and back to a single page
- Copies the left pages
Press [OK]
OR
Press the [BOOK ]button • Select [BOOK TO 2 SIDED]
Book 2-Sided
- Press [OK]
Enter desired sets
Press [Start...
Quick Start Guide - Page 13

Select the reproduction ratio, if necessary.
3. Press START Create Margin
• Reduces the image to 93% of its original size and places the reduced image at the center By combining it with the Reduce / Enlarge functions, you can further increase a margin. Great for creating copy edge for stapling or hole punching.
• 1. Press [Create Margin]. • 2.
Quick Start Guide - Page 15

Users can choose numbering Sequence and position of placement of copies
Press SAMPLE COPY
Place Documents in Feeder Press Edit /Stamp Select Stamp
Select ...side) Select Page Number Placement>OK Touch First Printing Page >indicate page to keep track of documents being copied for projects, etc. Page Numbering
Page Number Format
Number Page Position
Starting Page, Starting Number and Ending ...
Quick Start Guide - Page 16

Double Copies
Place Original in Document or lift the lid and place face down on Glass Platen
• Press [Edit / Stamp]. • Press [Edit Image]. • Press [Double Copies]. • Press [OK]. • Select the paper size.
• Enter desired number of copies • Press [Start]
Original Feed
Copy Output orientation
Quick Start Guide - Page 17

Place the document Select the paper size. Press [OK].
Note: You cannot use the bypass tray
with the image moved to the center of the copy paper. Press [Edit / Stamp]. Press [Start].
Press [Centering]. Press [Edit Image]. Document Centering
You can make copies with this function.
Quick Start Guide - Page 19

... or
Press [Designate: Blank]. Press the key to specify additional page location numbers, up the paper trays under paper tray settings.
Press [Start] or [Sample Copy]. Designate
Use this option you must set up the 20 locations may be selected. You can continue to select the chapter number.
Quick Start Guide - Page 20

... used when [sort] is selected.
If you press [Suspend] after checking the results, return to step 1 to adjust the copy settings as necessary. -Depending on the combination of [START] press [Sample Copy] key -One set is not available from the [Simplified screen]. You can only be able to output the job
Note...
Quick Start Guide - Page 21

Using the By-pass Tray
On copier panel press the # key
Press Paper Size
Place copy paper in tray Adjust tray paper guides to fit paper size
Press Paper Type, Select Paper option, Press OK
Press OK
Place originals, enter desired number of copies, press START, Press Clear Modes
Quick Start Guide - Page 33

Open the document you want to use
2. Enter desired number of copies.
3. How to print
5. Press [OK] Press File>Print>OK
6. In the [Name] list, click the Ricoh Copier/printer you wish to Print Documents from your PC
Basic Printing
4. !.
Similar Questions

How To Get Individual Copy Counts For Ricoh Pro 907ex
Can I have a step by step instruction on how I can get an individual copy count for all users? Each ...
Can I have a step by step instruction on how I can get an individual copy count for all users? Each ...
(Posted by lpeluso76442 9 years ago)

Operation Manual For A 907ex Copy Machine
How do you put a colored sheet of paper within the document?
How do you put a colored sheet of paper within the document?
(Posted by dwells93817 9 years ago)

My Ricoh Pro 907ex Copier Displays That Replacement Required, Replacefusing Unit
my ricoh pro 907ex copier displays that replacement required, replace fusing unit. how can i reset i...
my ricoh pro 907ex copier displays that replacement required, replace fusing unit. how can i reset i...
(Posted by azizsaidmparuka 9 years ago)

Ricoh Refill Staples Type M Pro 907ex
How do I refill the staples, Type M in a Ricoh PRO 907EX?
How do I refill the staples, Type M in a Ricoh PRO 907EX?
(Posted by jwhiteha 11 years ago)