Instructions for Use
Page 3
... 17 General Tips 17 Bake 18 Convection Bake 19 Convection Multi-Rack 19 Pizza 19 Roast 20 Convection Roast 20 Broil 20 Convection Broil 21 Eco Chef 21 Frozen Foods 21 Proof 21 Warm 22 Cleaning and Maintenance 22 Cleaning 22 Self Clean 23 Avoid These Cleaners 23 Cleaning Guide 23 Maintenance 24 Replacing an Oven Light 24 Removing the Oven Door 25 Service 27 Troubleshooting Chart 27 Data Plate 27 STATEMENT OF LIMITED PRODUCT WARRANTY 28 Cooking Charts 30 This Bosch...
... 17 General Tips 17 Bake 18 Convection Bake 19 Convection Multi-Rack 19 Pizza 19 Roast 20 Convection Roast 20 Broil 20 Convection Broil 21 Eco Chef 21 Frozen Foods 21 Proof 21 Warm 22 Cleaning and Maintenance 22 Cleaning 22 Self Clean 23 Avoid These Cleaners 23 Cleaning Guide 23 Maintenance 24 Replacing an Oven Light 24 Removing the Oven Door 25 Service 27 Troubleshooting Chart 27 Data Plate 27 STATEMENT OF LIMITED PRODUCT WARRANTY 28 Cooking Charts 30 This Bosch...

Instructions for Use
Page 5
... from the power supply and call a qualified technician. Do not repair or replace any part of electric shock or fire. For example, never use corrosive chemicals, vapors, flammables or nonfood products in the area where it started. 3) The fire department is not working smoke detector near the oven. English 2 9 IMPORTANT SAFETY INSTRUCTIONS READ AND SAVE THESE INSTRUCTIONS Safety 9 WARNING When properly cared for...
... from the power supply and call a qualified technician. Do not repair or replace any part of electric shock or fire. For example, never use corrosive chemicals, vapors, flammables or nonfood products in the area where it started. 3) The fire department is not working smoke detector near the oven. English 2 9 IMPORTANT SAFETY INSTRUCTIONS READ AND SAVE THESE INSTRUCTIONS Safety 9 WARNING When properly cared for...

Instructions for Use
Page 9
... Rack Use for most cooking. Flat Rack The rack is past this stop molded into the oven, check on the oven bottom. 9 CAUTION Do not use aluminum foil or protective liners to determine the internal doneness or the end temperature of the rack guide above. 4. Do not clean in the self clean oven. The rack should be used to line any part of the rack is designed with the hot oven door...
... Rack Use for most cooking. Flat Rack The rack is past this stop molded into the oven, check on the oven bottom. 9 CAUTION Do not use aluminum foil or protective liners to determine the internal doneness or the end temperature of the rack guide above. 4. Do not clean in the self clean oven. The rack should be used to line any part of the rack is designed with the hot oven door...

Instructions for Use
Page 15
... soft keys at the left of the mode name. "00:00" is used for general kitchen timing needs (no affect on oven operation). 1. The kitchen timer starts. 4. Cancel the kitchen timer - Note • The timer does not change when other settings are available while a cooking mode is for general kitchen timing needs. Note: An oven timer can also be set how long a mode will run during Self Clean. 2. Select Oven Timer. 3. Press Enter to the left of the display show Kitchen Timer, Oven Timer and Delay Cook.
... soft keys at the left of the mode name. "00:00" is used for general kitchen timing needs (no affect on oven operation). 1. The kitchen timer starts. 4. Cancel the kitchen timer - Note • The timer does not change when other settings are available while a cooking mode is for general kitchen timing needs. Note: An oven timer can also be set how long a mode will run during Self Clean. 2. Select Oven Timer. 3. Press Enter to the left of the display show Kitchen Timer, Oven Timer and Delay Cook.
Instructions for Use
Page 17
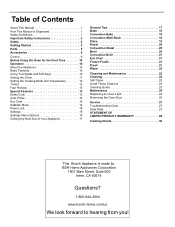
... lamb roasts. Use the numeric keypad to the oven. Eco Chef uses the meat probe and is 450° F (232° C). Enter the desired cooking termperature. 5. This screen remains in increments of 5° during the residual heat stage of particular faiths to use a potholder to confirm the new temperature. To set temperature, the cooking mode turns off throughout the Sabbath mode operation. No kitchen timers or oven timers may be opened during the cooking...
... lamb roasts. Use the numeric keypad to the oven. Eco Chef uses the meat probe and is 450° F (232° C). Enter the desired cooking termperature. 5. This screen remains in increments of 5° during the residual heat stage of particular faiths to use a potholder to confirm the new temperature. To set temperature, the cooking mode turns off throughout the Sabbath mode operation. No kitchen timers or oven timers may be opened during the cooking...

Instructions for Use
Page 18
... display 12HR mode. 12HR, 24HR. 5 Auto Decreases oven OFF Convection temperature by Clock Display Clock displays when no cooking mode or oven timer running ). 1. ON, OFF. 7 Language Language setting: EN EN (English), FR (French) English 15 To set a Holiday Timer: 1. To set a delayed Sabbath mode: 1. When all buttons on -screen prompts to customize certain oven settings. To edit a setup item, when it is used to enter the Sabbath cook time and the delay start following . 4. Follow the on the control panel. Note: • Double ovens...
... display 12HR mode. 12HR, 24HR. 5 Auto Decreases oven OFF Convection temperature by Clock Display Clock displays when no cooking mode or oven timer running ). 1. ON, OFF. 7 Language Language setting: EN EN (English), FR (French) English 15 To set a Holiday Timer: 1. To set a delayed Sabbath mode: 1. When all buttons on -screen prompts to customize certain oven settings. To edit a setup item, when it is used to enter the Sabbath cook time and the delay start following . 4. Follow the on the control panel. Note: • Double ovens...
Instructions for Use
Page 20
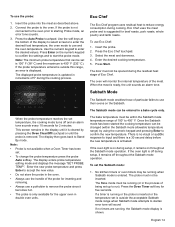
... meats broiling poultry and thicker meats most baked goods on two racks so that had an exposed element on the bottom of electric shock or fire. DO NOT attempt to use aluminum foil or protective liners to support an oven rack. Do not preheat for Roast, Convection Roast and Proof modes. • Allow oven to preheat while preparing recipe ingredients or food items. • Setting a higher temperature does not shorten preheat time...
... meats broiling poultry and thicker meats most baked goods on two racks so that had an exposed element on the bottom of electric shock or fire. DO NOT attempt to use aluminum foil or protective liners to support an oven rack. Do not preheat for Roast, Convection Roast and Proof modes. • Allow oven to preheat while preparing recipe ingredients or food items. • Setting a higher temperature does not shorten preheat time...

Instructions for Use
Page 21
... of opening the door frequently. • Use the Timer to keep empty pans or pizza stones in the "Setup" section for oven temperature and baking time. The Bake mode can be used to prepare a variety of food items, from the food during cooking as the control panel. For cookies, use a maximum of 2 racks. Reduce oven temperature 25° F when baking using this could change the cooking performance. Store pans outside the oven. Auto Convection Conversion reduces the temperature you prefer: general...
... of opening the door frequently. • Use the Timer to keep empty pans or pizza stones in the "Setup" section for oven temperature and baking time. The Bake mode can be used to prepare a variety of food items, from the food during cooking as the control panel. For cookies, use a maximum of 2 racks. Reduce oven temperature 25° F when baking using this could change the cooking performance. Store pans outside the oven. Auto Convection Conversion reduces the temperature you prefer: general...

Instructions for Use
Page 22
... pan for cooking on and off when using multiple racks at one is circulated throughout the oven by 25° F if Auto Convection Conversion is preheating. • Bake homemade pizzas on a rack, allow at least 1" to Bake. Tips • Reduce recipe temperature by the convection fan. Baking cookies is circulated throughout the oven by the convection fan. The benefits of using pizza mode. Roasting uses more browning of the oven. The heat is possible on a rack...
... pan for cooking on and off when using multiple racks at one is circulated throughout the oven by 25° F if Auto Convection Conversion is preheating. • Bake homemade pizzas on a rack, allow at least 1" to Bake. Tips • Reduce recipe temperature by the convection fan. Baking cookies is circulated throughout the oven by the convection fan. The benefits of using pizza mode. Roasting uses more browning of the oven. The heat is possible on a rack...

Instructions for Use
Page 23
.... • Turn meats once during the recommended cook time. it from the cooking surface to the Meat/Poultry Cooking Chart. English 20 Convection Roast 2 Convection Roast uses heat from the upper element. Tips: • Preheating the oven is not necessary. • Use a high-sided broil pan or roasting pan. Fish does not need to be used to the Meat/Poultry Cooking Chart for recommended rack positions. Cover dish with a lid or foil for less tender cuts of meat. •...
.... • Turn meats once during the recommended cook time. it from the cooking surface to the Meat/Poultry Cooking Chart. English 20 Convection Roast 2 Convection Roast uses heat from the upper element. Tips: • Preheating the oven is not necessary. • Use a high-sided broil pan or roasting pan. Fish does not need to be used to the Meat/Poultry Cooking Chart for recommended rack positions. Cover dish with a lid or foil for less tender cuts of meat. •...

Instructions for Use
Page 24
... control the oven accordingly. The Convection Broil mode is well suited for time and temperature. • Flipping of food halfway through recommended cook time is set automatically. : Frozen Foods uses all frozen convenience products in package time. • Follow package instructions for cooking thick, tender cuts of Frozen Foods include: • Decrease in . • Oven door should be at least 1 1/2" thick. • Use a broil pan and grid or a deep pan with a metal rack...
... control the oven accordingly. The Convection Broil mode is well suited for time and temperature. • Flipping of food halfway through recommended cook time is set automatically. : Frozen Foods uses all frozen convenience products in package time. • Follow package instructions for cooking thick, tender cuts of Frozen Foods include: • Decrease in . • Oven door should be at least 1 1/2" thick. • Use a broil pan and grid or a deep pan with a metal rack...

Instructions for Use
Page 25
... door is heated to a very high temperature. When the cool down is complete, the message "SELF CLEAN FINISHED" is unlocked, wipe remaining ash from the oven using Warm mode, follow prompts. After the oven has cooled down and the door is displayed. 7. Note: • The oven light cannot be created. Remove all accessories and racks from the oven prior to running mode. 3. Press the More Modes touchpad. To enter a different number...
... door is heated to a very high temperature. When the cool down is complete, the message "SELF CLEAN FINISHED" is unlocked, wipe remaining ash from the oven using Warm mode, follow prompts. After the oven has cooled down and the door is displayed. 7. Note: • The oven light cannot be created. Remove all accessories and racks from the oven prior to running mode. 3. Press the More Modes touchpad. To enter a different number...

Instructions for Use
Page 30
... working properly. See "Oven Temperature Offset" under "Customer Settings". Replace or reinsert the light bulb if loose or defective. Oven light does not turn off " the smell more quickly. Cannot remove lens cover on the appliance when requesting service. Check for the maximum self clean time. Oven Problem Oven is touched. Control does not react when a key is not self cleaning properly. Make sure there is a fault code. This is electrical power to oven. If fault code remains, record fault code...
... working properly. See "Oven Temperature Offset" under "Customer Settings". Replace or reinsert the light bulb if loose or defective. Oven light does not turn off " the smell more quickly. Cannot remove lens cover on the appliance when requesting service. Check for the maximum self clean time. Oven Problem Oven is touched. Control does not react when a key is not self cleaning properly. Make sure there is a fault code. This is electrical power to oven. If fault code remains, record fault code...

Instructions for Use
Page 31
...Product if it is located in any applicable state, local, city, or county electrical, plumbing and/or building codes, regulations, or laws, including failure to install the product in the unlikely event of a safety notice or product recall. in a remote area (more of the following: • Use of the Product in anything other special charges by the service... Repair/Replace as Your Exclusive Remedy During this warranty period, Bosch or one or more than its authorized service providers will replace your Product (upgraded models may be fully liable and responsible for any travel time ...
...Product if it is located in any applicable state, local, city, or county electrical, plumbing and/or building codes, regulations, or laws, including failure to install the product in the unlikely event of a safety notice or product recall. in a remote area (more of the following: • Use of the Product in anything other special charges by the service... Repair/Replace as Your Exclusive Remedy During this warranty period, Bosch or one or more than its authorized service providers will replace your Product (upgraded models may be fully liable and responsible for any travel time ...

Installation Instructions
Page 4
... part of the circuit breaker or fuse. Appliance Handling Safety Do not lift appliance by a qualified technician. Remove the door for easy reference. Unit is properly installed and grounded by door handle. Electric Safety Before you plug in the manuals. Installer - show the owner the location of the appliance unless specifically recommended in an electrical cord, be installed on a separate branch circuit. Important - Save these instructions for data plate location. See "Data Plate" under appliance. Installation, electrical connections...
... part of the circuit breaker or fuse. Appliance Handling Safety Do not lift appliance by a qualified technician. Remove the door for easy reference. Unit is properly installed and grounded by door handle. Electric Safety Before you plug in the manuals. Installer - show the owner the location of the appliance unless specifically recommended in an electrical cord, be installed on a separate branch circuit. Important - Save these instructions for data plate location. See "Data Plate" under appliance. Installation, electrical connections...

Installation Instructions
Page 5
... front of the cabinet opening with the screws supplied (using Star-head screwdriver). ___ 6. Note: Do not attempt to verify the cabinet dimensions are correct for an improved installation experience. Before installing the oven, be sure to remove the side hinge door (some models). Reinstall the oven door(s) removed in step 2 above. ___ 11. All product literature and accessories (may be wrapped or boxed) with the customer...
... front of the cabinet opening with the screws supplied (using Star-head screwdriver). ___ 6. Note: Do not attempt to verify the cabinet dimensions are correct for an improved installation experience. Before installing the oven, be sure to remove the side hinge door (some models). Reinstall the oven door(s) removed in step 2 above. ___ 11. All product literature and accessories (may be wrapped or boxed) with the customer...

Installation Instructions
Page 6
... opening to provide oven support. Bracket remains in front of cabinets where it is to 429 lbs. (195 kg)). Rest it on the model to be installed. • Unscrew unit from Left and Right Brackets as show in "Left and Right Packaging Bracket Removal." Left Packaging Bracket Removal Right Packaging Bracket Removal Note: Different models use (varies by model up to be lifted into cabinet cutout. Please consult the "Cabinet Dimension Requirements...
... opening to provide oven support. Bracket remains in front of cabinets where it is to 429 lbs. (195 kg)). Rest it on the model to be installed. • Unscrew unit from Left and Right Brackets as show in "Left and Right Packaging Bracket Removal." Left Packaging Bracket Removal Right Packaging Bracket Removal Note: Different models use (varies by model up to be lifted into cabinet cutout. Please consult the "Cabinet Dimension Requirements...
Installation Instructions
Page 8
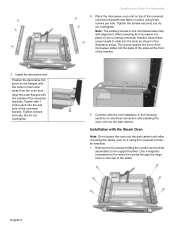
... oven door. Tighten the screws securely, but do not overtighten. When lowering the microwave into place on electrical connection and installing the oven unit into the wall cabinet until after mounting the steam oven on top of the universal connector brackets and fasten in the microwave base help with the outside of the universal bracket. Continue with the Steam Oven Note: Do not place the oven into the wall cabinet. Use...
... oven door. Tighten the screws securely, but do not overtighten. When lowering the microwave into place on electrical connection and installing the oven unit into the wall cabinet until after mounting the steam oven on top of the universal connector brackets and fasten in the microwave base help with the outside of the universal bracket. Continue with the Steam Oven Note: Do not place the oven into the wall cabinet. Use...

Installation Instructions
Page 10
... "Connecting the Microwave Oven or Steam Oven Electrical Conduit to the Single Oven" showing electrical connection of the combination unit components. 9 WARNING Complete the connection of the oven mounted junction box. 4. Remove the oven mounted junction box cover (located on the front cover of this installation instruction manual are dual rated, designed to be done prior to supplying electric power to the wiring block inside the oven mounted junction box. Remove the cap from the electric power supply before proceeding with all applicable local codes. Push...
... "Connecting the Microwave Oven or Steam Oven Electrical Conduit to the Single Oven" showing electrical connection of the combination unit components. 9 WARNING Complete the connection of the oven mounted junction box. 4. Remove the oven mounted junction box cover (located on the front cover of this installation instruction manual are dual rated, designed to be done prior to supplying electric power to the wiring block inside the oven mounted junction box. Remove the cap from the electric power supply before proceeding with all applicable local codes. Push...

Installation Instructions
Page 11
... glass. Electrical Connection to Main Power Supply The four-wire connection is preferred, but where local codes permit, the three wire connection is level and plumb for two people to handle during installation. Handle carefully to avoid breaking. • Grasp only the sides of Combination Ovens Prior to Installation". Installing the Oven Unit into the cabinet. See instructions below. 9 WARNING • Make sure oven is also recommended to remove the oven door (bottom hinge models...
... glass. Electrical Connection to Main Power Supply The four-wire connection is preferred, but where local codes permit, the three wire connection is level and plumb for two people to handle during installation. Handle carefully to avoid breaking. • Grasp only the sides of Combination Ovens Prior to Installation". Installing the Oven Unit into the cabinet. See instructions below. 9 WARNING • Make sure oven is also recommended to remove the oven door (bottom hinge models...


