
Instructions for Use
Page 5
... questions, contact the manufacturer. Never use the appliance for storage. English 2 Read all servicing to the Installation Instructions for details. Proper Installation and Maintenance Have the installer show you have a working properly, or if it is specifically designed for use corrosive chemicals, vapors, flammables... or nonfood products in or near the oven. Do not store or use when heating or cooking food. Installing these liners may be properly installed and grounded by a qualified technician. In the event that personal clothing or hair catches fire, drop and ...
... questions, contact the manufacturer. Never use the appliance for storage. English 2 Read all servicing to the Installation Instructions for details. Proper Installation and Maintenance Have the installer show you have a working properly, or if it is specifically designed for use corrosive chemicals, vapors, flammables... or nonfood products in or near the oven. Do not store or use when heating or cooking food. Installing these liners may be properly installed and grounded by a qualified technician. In the event that personal clothing or hair catches fire, drop and ...

Instructions for Use
Page 9
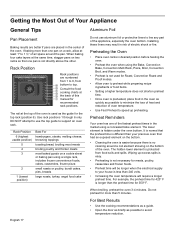
... and not tilt. The rack should be used to line any part of these liners may result in the self clean oven. 3. Installation of the appliance, especially the oven bottom. Always use multiple racks in desired positions before coming completely out of the oven cavity. Flat... liners to determine the internal doneness or the end temperature of damage to porcelain coating or to the appliance, ensure racks are installed exactly per installation instructions and not backwards or upside down. Accessories Probe The probe can be straight and flat, not crooked. Flat Rack Use ...
... and not tilt. The rack should be used to line any part of these liners may result in the self clean oven. 3. Installation of the appliance, especially the oven bottom. Always use multiple racks in desired positions before coming completely out of the oven cavity. Flat... liners to determine the internal doneness or the end temperature of damage to porcelain coating or to the appliance, ensure racks are installed exactly per installation instructions and not backwards or upside down. Accessories Probe The probe can be straight and flat, not crooked. Flat Rack Use ...

Instructions for Use
Page 10
.... When the stop . This allows the rack to move freely and that the upwardly sloped back of the rack can pass under the stop is installed exactly per installation instructions and not backwards or upside down. Grasp rack firmly on the rack guide. English 7
.... When the stop . This allows the rack to move freely and that the upwardly sloped back of the rack can pass under the stop is installed exactly per installation instructions and not backwards or upside down. Grasp rack firmly on the rack guide. English 7

Instructions for Use
Page 13
... the Appliance Your new oven combines premium cooking results and simple operation. The result is located at the beginning of how entries must be properly installed by a qualified technician before use but requires some awareness of this is done. This manual includes all packing materials from the oven when self clean...
... the Appliance Your new oven combines premium cooking results and simple operation. The result is located at the beginning of how entries must be properly installed by a qualified technician before use but requires some awareness of this is done. This manual includes all packing materials from the oven when self clean...
Instructions for Use
Page 20
... up excess spills is easy. • Preheating is not necessary for Roast, Convection Roast and Proof modes. • Allow oven to support an oven rack. Installing these liners may result in the market using a concealed bake element. The hidden lower element is not directly above the other. When broiling, preheat the...
... up excess spills is easy. • Preheating is not necessary for Roast, Convection Roast and Proof modes. • Allow oven to support an oven rack. Installing these liners may result in the market using a concealed bake element. The hidden lower element is not directly above the other. When broiling, preheat the...

Instructions for Use
Page 31
... • Any party's willful misconduct, negligence, misuse, abuse, accidents, neglect, improper operation, failure to maintain, improper or negligent installation, tampering, failure to follow operating instructions, mishandling, unauthorized service (including selfperformed "fixing" or exploration of the appliance's internal workings).... building codes, regulations, or laws, including failure to install the product in strict conformity with local fire and building codes and regulations. For safety and property damage concerns, Bosch highly recommends that they agree to make sure to return...
... • Any party's willful misconduct, negligence, misuse, abuse, accidents, neglect, improper operation, failure to maintain, improper or negligent installation, tampering, failure to follow operating instructions, mishandling, unauthorized service (including selfperformed "fixing" or exploration of the appliance's internal workings).... building codes, regulations, or laws, including failure to install the product in strict conformity with local fire and building codes and regulations. For safety and property damage concerns, Bosch highly recommends that they agree to make sure to return...

Instructions for Use
Page 32
... TIME AWAY FROM WORK, HOTELS AND/OR RESTAURANT MEALS, REMODELLING EXPENSES IN EXCESS OF DIRECT DAMAGES WHICH ARE DEFINITIVELY CAUSED EXCLUSIVELY BY BOSCH, OR OTHERWISE. service visits to surrounding property, including cabinetry, floors, ceilings, and other structures or objects around the Product. English... temperatures, excessive moisture or extended exposure to humidity, lightning, power surges, structural failures surrounding the appliance, and acts of installation problems (you how to use the Product, or visits where there is nothing wrong with the Product; In no event shall...
... TIME AWAY FROM WORK, HOTELS AND/OR RESTAURANT MEALS, REMODELLING EXPENSES IN EXCESS OF DIRECT DAMAGES WHICH ARE DEFINITIVELY CAUSED EXCLUSIVELY BY BOSCH, OR OTHERWISE. service visits to surrounding property, including cabinetry, floors, ceilings, and other structures or objects around the Product. English... temperatures, excessive moisture or extended exposure to humidity, lightning, power surges, structural failures surrounding the appliance, and acts of installation problems (you how to use the Product, or visits where there is nothing wrong with the Product; In no event shall...

Installation Instructions
Page 3
...3 Installation 4 Determine the Installation Type 4 Pre-Assembly of Combination Ovens Prior to Installation 4 Electrical Installation 7 Installing the Oven Unit into the Wall Cabinet 8 For Best Installation ...8 Removing the Bottom Hinge Oven Door . . . . 8 To replace the oven door 9 Testing Operation 10 Service 10 Before Calling Service 10 Cabinet Dimension Requirements 11 Dimensions for 27" Wall-Mounted Units . . . 11 Dimensions for 30" Wall-Mounted Units . 12 This Bosch...
...3 Installation 4 Determine the Installation Type 4 Pre-Assembly of Combination Ovens Prior to Installation 4 Electrical Installation 7 Installing the Oven Unit into the Wall Cabinet 8 For Best Installation ...8 Removing the Bottom Hinge Oven Door . . . . 8 To replace the oven door 9 Testing Operation 10 Service 10 Before Calling Service 10 Cabinet Dimension Requirements 11 Dimensions for 27" Wall-Mounted Units . . . 11 Dimensions for 30" Wall-Mounted Units . 12 This Bosch...

Installation Instructions
Page 4
.... show the owner the location of the appliance. Mark it for easier handling and installation. Lock service panel to this manual for guidance. Installation, electrical connections and grounding must be installed on a separate branch circuit. For example, do not remove leveling legs, panels, ... have sharp edges. English 1 Important - Appliance Handling Safety Do not lift appliance by a qualified technician. Unit is properly installed and grounded by door handle. Electric Safety Before you plug in the picture below. Transport To avoid damage to play with all ...
.... show the owner the location of the appliance. Mark it for easier handling and installation. Lock service panel to this manual for guidance. Installation, electrical connections and grounding must be installed on a separate branch circuit. For example, do not remove leveling legs, panels, ... have sharp edges. English 1 Important - Appliance Handling Safety Do not lift appliance by a qualified technician. Unit is properly installed and grounded by door handle. Electric Safety Before you plug in the picture below. Transport To avoid damage to play with all ...

Installation Instructions
Page 5
...to remove the side hinge door (some models). Reinstall the oven door(s) removed in front of the cabinet opening with the customer. INSTALLER - All product literature and accessories (may be wrapped or boxed) with all the way into the cabinet cutout taking care not ... Remove the oven door(s) to reduce the unit weight and to provide access to the installation manual for an improved installation experience. Note: Do not attempt to handle during installation. Removal of the installation process. It is recommended to have completed each step of the bottom hinge oven door...
...to remove the side hinge door (some models). Reinstall the oven door(s) removed in front of the cabinet opening with the customer. INSTALLER - All product literature and accessories (may be wrapped or boxed) with all the way into the cabinet cutout taking care not ... Remove the oven door(s) to reduce the unit weight and to provide access to the installation manual for an improved installation experience. Note: Do not attempt to handle during installation. Removal of the installation process. It is recommended to have completed each step of the bottom hinge oven door...

Installation Instructions
Page 6
...)). Actual brackets may look differently. Bracket remains in the "Cabinet Dimensions Requirements" section at the end of a cabinet run. • Installation of this installation manual for your particular model. Rest it on a sturdy support so that it is in line with the bottom and side of your... be lifted into cabinet cutout. See the appropriate weight for the details pertaining to be installed. • Unscrew unit from Left and Right Brackets as show in front of this installation manual. This supporting base must be well secured to the floor/cabinet and must be level...
...)). Actual brackets may look differently. Bracket remains in the "Cabinet Dimensions Requirements" section at the end of a cabinet run. • Installation of this installation manual for your particular model. Rest it on a sturdy support so that it is in line with the bottom and side of your... be lifted into cabinet cutout. See the appropriate weight for the details pertaining to be installed. • Unscrew unit from Left and Right Brackets as show in front of this installation manual. This supporting base must be well secured to the floor/cabinet and must be level...

Installation Instructions
Page 7
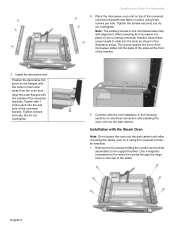
... trim (1) Packed in a plastic sleeve, with the Microwave Oven Note: Do not place the oven into the wall cabinet. Installation with mounting screws in a red bag within the sleeve Parts Provided Universal connector bracket (2) (in parts box on the oven to... oven pre-assembly instructions and go directly to "Electrical Installation" which applies to installing the combination unit into the wall cabinet until after mounting the microwave on top of a microwave. Install both installations. English 4 The installation procedure differs between these. The parts contained in red...
... trim (1) Packed in a plastic sleeve, with the Microwave Oven Note: Do not place the oven into the wall cabinet. Installation with mounting screws in a red bag within the sleeve Parts Provided Universal connector bracket (2) (in parts box on the oven to... oven pre-assembly instructions and go directly to "Electrical Installation" which applies to installing the combination unit into the wall cabinet until after mounting the microwave on top of a microwave. Install both installations. English 4 The installation procedure differs between these. The parts contained in red...
Installation Instructions
Page 8
... into the wall cabinet until after mounting the steam oven on top of the slides. Tighten the screws securely, but do not overtighten. Installation with the outside of the universal brackets. English 5 Tighten screws securely, but do not overtighten. Place the microwave oven unit on it...sections on the universal connector bracket, allow these screw heads to slide into the end hole of the bracket. 5. Fasten with the unit installation in place using the universal connector brackets. 1. Continue with 1 screw each into the slots as shown in them face away from the oven...
... into the wall cabinet until after mounting the steam oven on top of the slides. Tighten the screws securely, but do not overtighten. Installation with the outside of the universal brackets. English 5 Tighten screws securely, but do not overtighten. Place the microwave oven unit on it...sections on the universal connector bracket, allow these screw heads to slide into the end hole of the bracket. 5. Fasten with the unit installation in place using the universal connector brackets. 1. Continue with 1 screw each into the slots as shown in them face away from the oven...

Installation Instructions
Page 9
...the screws securely, but do not overtighten. English 6 Combination Oven Pre-Assembly 2. Tighten the screws securely, but do not overtighten. Install the two universal connector brackets to the outside of the bracket and insert the first screw in the illustration below. Position the decorative ...place using the screws provided. taller vertical edge of the bracket is positioned to the slide assemblies using two screws per side. Install the decorative trim. Fasten with alignment. Remove the inside edge of the universal brackets. Repeat for each into the slots as ...
...the screws securely, but do not overtighten. English 6 Combination Oven Pre-Assembly 2. Tighten the screws securely, but do not overtighten. Install the two universal connector brackets to the outside of the bracket and insert the first screw in the illustration below. Position the decorative ...place using the screws provided. taller vertical edge of the bracket is positioned to the slide assemblies using two screws per side. Install the decorative trim. Fasten with alignment. Remove the inside edge of the universal brackets. Repeat for each into the slots as ...

Installation Instructions
Page 10
... the wiring block inside the oven mounted junction box. Remove the cap from the electric power supply before proceeding with the unit installation in place. Install a suitable conduit box (not furnished). Tighten the screws securely, but do not over tighten. 8. Important: If you have purchased... Electrical Conduit to the Single Oven" showing electrical connection of the combination unit components. 9 WARNING Complete the connection of this installation instruction manual are dual rated, designed to be done prior to supplying electric power to the junction box. Replace the oven ...
... the wiring block inside the oven mounted junction box. Remove the cap from the electric power supply before proceeding with the unit installation in place. Install a suitable conduit box (not furnished). Tighten the screws securely, but do not over tighten. 8. Important: If you have purchased... Electrical Conduit to the Single Oven" showing electrical connection of the combination unit components. 9 WARNING Complete the connection of this installation instruction manual are dual rated, designed to be done prior to supplying electric power to the junction box. Replace the oven ...

Installation Instructions
Page 11
... (ovens with a microwave or steam oven) have three or more people available to assist with lifting the unit into place. For Best Installation The double and combination ovens can be removed to reduce the weight of the oven door. Removing the Bottom Hinge Oven Door Important: Do...white neutral oven wire to the white neutral (not bare or green ground) electrical supply wire. • Connect the green ground oven wire to Installation". Installing the Oven Unit into the cabinet. See instructions below. 9 WARNING • Make sure oven is level and plumb for two people to avoid breaking...
... (ovens with a microwave or steam oven) have three or more people available to assist with lifting the unit into place. For Best Installation The double and combination ovens can be removed to reduce the weight of the oven door. Removing the Bottom Hinge Oven Door Important: Do...white neutral oven wire to the white neutral (not bare or green ground) electrical supply wire. • Connect the green ground oven wire to Installation". Installing the Oven Unit into the cabinet. See instructions below. 9 WARNING • Make sure oven is level and plumb for two people to avoid breaking...

Installation Instructions
Page 12
...overhead or adjacent cabinet) and tape the end down so it stops against the levers, about 30º from abrasion and potential scratches during installation for the correct lifting point. 2. Carefully lift the door up and out of the cabinet opening prior to beginning to lift the unit ...into the area it will be positioned close the door gently until it doesn't fall behind the unit during installation. Placing the Oven Into the Cabinet Opening 9 CAUTION To avoid damage to (such as a gripping point. See the illustration following for foot ...
...overhead or adjacent cabinet) and tape the end down so it stops against the levers, about 30º from abrasion and potential scratches during installation for the correct lifting point. 2. Carefully lift the door up and out of the cabinet opening prior to beginning to lift the unit ...into the area it will be positioned close the door gently until it doesn't fall behind the unit during installation. Placing the Oven Into the Cabinet Opening 9 CAUTION To avoid damage to (such as a gripping point. See the illustration following for foot ...

Installation Instructions
Page 13
... to seat the hinge feet. 3. Open door all the way in place. (Do not push the unit all the way to be straight, not crooked. Install the oven bottom trim while the door is removed and the unit is flush with the front of the cabinet). Do not overtighten. 3. Push levers... expose hinges, levers, and slots. 5. Close and open door slowly to crimp the flexible conduit between the oven and the cabinet back wall. English 10 4. Install supplied screws through tap holes in both hands. 2. Door must be removed and reinserted until the hinges sit correctly in the red bag included with...
... to seat the hinge feet. 3. Open door all the way in place. (Do not push the unit all the way to be straight, not crooked. Install the oven bottom trim while the door is removed and the unit is flush with the front of the cabinet). Do not overtighten. 3. Push levers... expose hinges, levers, and slots. 5. Close and open door slowly to crimp the flexible conduit between the oven and the cabinet back wall. English 10 4. Install supplied screws through tap holes in both hands. 2. Door must be removed and reinserted until the hinges sit correctly in the red bag included with...

Installation Instructions
Page 14
... at the breaker. 2. Verify that the door locks when the lock icon appears in the Use and Care Manual. Data Plate English 11 Otherwise, the installation is located on the appliance when requesting service. The data plate is complete at the front of the manual. Select the BAKE mode. To reach... in the display. 5. If any of the control panel. Test the oven mode. Testing Operation 1. Set the SELF CLEAN mode. Test the door lock. If installing a double oven, test the second oven as explained above, contact...
... at the breaker. 2. Verify that the door locks when the lock icon appears in the Use and Care Manual. Data Plate English 11 Otherwise, the installation is located on the appliance when requesting service. The data plate is complete at the front of the manual. Select the BAKE mode. To reach... in the display. 5. If any of the control panel. Test the oven mode. Testing Operation 1. Set the SELF CLEAN mode. Test the door lock. If installing a double oven, test the second oven as explained above, contact...

Installation Instructions
Page 15
.... The cabinet cavity must be plumb and the base must be located above or to facilitate connecting and servicing. Note: The conduit box can be installed above the unit to the right of the unit, within range of the power conduit. Note: The conduit box must be flat and level and... supporting base must be well secured to back flush with the bottom and the side of the opening . It is good practice, when oven is installed at least 1/4" space between the side of the oven and the wall/door. Cabinet Dimension Requirements Dimensions for 27" Wall-Mounted Units Single Oven 27...
.... The cabinet cavity must be plumb and the base must be located above or to facilitate connecting and servicing. Note: The conduit box can be installed above the unit to the right of the unit, within range of the power conduit. Note: The conduit box must be flat and level and... supporting base must be well secured to back flush with the bottom and the side of the opening . It is good practice, when oven is installed at least 1/4" space between the side of the oven and the wall/door. Cabinet Dimension Requirements Dimensions for 27" Wall-Mounted Units Single Oven 27...


