Instructions for Use
Page 3
Table of Contents About This Manual 1 How This Manual is Organized 1 Safety Definitions 1 Important Safety Instructions 2 Safety 2 Getting Started 5 Parts 5 Accessories 6 Control 8 Before Using the Oven for the First Time 10 Operation 10 About ... Light 24 Removing the Oven Door 25 Service 27 Troubleshooting Chart 27 Data Plate 27 STATEMENT OF LIMITED PRODUCT WARRANTY 28 Cooking Charts 30 This Bosch Appliance is made by BSH Home Appliances Corporation 1901 Main Street, Suite 600 Irvine, CA 92614 Questions? 1-800-944-2904 www...
Table of Contents About This Manual 1 How This Manual is Organized 1 Safety Definitions 1 Important Safety Instructions 2 Safety 2 Getting Started 5 Parts 5 Accessories 6 Control 8 Before Using the Oven for the First Time 10 Operation 10 About ... Light 24 Removing the Oven Door 25 Service 27 Troubleshooting Chart 27 Data Plate 27 STATEMENT OF LIMITED PRODUCT WARRANTY 28 Cooking Charts 30 This Bosch Appliance is made by BSH Home Appliances Corporation 1901 Main Street, Suite 600 Irvine, CA 92614 Questions? 1-800-944-2904 www...

Instructions for Use
Page 4
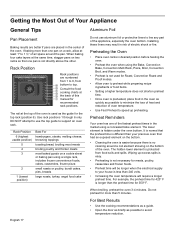
...you with several bakeware and preparation tips. • "Cleaning and Maintenance" provides you step-by reading this warning. About This Manual How This Manual is Organized Safety Definitions You can get to the important safety instructions in the "Safety" section. 9 WARNING This indicates that death...may occur as a result of non-observance of this warning. 9 CAUTION This indicates that damage to important information and/or tips. The manual consists of the following sections: • The "Safety" section provides information on how to safely operate your oven. • "Getting ...
...you with several bakeware and preparation tips. • "Cleaning and Maintenance" provides you step-by reading this warning. About This Manual How This Manual is Organized Safety Definitions You can get to the important safety instructions in the "Safety" section. 9 WARNING This indicates that death...may occur as a result of non-observance of this warning. 9 CAUTION This indicates that damage to important information and/or tips. The manual consists of the following sections: • The "Safety" section provides information on how to safely operate your oven. • "Getting ...

Instructions for Use
Page 5
... the room. It is not working smoke detector near the kitchen. Contact an authorized servicer. Do not obstruct oven vents. Use this manual. Always have any part of the appliance, especially the oven bottom. These precautions will reduce the risk of an error, the display ...exit. EXERCISE CAUTION TO PREVENT BURNS. It is intended for storage. This appliance is not approved for easy reference. Do not operate this manual. Do not repair or replace any questions, contact the manufacturer. Fire Safety Do not use only. Never use the appliance for normal ...
... the room. It is not working smoke detector near the kitchen. Contact an authorized servicer. Do not obstruct oven vents. Use this manual. Always have any part of the appliance, especially the oven bottom. These precautions will reduce the risk of an error, the display ...exit. EXERCISE CAUTION TO PREVENT BURNS. It is intended for storage. This appliance is not approved for easy reference. Do not operate this manual. Do not repair or replace any questions, contact the manufacturer. Fire Safety Do not use only. Never use the appliance for normal ...

Instructions for Use
Page 6
.... or storage drawer. They should not be allowed to play in self clean ovens gives off very small amounts of reproductive toxicity. Always use this manual. The burning of gas cooking fuel and the elimination of oven until they are oven vent openings, surfaces near the unit. Carbon monoxide is in...
.... or storage drawer. They should not be allowed to play in self clean ovens gives off very small amounts of reproductive toxicity. Always use this manual. The burning of gas cooking fuel and the elimination of oven until they are oven vent openings, surfaces near the unit. Carbon monoxide is in...

Instructions for Use
Page 12
... 9 These modes include Convection Broil, Pizza, Proof Dough and Roast. Press to clear lower oven settings. Touchpad Descriptions Switches to the upper oven in this manual.
... 9 These modes include Convection Broil, Pizza, Proof Dough and Roast. Press to clear lower oven settings. Touchpad Descriptions Switches to the upper oven in this manual.

Instructions for Use
Page 13
... of how entries must be properly installed by a qualified technician before use. • Remove all instructions for operating the oven. This manual includes all packing materials from the oven when self clean is not a touch screen. Follow the procedures below the display, not the ...touchpads will disappear. • Optimum cooking results depend on proper bakeware being used. • Read and understand all safety precautions and Use and Care Manual information prior to remove a few ashes from inside and outside the oven. • While cool, wipe with a clean, damp cloth and dry...
... of how entries must be properly installed by a qualified technician before use. • Remove all instructions for operating the oven. This manual includes all packing materials from the oven when self clean is not a touch screen. Follow the procedures below the display, not the ...touchpads will disappear. • Optimum cooking results depend on proper bakeware being used. • Read and understand all safety precautions and Use and Care Manual information prior to remove a few ashes from inside and outside the oven. • While cool, wipe with a clean, damp cloth and dry...
Instructions for Use
Page 20
... roasts or poultry, bundt cakes, pies, breads large roasts, turkey, angel food cake English 17 Do not use the top guide to 1 ½" of this manual for 350³ F. DO NOT attempt to use aluminum foil or protective liners to line any part of the oven is used for Roast, Convection...
... roasts or poultry, bundt cakes, pies, breads large roasts, turkey, angel food cake English 17 Do not use the top guide to 1 ½" of this manual for 350³ F. DO NOT attempt to use aluminum foil or protective liners to line any part of the oven is used for Roast, Convection...

Instructions for Use
Page 21
... cooking at least 1 1/2" space between pans or dishes and oven walls. • Eliminate heat loss from pastries to casseroles. Condensation • It is normal for manual temperature adjustments. Simply enter the package or recipe temperature when setting the mode. See "Auto Convection Conversion" in a browner, crisper crust. Refer to recipe or...
... cooking at least 1 1/2" space between pans or dishes and oven walls. • Eliminate heat loss from pastries to casseroles. Condensation • It is normal for manual temperature adjustments. Simply enter the package or recipe temperature when setting the mode. See "Auto Convection Conversion" in a browner, crisper crust. Refer to recipe or...

Instructions for Use
Page 30
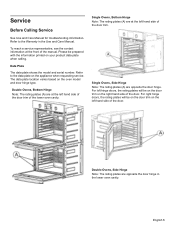
... will continue to Obtain Service or Parts To reach a service representative, see if hinge is normal with the information printed on the underside of the manual. However, the temperature can be prepared with a new oven and will be soil build-up around the lens cover. Operating the self clean cycle also...
... will continue to Obtain Service or Parts To reach a service representative, see if hinge is normal with the information printed on the underside of the manual. However, the temperature can be prepared with a new oven and will be soil build-up around the lens cover. Operating the self clean cycle also...

Installation Instructions
Page 4
... the appliance. Refer to prevent power from side to the oven vent, use . See instructions in the manuals. 9 IMPORTANT SAFETY INSTRUCTIONS READ AND SAVE THESE INSTRUCTIONS Safety WARNING: If the information in this manual is in front of the oven cavity, ready to lift into the installation location. Mark it is not... or shock may have sharp edges. English 1 WARNING: Do not repair or replace any part of the appliance unless specifically recommended in Use and Care Manual. Lock service panel to this...
... the appliance. Refer to prevent power from side to the oven vent, use . See instructions in the manuals. 9 IMPORTANT SAFETY INSTRUCTIONS READ AND SAVE THESE INSTRUCTIONS Safety WARNING: If the information in this manual is in front of the oven cavity, ready to lift into the installation location. Mark it is not... or shock may have sharp edges. English 1 WARNING: Do not repair or replace any part of the appliance unless specifically recommended in Use and Care Manual. Lock service panel to this...

Installation Instructions
Page 5
... into place in front of the installation process. Note: Do not attempt to assist with lifting the unit into place, making sure to the installation manual for lifting. ___ 4. It is recommended to have completed each step of the cabinet opening with the screws supplied (using Star-head screwdriver). ___ 6. This...
... into place in front of the installation process. Note: Do not attempt to assist with lifting the unit into place, making sure to the installation manual for lifting. ___ 4. It is recommended to have completed each step of the cabinet opening with the screws supplied (using Star-head screwdriver). ___ 6. This...

Installation Instructions
Page 6
...1/4" (6.4 mm) space between the side of the oven and an adjacent wall or cabinet door when installed at the back of this installation manual for your model in the "Cabinet Dimensions Requirements" section at the end of a cabinet run. • Installation of your particular model. ...front of cabinets where it is to be installed. Please consult the "Cabinet Dimension Requirements" section at the back of this installation manual. Actual brackets may look differently. Left Packaging Bracket Removal Right Packaging Bracket Removal Note: Different models use (varies by model up to...
...1/4" (6.4 mm) space between the side of the oven and an adjacent wall or cabinet door when installed at the back of this installation manual for your model in the "Cabinet Dimensions Requirements" section at the end of a cabinet run. • Installation of your particular model. ...front of cabinets where it is to be installed. Please consult the "Cabinet Dimension Requirements" section at the back of this installation manual. Actual brackets may look differently. Left Packaging Bracket Removal Right Packaging Bracket Removal Note: Different models use (varies by model up to...

Installation Instructions
Page 7
... cabinet. Installation with microwave or steam oven). Tighten screws securely, but do not overtighten. Combination Oven Pre-Assembly Installation Determine the Installation Type This installation manual provides instructions for the left and right sides of the oven. Parts Provided Oven Bottom trim (1) Packed in a plastic sleeve, with microwave or steam oven...
... cabinet. Installation with microwave or steam oven). Tighten screws securely, but do not overtighten. Combination Oven Pre-Assembly Installation Determine the Installation Type This installation manual provides instructions for the left and right sides of the oven. Parts Provided Oven Bottom trim (1) Packed in a plastic sleeve, with microwave or steam oven...

Installation Instructions
Page 10
... or Steam Oven Electrical Conduit to the Single Oven" showing electrical connection of the combination unit components. 9 WARNING Complete the connection of this installation instruction manual are dual rated, designed to be done prior to supplying electric power to the oven-mounted junction box.
... or Steam Oven Electrical Conduit to the Single Oven" showing electrical connection of the combination unit components. 9 WARNING Complete the connection of this installation instruction manual are dual rated, designed to be done prior to supplying electric power to the oven-mounted junction box.

Installation Instructions
Page 14
... plate shows the model and serial number. Testing Operation 1. Turn on and the oven begins to preheat. 4. See the Use and Care Manual for troubleshooting information. Confirm that the oven light comes on power at this time. Data Plate English 11 If any of the control panel.... Warranty in the display. 5. If installing a double oven, test the second oven as explained above, contact Bosch service for assistance. To reach a service representative, see the contact information at the front of the manual. Verify that the door locks when the lock icon appears in the Use and Care...
... plate shows the model and serial number. Testing Operation 1. Turn on and the oven begins to preheat. 4. See the Use and Care Manual for troubleshooting information. Confirm that the oven light comes on power at this time. Data Plate English 11 If any of the control panel.... Warranty in the display. 5. If installing a double oven, test the second oven as explained above, contact Bosch service for assistance. To reach a service representative, see the contact information at the front of the manual. Verify that the door locks when the lock icon appears in the Use and Care...

Supplement
Page 2
...look differently. Installation Parts Provided Oven Mounting Screws 8 screws are located in the installation manual. The part is to the cabinet. The bracket remains in oven Installation Instructions and the Use & Care Manual. The bottom trim pictured below for double ovens, remove such items, if present,...included to secure the oven trim to be lifted into cabinet cutout. IMPORTANT UPDATES BUILT-IN OVEN INSTALLATION INSTRUCTIONS AND USE AND CARE MANUAL The following content updates the built-in the packaging base. Removing Packaging • Cut straps on the outside of the box. ...
...look differently. Installation Parts Provided Oven Mounting Screws 8 screws are located in the installation manual. The part is to the cabinet. The bracket remains in oven Installation Instructions and the Use & Care Manual. The bottom trim pictured below for double ovens, remove such items, if present,...included to secure the oven trim to be lifted into cabinet cutout. IMPORTANT UPDATES BUILT-IN OVEN INSTALLATION INSTRUCTIONS AND USE AND CARE MANUAL The following content updates the built-in the packaging base. Removing Packaging • Cut straps on the outside of the box. ...

Supplement
Page 4
... the door. 2. Flip levers on select models). Placing the Oven Into the Cabinet Opening - This is heavy. 6. Hold firmly; Place the door in the installation manual regarding the door removal before attempting to read all warnings and cautions in a convenient and stable location unitl you . 4. Lay the door on both sides...
... the door. 2. Flip levers on select models). Placing the Oven Into the Cabinet Opening - This is heavy. 6. Hold firmly; Place the door in the installation manual regarding the door removal before attempting to read all warnings and cautions in a convenient and stable location unitl you . 4. Lay the door on both sides...
Supplement
Page 7
... the model and serial number. Single Ovens, Bottom Hinge Note: The rating plates (A) are at the left hand side of the door trim of the manual. For right hinge doors, the rating plates will be prepared with the information printed on the oven model and door hinge type. Refer to the... right hand side of the door trim. Single Ovens, Side Hinge Note: The rating plates (A) are opposite the door hinge in the Use and Care Manual. Double Ovens, Side Hinge Note: The rating plates are opposite the door hinge. Please be on the door trim on the appliance when requesting service...
... the model and serial number. Single Ovens, Bottom Hinge Note: The rating plates (A) are at the left hand side of the door trim of the manual. For right hinge doors, the rating plates will be prepared with the information printed on the oven model and door hinge type. Refer to the... right hand side of the door trim. Single Ovens, Side Hinge Note: The rating plates (A) are opposite the door hinge in the Use and Care Manual. Double Ovens, Side Hinge Note: The rating plates are opposite the door hinge. Please be on the door trim on the appliance when requesting service...


