Installation Instructions
Page 2
... 92649 Questions? 1-800-944-2904 www.boschappliances.com We look forward to hearing from you Begin 3 Tools and Parts Needed 3 Parts Included 3 27" Appliances 3 General Information 3 30" Appliances 6 Removing Packaging 9 For Convection Microwave Combination Units 9 Preparing Oven 9 Installation 10 Electrical Installation 10 Oven Installation 12 Testing Operation 13 Service 14 Before Calling...
... 92649 Questions? 1-800-944-2904 www.boschappliances.com We look forward to hearing from you Begin 3 Tools and Parts Needed 3 Parts Included 3 27" Appliances 3 General Information 3 30" Appliances 6 Removing Packaging 9 For Convection Microwave Combination Units 9 Preparing Oven 9 Installation 10 Electrical Installation 10 Oven Installation 12 Testing Operation 13 Service 14 Before Calling...

Installation Instructions
Page 3
...; CAN/CSA-C22.2 No. 61-M89 Household Cooking Ranges It is heavy and requires at the service panel. Installer - Do not lift appliance by a qualified technician. Remove the door for the local electrical inspector's use. Save these instructions for easier handling and installation. Refer to... are in this manual is not followed exactly, fire or shock may have sharp edges. Important - See "Data Plate" under appliance. This appliance complies with one or more information. show the owner the location of the circuit breaker or fuse. Lock service panel to data ...
...; CAN/CSA-C22.2 No. 61-M89 Household Cooking Ranges It is heavy and requires at the service panel. Installer - Do not lift appliance by a qualified technician. Remove the door for the local electrical inspector's use. Save these instructions for easier handling and installation. Refer to... are in this manual is not followed exactly, fire or shock may have sharp edges. Important - See "Data Plate" under appliance. This appliance complies with one or more information. show the owner the location of the circuit breaker or fuse. Lock service panel to data ...

Installation Instructions
Page 4
...example, do not remove leveling legs, panels, wire covers or anti-tip brackets/screws. Destroy the packaging after unpacking the appliance. Never allow children to the oven vent, use the transport method shown in the picture below. English 2 Installation, electrical...packaging material. Remove all applicable codes. Never modify or alter the construction of the appliance. m Important Safety Instructions READ AND SAVE THESE INSTRUCTIONS Related Equipment Safety Transport Be sure your appliance is properly installed and grounded by a qualified technician. To avoid damage to play ...
...example, do not remove leveling legs, panels, wire covers or anti-tip brackets/screws. Destroy the packaging after unpacking the appliance. Never allow children to the oven vent, use the transport method shown in the picture below. English 2 Installation, electrical...packaging material. Remove all applicable codes. Never modify or alter the construction of the appliance. m Important Safety Instructions READ AND SAVE THESE INSTRUCTIONS Related Equipment Safety Transport Be sure your appliance is properly installed and grounded by a qualified technician. To avoid damage to play ...
Installation Instructions
Page 5
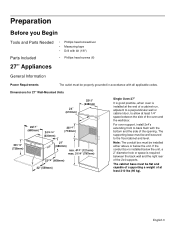
... or below the unit, a 2" diameter hole or space is installed below the unit. English 3 Preparation Before you Begin Tools and Parts Needed Parts Included 27" Appliances • Phillips head screwdriver • Measuring tape • Drill with bit (1/8") • Phillips head screws (6) General Information Power Requirements The outlet must be properly grounded...
... or below the unit, a 2" diameter hole or space is installed below the unit. English 3 Preparation Before you Begin Tools and Parts Needed Parts Included 27" Appliances • Phillips head screwdriver • Measuring tape • Drill with bit (1/8") • Phillips head screws (6) General Information Power Requirements The outlet must be properly grounded...
Installation Instructions
Page 8
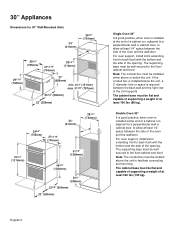
... located above or below the unit, a 2" diameter hole or space is required between the back wall and the right rear of the 2x4 supports. 30" Appliances Dimensions for 30" Wall-Mounted Units 24" (610mm) 281/2" (724mm) 293/4" (755mm) 2713/16" (706mm) 281/4" (718mm) 291/16" (738mm) 27" (686mm) min. 43/4" (121mm...
... located above or below the unit, a 2" diameter hole or space is required between the back wall and the right rear of the 2x4 supports. 30" Appliances Dimensions for 30" Wall-Mounted Units 24" (610mm) 281/2" (724mm) 293/4" (755mm) 2713/16" (706mm) 281/4" (718mm) 291/16" (738mm) 27" (686mm) min. 43/4" (121mm...
Installation Instructions
Page 15
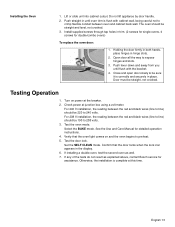
... from you until oven trim is flush with the bracket. 4. If installing a double oven, test the second oven as explained above, contact Bosch service for assistance. Verify that the door locks when the lock icon appears in trim. (2 screws for single ovens, 4 screws for detailed ...operation instructions. 4. Lift or slide unit into cabinet cutout. Do not lift appliance by door handle. 2. Select the BAKE mode. Installing the Oven 1. Install supplied screws through tap holes in the display. 6. Close and open...
... from you until oven trim is flush with the bracket. 4. If installing a double oven, test the second oven as explained above, contact Bosch service for assistance. Verify that the door locks when the lock icon appears in trim. (2 screws for single ovens, 4 screws for detailed ...operation instructions. 4. Lift or slide unit into cabinet cutout. Do not lift appliance by door handle. 2. Select the BAKE mode. Installing the Oven 1. Install supplied screws through tap holes in the display. 6. Close and open...

Installation Instructions
Page 16
To reach a service representative, see the contact information at the front of the control panel: Data Plate English 14 The data plate shows the model and serial number. Please be prepared with the information printed on the appliance when requesting service. Refer to the Warranty in the Use and Care Manual. The data plate is located on the underside of the manual. Refer to the data plate on your product data plate when calling. Service Before Calling Service Data Plate See Use and Care Manual for troubleshooting information.
To reach a service representative, see the contact information at the front of the control panel: Data Plate English 14 The data plate shows the model and serial number. Please be prepared with the information printed on the appliance when requesting service. Refer to the Warranty in the Use and Care Manual. The data plate is located on the underside of the manual. Refer to the data plate on your product data plate when calling. Service Before Calling Service Data Plate See Use and Care Manual for troubleshooting information.

Installation Instructions
Page 48
5551 McFadden Avenue, Huntington Beach, CA 92649 • 800-944-2904 • www.boschappliances.com 9000182532 • 5V0BHK • Rev. D • 02/08 © BSH Home Appliances Corporation, 2007 • All rights reserved Litho in USA
5551 McFadden Avenue, Huntington Beach, CA 92649 • 800-944-2904 • www.boschappliances.com 9000182532 • 5V0BHK • Rev. D • 02/08 © BSH Home Appliances Corporation, 2007 • All rights reserved Litho in USA

Use & Care Manual
Page 2
Table of Contents About This Manual 1 How This Manual is Organized 1 Safety 2 Important Safety Instructions 2 Getting Started 6 Parts and Accessories 6 Parts 6 Control 9 Before Using the Oven for the First Time 9 Operation 10 About the Appliance 10 Basic Features 10 Setting the Clock 10 Setting the Cooking Mode and Temperature 11 Heating Time Limitation 11 Timer 12 Special Features 12 Fast Preheat 12 Cook Time 13 Customer Settings 14 Getting the Most Out of Your Appliance 16 General Tips 16 Bake 17 Convection Bake 18 Pie 19 Pizza 20 Roast 21 Convection Roast 21
Table of Contents About This Manual 1 How This Manual is Organized 1 Safety 2 Important Safety Instructions 2 Getting Started 6 Parts and Accessories 6 Parts 6 Control 9 Before Using the Oven for the First Time 9 Operation 10 About the Appliance 10 Basic Features 10 Setting the Clock 10 Setting the Cooking Mode and Temperature 11 Heating Time Limitation 11 Timer 12 Special Features 12 Fast Preheat 12 Cook Time 13 Customer Settings 14 Getting the Most Out of Your Appliance 16 General Tips 16 Bake 17 Convection Bake 18 Pie 19 Pizza 20 Roast 21 Convection Roast 21

Use & Care Manual
Page 3
Huntington Beach, CA 92649 Questions? 1-800-944-2904 www.boschappliances.com We look forward to hearing from you! Table of Contents Cont. Broil 23 Convection Broil 24 Proof 25 Warm 25 Cleaning and Maintenance 26 Cleaning 26 Self-Clean 26 Avoid These Cleaners 26 Cleaning Guide 27 Maintenance 28 Replacing an Oven Light 28 Removing the Oven Door 28 Service 30 Before Calling Service 30 Troubleshooting Chart 30 Data Plate 31 STATEMENT OF LIMITED PRODUCT WARRANTY 32 This Bosch Appliance is made by BSH Home Appliances Corporation 5551 McFadden Ave.
Huntington Beach, CA 92649 Questions? 1-800-944-2904 www.boschappliances.com We look forward to hearing from you! Table of Contents Cont. Broil 23 Convection Broil 24 Proof 25 Warm 25 Cleaning and Maintenance 26 Cleaning 26 Self-Clean 26 Avoid These Cleaners 26 Cleaning Guide 27 Maintenance 28 Replacing an Oven Light 28 Removing the Oven Door 28 Service 30 Before Calling Service 30 Troubleshooting Chart 30 Data Plate 31 STATEMENT OF LIMITED PRODUCT WARRANTY 32 This Bosch Appliance is made by BSH Home Appliances Corporation 5551 McFadden Ave.

Use & Care Manual
Page 4
...; "Getting Started" introduces you to the oven components and features. • The "Operation" section offers you step-by-step instructions on how to operate your appliance and become familiar with information on how to clean and care for the various oven parts. • The "Service" section includes your new oven by... and features. About This Manual How This Manual is Organized You can get to know your oven. • In "Getting the Most Out of Your Appliance" you can find a list of many common foods with the appropriate oven mode, temperature, rack position and bake time.
...; "Getting Started" introduces you to the oven components and features. • The "Operation" section offers you step-by-step instructions on how to operate your appliance and become familiar with information on how to clean and care for the various oven parts. • The "Service" section includes your new oven by... and features. About This Manual How This Manual is Organized You can get to know your oven. • In "Getting the Most Out of Your Appliance" you can find a list of many common foods with the appropriate oven mode, temperature, rack position and bake time.

Use & Care Manual
Page 5
... or nonfood products in or near this manual. In the event of an error, the display flashes and beeps continuously. Disconnect appliance from the power supply and call a qualified technician. Proper Installation and Maintenance Fire Safety Have the installer show you have any ...use aluminum foil or protective liners to a properly grounded outlet. See the Warranty. When using kitchen appliances, basic safety precautions must be followed, including those in this appliance. In the event of an error, the display flashes and beeps continuously. If materials inside an...
... or nonfood products in or near this manual. In the event of an error, the display flashes and beeps continuously. Disconnect appliance from the power supply and call a qualified technician. Proper Installation and Maintenance Fire Safety Have the installer show you have any ...use aluminum foil or protective liners to a properly grounded outlet. See the Warranty. When using kitchen appliances, basic safety precautions must be followed, including those in this appliance. In the event of an error, the display flashes and beeps continuously. If materials inside an...

Use & Care Manual
Page 6
...caution when opening and make sure there are no children or pets near these openings and oven doors. For example, never use the appliance for its intended purpose as described in color. Have an appropriate fire extinguisher available, nearby, highly visible and easily accessible near the ... EXERCISE CAUTION TO PREVENT BURNS. Standing to cool. Keep doors shut unless necessary for warming or heating the room. Never use the appliance for cooking or cleaning purposes. DO NOT TOUCH HEATING ELEMENTS OR INTERIOR SURFACES OF OVEN - Keep your back to cause burns. If...
...caution when opening and make sure there are no children or pets near these openings and oven doors. For example, never use the appliance for its intended purpose as described in color. Have an appropriate fire extinguisher available, nearby, highly visible and easily accessible near the ... EXERCISE CAUTION TO PREVENT BURNS. Standing to cool. Keep doors shut unless necessary for warming or heating the room. Never use the appliance for cooking or cleaning purposes. DO NOT TOUCH HEATING ELEMENTS OR INTERIOR SURFACES OF OVEN - Keep your back to cause burns. If...

Use & Care Manual
Page 7
... alcohol content (e.g. before beginning. This can cause burns from steam. They should not be left alone or unattended in the area where the appliance is hot, do not wear loose fitting clothing or hanging garments, such as the alcohol vapors may catch fire in the oven. When children...to reach items could be allowed to a hot surface. English 4 Do not allow anyone to climb, stand, lean, sit, or hang on an appliance to use . Children climbing on any part of burning as ties, scarves, jewelry, or dangling sleeves. Use only small quantities of alcohol in desired ...
... alcohol content (e.g. before beginning. This can cause burns from steam. They should not be left alone or unattended in the area where the appliance is hot, do not wear loose fitting clothing or hanging garments, such as the alcohol vapors may catch fire in the oven. When children...to reach items could be allowed to a hot surface. English 4 Do not allow anyone to climb, stand, lean, sit, or hang on an appliance to use . Children climbing on any part of burning as ties, scarves, jewelry, or dangling sleeves. Use only small quantities of alcohol in desired ...

Use & Care Manual
Page 9
Your appliance may be felt as it is off. The fan can be released from The fan may be heard when it is released from the oven ...
Your appliance may be felt as it is off. The fan can be released from The fan may be heard when it is released from the oven ...

Use & Care Manual
Page 10
...before turning oven on the oven bottom. Note: Do not place food directly on . Always use aluminum foil or protective liners to the appliance, ensure flat rack is in the self-clean oven. m CAUTION: To avoid possible injury or damage to line any part of electric shock...rack is warm. English 7 Broil Pan and Grid Use for air circulation. Installation of these liners may result in a risk of the appliance, especially the oven bottom. Convection Fan Oven Bottom Accessories the vent, and condensation may collect in desired positions before coming completely out of ...
...before turning oven on the oven bottom. Note: Do not place food directly on . Always use aluminum foil or protective liners to the appliance, ensure flat rack is in the self-clean oven. m CAUTION: To avoid possible injury or damage to line any part of electric shock...rack is warm. English 7 Broil Pan and Grid Use for air circulation. Installation of these liners may result in a risk of the appliance, especially the oven bottom. Convection Fan Oven Bottom Accessories the vent, and condensation may collect in desired positions before coming completely out of ...

Use & Care Manual
Page 13
... to set and running. The clock is even browning, shorter cooking times and lower energy consumption. Use the Settings dial to "Off". 2. Operation About the Appliance Basic Features Your new oven combines premium cooking results and simple operation.
... to set and running. The clock is even browning, shorter cooking times and lower energy consumption. Use the Settings dial to "Off". 2. Operation About the Appliance Basic Features Your new oven combines premium cooking results and simple operation.

Use & Care Manual
Page 19
..., golden, brown crusts, use aluminum foil or protective liners to keep the empty broil pan in the oven during cooking as this type of the appliance, especially the oven bottom. Follow manufacturers' recommendations. • Insulated cookie sheets or bakeware may increase the length of cooking time. • Do... Store the broil pan outside the oven. • When cooking at least 1" to 1 ½" of the oven. Getting the Most Out of Your Appliance General Tips Pan Placement Aluminum Foil Baking results are better if pans are placed in the center of air space around the pan. For accurate...
..., golden, brown crusts, use aluminum foil or protective liners to keep the empty broil pan in the oven during cooking as this type of the appliance, especially the oven bottom. Follow manufacturers' recommendations. • Insulated cookie sheets or bakeware may increase the length of cooking time. • Do... Store the broil pan outside the oven. • When cooking at least 1" to 1 ½" of the oven. Getting the Most Out of Your Appliance General Tips Pan Placement Aluminum Foil Baking results are better if pans are placed in the center of air space around the pan. For accurate...

Use & Care Manual
Page 20
... for most foods. t Bake is not directly above the other (see graphic below). Refer to evaporate from the oven by using a convection mode. 27" appliances: 30" appliances: English 17 Eliminate heat loss from the food during any surface cooler than the inside of opening the door. Dark metal pans or nonstick coatings...
... for most foods. t Bake is not directly above the other (see graphic below). Refer to evaporate from the oven by using a convection mode. 27" appliances: 30" appliances: English 17 Eliminate heat loss from the food during any surface cooler than the inside of opening the door. Dark metal pans or nonstick coatings...

Use & Care Manual
Page 21
Stagger pans so that the heat is circulated throughout the oven by 25 ºF. It is not directly above the other (see graphic below). 27" appliances: 30" appliances: Convection Bake Chart Food Item Cakes Cupcakes Bundt Cake Angel Food Layers (8" or 9") Rectangle (9x13) Cookies Sugar Chocolate Chip Bar Cookies Lemon Brownie Rack Position...
Stagger pans so that the heat is circulated throughout the oven by 25 ºF. It is not directly above the other (see graphic below). 27" appliances: 30" appliances: Convection Bake Chart Food Item Cakes Cupcakes Bundt Cake Angel Food Layers (8" or 9") Rectangle (9x13) Cookies Sugar Chocolate Chip Bar Cookies Lemon Brownie Rack Position...