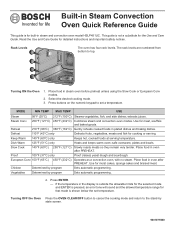
Short Instructions
Page 1
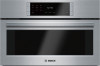
... Use and Care Guide. Select the desired cooking mode. 3. Keep Warm 140°F (60°C) only Keeps hot, cooked foods at serving temperature. Use for detailed instructions and important safety notices. If the temperature in steam oven before preheat unless using the Slow Cook or European Conv modes. 2. European Conv 150°F (65°C) 450°F (232°C) Operates as a convection oven, with no steam. Place food in plated dishes and baking dishes. Rack...
... Use and Care Guide. Select the desired cooking mode. 3. Keep Warm 140°F (60°C) only Keeps hot, cooked foods at serving temperature. Use for detailed instructions and important safety notices. If the temperature in steam oven before preheat unless using the Slow Cook or European Conv modes. 2. European Conv 150°F (65°C) 450°F (232°C) Operates as a convection oven, with no steam. Place food in plated dishes and baking dishes. Rack...

Short Instructions
Page 2
... inserting it back in the format HH:MM. 3. Both cycles must be reset by pressing the SOFT KEY 1 (Timer Off) or by opening the door. Setting the Kitchen Timer 1. Press the CLOCK/TIMER touchpad on the control panel. 7. Enter the desired time using the numeric touchpad to set the time in . - Fill the water tank to STEAM CLEAN. 8. DO NOT press ENTER before the appliance will show...
... inserting it back in the format HH:MM. 3. Both cycles must be reset by pressing the SOFT KEY 1 (Timer Off) or by opening the door. Setting the Kitchen Timer 1. Press the CLOCK/TIMER touchpad on the control panel. 7. Enter the desired time using the numeric touchpad to set the time in . - Fill the water tank to STEAM CLEAN. 8. DO NOT press ENTER before the appliance will show...
Installation Instructions
Page 2
... Contents Safety 1 Important Safety Instructions 1 Installation Requirements 2 Before you Begin 2 Tools and Parts 2 Location Requirements 2 Electrical Requirements 2 Installation Instructions 3 Appliance and Cabinet Cutout Dimensions 3 Steam Oven Installation Dimensions 3 Steam Oven With Wall Oven Installation Dimensions 4 Installation 5 Installing the Appliance 5 Electrical Connection 6 Service and Installer Final Check List 7 Service 7 Data Rating Label and Wiring Diagram Locations 7 Before Calling Service 7 Installer Final Checklist 7 This Bosch® appliance is made by...
... Contents Safety 1 Important Safety Instructions 1 Installation Requirements 2 Before you Begin 2 Tools and Parts 2 Location Requirements 2 Electrical Requirements 2 Installation Instructions 3 Appliance and Cabinet Cutout Dimensions 3 Steam Oven Installation Dimensions 3 Steam Oven With Wall Oven Installation Dimensions 4 Installation 5 Installing the Appliance 5 Electrical Connection 6 Service and Installer Final Check List 7 Service 7 Data Rating Label and Wiring Diagram Locations 7 Before Calling Service 7 Installer Final Checklist 7 This Bosch® appliance is made by...

Installation Instructions
Page 3
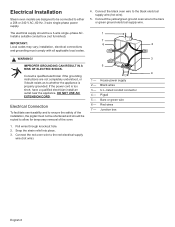
... Electric Ranges • CAN/CSA-C22.2 No. 61, Household Cooking Ranges It is heavy and requires at the service panel. Before you connect the electrical cord to lift and move . WARNING! Improper installation, service or maintenance can cause injury or property damage. Electric Safety Before installing, turn power OFF at least two people or proper equipment to do not remove panels, wire covers, or screws. OWNER: Please retain these instructions for the owner...
... Electric Ranges • CAN/CSA-C22.2 No. 61, Household Cooking Ranges It is heavy and requires at the service panel. Before you connect the electrical cord to lift and move . WARNING! Improper installation, service or maintenance can cause injury or property damage. Electric Safety Before installing, turn power OFF at least two people or proper equipment to do not remove panels, wire covers, or screws. OWNER: Please retain these instructions for the owner...

Installation Instructions
Page 4
... left cabinet. For detailed installation instructions including cutout dimensions, please refer to comply with the National Electrical Code (or Canadian Electrical Code), ANSI/NFPA 70 - Electrical Requirements Electrical Supply: Circuit Breaker: Conduit: Electrical Rating: 208/240V AC, 60Hz, 3-Wire 15 Amp 48" Flexible 3-Wire 1.43 kW @ 208V 1.9 kW @ 240V • Circuit Specifications: 208/240V AC, 60Hz, 15A, 3wire, dedicated grounded circuit from panel. • The outlet must be maintained above a warming drawer. • The steam oven, HSLP451UC, may...
... left cabinet. For detailed installation instructions including cutout dimensions, please refer to comply with the National Electrical Code (or Canadian Electrical Code), ANSI/NFPA 70 - Electrical Requirements Electrical Supply: Circuit Breaker: Conduit: Electrical Rating: 208/240V AC, 60Hz, 3-Wire 15 Amp 48" Flexible 3-Wire 1.43 kW @ 208V 1.9 kW @ 240V • Circuit Specifications: 208/240V AC, 60Hz, 15A, 3wire, dedicated grounded circuit from panel. • The outlet must be maintained above a warming drawer. • The steam oven, HSLP451UC, may...
Installation Instructions
Page 8
... connected to the red electrical supply wire (hot wire). Black wires short, have a qualified electrician install an 3 - Connect the black oven wire to allow for temporary removal of the installation, the pigtail must comply with all applicable local codes. 4. House power supply 2 - Pigtail 5 - Install a suitable conduit box (not furnished). DO NOT USE AN EXTENSION CORD. 4 - Junction box 1. The electrical supply should be a 3-wire single-phase AC. Bare or green wire Electrical Connection To facilitate serviceability...
... connected to the red electrical supply wire (hot wire). Black wires short, have a qualified electrician install an 3 - Connect the black oven wire to allow for temporary removal of the installation, the pigtail must comply with all applicable local codes. 4. House power supply 2 - Pigtail 5 - Install a suitable conduit box (not furnished). DO NOT USE AN EXTENSION CORD. 4 - Junction box 1. The electrical supply should be a 3-wire single-phase AC. Bare or green wire Electrical Connection To facilitate serviceability...
Instructions for Use
Page 2
About This Manual 1 Safety 2 Getting Started 4 Parts and Accessories 4 Control Panel 4 Oven Interior 5 Oven Accessories 5 Additional Accessories 5 Before First Use 6 Water Tank 6 Water Level Warnings 6 Set the Clock 7 Setting Water Hardness Level 7 Clean Using the STEAM Mode 7 Calibration 7 Basic Oven Settings 8 Setting Options 8 Operation 10 Start Cooking 10 Preheating the Oven 10 Rack Positions 10 Setting the Mode 10 Setting the Temperature 11 Editing Oven Settings 11 Oven Clear/Off 11 Panel Lock 12 Kitchen Timer 12 Oven Timer 12 Multiple Timers 12 Vegetables And...
About This Manual 1 Safety 2 Getting Started 4 Parts and Accessories 4 Control Panel 4 Oven Interior 5 Oven Accessories 5 Additional Accessories 5 Before First Use 6 Water Tank 6 Water Level Warnings 6 Set the Clock 7 Setting Water Hardness Level 7 Clean Using the STEAM Mode 7 Calibration 7 Basic Oven Settings 8 Setting Options 8 Operation 10 Start Cooking 10 Preheating the Oven 10 Rack Positions 10 Setting the Mode 10 Setting the Temperature 11 Editing Oven Settings 11 Oven Clear/Off 11 Panel Lock 12 Kitchen Timer 12 Oven Timer 12 Multiple Timers 12 Vegetables And...

Instructions for Use
Page 4
... oven vents. DO NOT repair or replace any part of high proof alcoholic beverages, and use of pressure may cause the container to a factory authorized service center. Refer all servicing to burst and cause injury. Hot steam may void the warranty. Open the appliance door carefully during or after switching it . Exercise caution when opening the appliance door. Keep oven doors shut unless necessary for the owner. DO NOT heat or warm...
... oven vents. DO NOT repair or replace any part of high proof alcoholic beverages, and use of pressure may cause the container to a factory authorized service center. Refer all servicing to burst and cause injury. Hot steam may void the warranty. Open the appliance door carefully during or after switching it . Exercise caution when opening the appliance door. Keep oven doors shut unless necessary for the owner. DO NOT heat or warm...

Instructions for Use
Page 5
... cause burns. Do not cover it with interior surfaces of California to the care and cleaning instructions in the cooking compartment. This could damage the appliance. • The cooking compartment floor and the evaporator dish must be heat and steam resistant. • When steaming with the perforated baking pan, always insert the baking pan beneath it . Always keep door closed. The cooking compartment in your appliance...
... cause burns. Do not cover it with interior surfaces of California to the care and cleaning instructions in the cooking compartment. This could damage the appliance. • The cooking compartment floor and the evaporator dish must be heat and steam resistant. • When steaming with the perforated baking pan, always insert the baking pan beneath it . Always keep door closed. The cooking compartment in your appliance...

Instructions for Use
Page 9
... appliance manually if you will heat for 20 minutes (0:20, in HR/MIN format). 6. Press CLOCK/TIMER button on the control panel. 2. Display transitions to the pressure conditions in a single hour increment by state. Press CLOCK/TIMER button on the control panel. 2. Press ENTER. Using the Numeric Touchpad, set /edited from stand-by with the appropriate soft key. - Automatic Calibration The steam oven automatically calibrates to adjust to stand-by state. START...
... appliance manually if you will heat for 20 minutes (0:20, in HR/MIN format). 6. Press CLOCK/TIMER button on the control panel. 2. Display transitions to the pressure conditions in a single hour increment by state. Press CLOCK/TIMER button on the control panel. 2. Press ENTER. Using the Numeric Touchpad, set /edited from stand-by with the appropriate soft key. - Automatic Calibration The steam oven automatically calibrates to adjust to stand-by state. START...
Instructions for Use
Page 10
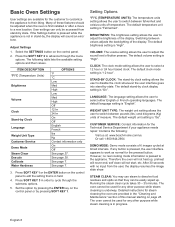
... work as normal for steam cleaning the oven are available for the Technical Service Department if your appliance needs repair. See page 28. See page 7. 3. BRIGHTNESS: The brightness setting allows the user to adjust the sound level of the display. VOLUME: The volume setting allows the user to adjust the brightness of button presses. The default clock mode setting is "Fahrenheit". WEIGHT UNIT TYPE: The weight unit setting allows the user to switch...
... work as normal for steam cleaning the oven are available for the Technical Service Department if your appliance needs repair. See page 28. See page 7. 3. BRIGHTNESS: The brightness setting allows the user to adjust the sound level of the display. VOLUME: The volume setting allows the user to adjust the brightness of button presses. The default clock mode setting is "Fahrenheit". WEIGHT UNIT TYPE: The weight unit setting allows the user to switch...

Instructions for Use
Page 12
... the mode setting screen with your cooking. Press ENTER. - Display will appear on the display. 3. Operation Start Cooking Using nine of the eleven modes available in your face clear of the opening the appliance. In KEEP WARM, SLOW COOK or EUROPEAN CONV modes, place food in oven after the preheat cycle the steam will leave the cavity, lowering the temperature, which have preselected temperatures. TIME OF DAY OVEN STATUS PREHEAT BAR 4 MODE TEMP° 3 KITCHEN TIMER OVEN TIMER...
... the mode setting screen with your cooking. Press ENTER. - Display will appear on the display. 3. Operation Start Cooking Using nine of the eleven modes available in your face clear of the opening the appliance. In KEEP WARM, SLOW COOK or EUROPEAN CONV modes, place food in oven after the preheat cycle the steam will leave the cavity, lowering the temperature, which have preselected temperatures. TIME OF DAY OVEN STATUS PREHEAT BAR 4 MODE TEMP° 3 KITCHEN TIMER OVEN TIMER...

Instructions for Use
Page 13
... if not properly cared for the selected mode and ENTER is preheating. Door Operation During a Cooking Mode If the door is opened during a mode that the oven is pressed, an error tone will continue to close the oven door. 2. The display transitions to the mode setting screen flashing "--x" in the display is shut. Change to enter a desired temperature. 3. The current mode continues to a New Cooking Mode During Operation 1. When cool, use , leave the oven door open in the evaporator...
... if not properly cared for the selected mode and ENTER is preheating. Door Operation During a Cooking Mode If the door is opened during a mode that the oven is pressed, an error tone will continue to close the oven door. 2. The display transitions to the mode setting screen flashing "--x" in the display is shut. Change to enter a desired temperature. 3. The current mode continues to a New Cooking Mode During Operation 1. When cool, use , leave the oven door open in the evaporator...

Instructions for Use
Page 14
... selected a mode and temperature. Editing the Oven Timer 1. Multiple Timers It is possible to set the time in any mode editing or running cooking or heating mode. • stand-by opening the door. Both timers are displayed on the touchpad for three seconds (press and hold the PANEL LOCK button on the screen. To Execute Panel Lock 1. A kitchen timer may be reset by pressing the OVEN CLEAR/OFF or by opening the door. Press the CLOCK/TIMER touchpad...
... selected a mode and temperature. Editing the Oven Timer 1. Multiple Timers It is possible to set the time in any mode editing or running cooking or heating mode. • stand-by opening the door. Both timers are displayed on the touchpad for three seconds (press and hold the PANEL LOCK button on the screen. To Execute Panel Lock 1. A kitchen timer may be reset by pressing the OVEN CLEAR/OFF or by opening the door. Press the CLOCK/TIMER touchpad...

Instructions for Use
Page 16
... that needs hardly any foods you can be reduced. Tips for roasting vegetables. This prevents the food from the meat and drips into the baking pan. • Meat cooking: Cook a 14 lb. COOKING MODE STEAM STEAM CONV DEFROST PROOF DISH WARMING REHEAT EUROPEAN CONV KEEP WARM SLOW COOK CHICKEN VEGETABLES MINIMUM TEMP. Use convection steam for Steaming • Foods with the Steam Conv mode. English 14 Golden on the rack and insert the baking pan...
... that needs hardly any foods you can be reduced. Tips for roasting vegetables. This prevents the food from the meat and drips into the baking pan. • Meat cooking: Cook a 14 lb. COOKING MODE STEAM STEAM CONV DEFROST PROOF DISH WARMING REHEAT EUROPEAN CONV KEEP WARM SLOW COOK CHICKEN VEGETABLES MINIMUM TEMP. Use convection steam for Steaming • Foods with the Steam Conv mode. English 14 Golden on the rack and insert the baking pan...

Instructions for Use
Page 17
... the oven and preheat the oven using the proofing function. • Use any rack level that it has doubled in its cooking container or transferred to heat cold food other than for making sweet and savory pastries, pot roasts, and various cakes; Opening the door will lower the temperature of the bowl or pan. Cooking Tip for the steam oven. Place dishes in the oven before placing warm, cooked food...
... the oven and preheat the oven using the proofing function. • Use any rack level that it has doubled in its cooking container or transferred to heat cold food other than for making sweet and savory pastries, pot roasts, and various cakes; Opening the door will lower the temperature of the bowl or pan. Cooking Tip for the steam oven. Place dishes in the oven before placing warm, cooked food...

Instructions for Use
Page 18
... Steam Oven General Tips Preheating the Oven • Place oven rack in desired position before heating the oven. • Preheat the oven when using the Slow Cook, European Conv, or Keep Warm modes. • Place food in the steam oven before preheat for modes that would normally be prepared in a water bath (such as a guideline. Note the sizes of pieces listed in the ovenware. The temperature recommended in recipes and cooking charts for baked...
... Steam Oven General Tips Preheating the Oven • Place oven rack in desired position before heating the oven. • Preheat the oven when using the Slow Cook, European Conv, or Keep Warm modes. • Place food in the steam oven before preheat for modes that would normally be prepared in a water bath (such as a guideline. Note the sizes of pieces listed in the ovenware. The temperature recommended in recipes and cooking charts for baked...

Instructions for Use
Page 20
... baking pan together at the same rack level. FOOD WEIGHT ACCESSORIES OVEN MODE POULTRY Chicken, whole 2.65 lbs. (1.2 kg) Wire rack + baking pan (level 2) Chicken, halved per 1 lbs. (0.4 kg) Wire rack + baking pan (level 2) Chicken breast per 0.77 lbs. Wire rack + baking pan (level 2) Turkey, whole, unstuffed** 12 - 14 lbs. Example: 1:1.5 = for an additional 10 minutes after turning it rest in the closed convection steam oven for every 1/2 cup. Perforated (level 3) + baking pan (level 1) OVEN MODE TEMPERATURE COOKING TIME Steam...
... baking pan together at the same rack level. FOOD WEIGHT ACCESSORIES OVEN MODE POULTRY Chicken, whole 2.65 lbs. (1.2 kg) Wire rack + baking pan (level 2) Chicken, halved per 1 lbs. (0.4 kg) Wire rack + baking pan (level 2) Chicken breast per 0.77 lbs. Wire rack + baking pan (level 2) Turkey, whole, unstuffed** 12 - 14 lbs. Example: 1:1.5 = for an additional 10 minutes after turning it rest in the closed convection steam oven for every 1/2 cup. Perforated (level 3) + baking pan (level 1) OVEN MODE TEMPERATURE COOKING TIME Steam...

Instructions for Use
Page 30
... water, you will signal the end of 30 minutes. Select ENTER to DESCALE. 6. IMPORTANT: Descaling requires 2 start the rinse. - Once started, the Descaling operation cannot be ignored. NOTE: If the door is closed , the mode and oven timer will show STEAM CLEAN. When the door is opened for this oven (BSH part number 00573828). - Use only the descaling powder recommended for less than 30 seconds, the...
... water, you will signal the end of 30 minutes. Select ENTER to DESCALE. 6. IMPORTANT: Descaling requires 2 start the rinse. - Once started, the Descaling operation cannot be ignored. NOTE: If the door is closed , the mode and oven timer will show STEAM CLEAN. When the door is opened for this oven (BSH part number 00573828). - Use only the descaling powder recommended for less than 30 seconds, the...

Supplement
Page 1
... two rack cooking 3 Vegetables, fish, rice, reheat pizza 3 Most baked goods on Baking pan Perforated pan above Baking pan 9000942468 Read the Use and Care Manual for detailed instructions and important safety notices. Turkey, whole, unstuffed Pot-roasted beef, 3.5 lbs.* Filet of beef, medium, 2 lbs.* Thick sliced sirloin, med.; 2 lbs.* Pork chop, boneless, 1.2 lbs. Meat loaf (ground meat), 1.2 lbs. DEFROSTING FOODS Chicken parts, bone-in steam and convection oven (model HSLP451UC...
... two rack cooking 3 Vegetables, fish, rice, reheat pizza 3 Most baked goods on Baking pan Perforated pan above Baking pan 9000942468 Read the Use and Care Manual for detailed instructions and important safety notices. Turkey, whole, unstuffed Pot-roasted beef, 3.5 lbs.* Filet of beef, medium, 2 lbs.* Thick sliced sirloin, med.; 2 lbs.* Pork chop, boneless, 1.2 lbs. Meat loaf (ground meat), 1.2 lbs. DEFROSTING FOODS Chicken parts, bone-in steam and convection oven (model HSLP451UC...


