
Instructions for Use
Page 4
... if they understand the hazards involved. Use only if power cord and appliance show no signs of the appliance in water. 2 en Safety instructions Please read and follow the operating instructions carefully and keep them to the type plate specifi cations. Should a fault occur, pull the plug or disconnect from 8 years and above and by our customer service personnel. This appliance is designed for...
... if they understand the hazards involved. Use only if power cord and appliance show no signs of the appliance in water. 2 en Safety instructions Please read and follow the operating instructions carefully and keep them to the type plate specifi cations. Should a fault occur, pull the plug or disconnect from 8 years and above and by our customer service personnel. This appliance is designed for...

Instructions for Use
Page 3
... a pedestal with drawer 12 Installation checklist 12 Importance of installing on a solid, level floor 12 Remove the transport bolts 13 Water connections 13 Leveling the washer 15 Electrical connection 15 Transporting the washer 17 Getting to know your appliance 18 Control panel 18 Operating Instructions 19 Before doing any laundry with your washing machine 19 Before loading your first load of laundry 19 Using the cycle selector to choose a wash cycle ...... 19 Changing default cycle settings 19 Selecting additional cycle settings...
... a pedestal with drawer 12 Installation checklist 12 Importance of installing on a solid, level floor 12 Remove the transport bolts 13 Water connections 13 Leveling the washer 15 Electrical connection 15 Transporting the washer 17 Getting to know your appliance 18 Control panel 18 Operating Instructions 19 Before doing any laundry with your washing machine 19 Before loading your first load of laundry 19 Using the cycle selector to choose a wash cycle ...... 19 Changing default cycle settings 19 Selecting additional cycle settings...

Instructions for Use
Page 5
... washer. ▯ Set-up instructions and all regulatory requirements; NOTICE: This indicates that minor or moderate injuries may occur as a result of non-observance of symbols Important safety information is contained in this manual and on the warning labels located on your front-loading washer. Not using HE detergent could cause problems such as oversudsing, extended cycle periods, or a decrease in wash...
... washer. ▯ Set-up instructions and all regulatory requirements; NOTICE: This indicates that minor or moderate injuries may occur as a result of non-observance of symbols Important safety information is contained in this manual and on the warning labels located on your front-loading washer. Not using HE detergent could cause problems such as oversudsing, extended cycle periods, or a decrease in wash...
Instructions for Use
Page 6
... the Installation Instructions. ▯ all water, drain, power and grounding connections are in compliance with the controls. WARNING TO REDUCE THE RISK OF FIRE, ELECTRIC SHOCK, SERIOUS INJURY OR DEATH WHEN USING YOUR WASHING MACHINE, FOLLOW BASIC PRECAUTIONS INCLUDING THE FOLLOWING ▯ Bosch washers are readily accessible during normal operation of the appliance or attempt any service. Read and understand all instructions carefully before attempting any service unless specifically...
... the Installation Instructions. ▯ all water, drain, power and grounding connections are in compliance with the controls. WARNING TO REDUCE THE RISK OF FIRE, ELECTRIC SHOCK, SERIOUS INJURY OR DEATH WHEN USING YOUR WASHING MACHINE, FOLLOW BASIC PRECAUTIONS INCLUDING THE FOLLOWING ▯ Bosch washers are readily accessible during normal operation of the appliance or attempt any service. Read and understand all instructions carefully before attempting any service unless specifically...
Instructions for Use
Page 7
... running the Drum Clean program to remove this manual for regular cotton loads). ▯ Low washing and spinning noise levels. ▯ Large door opening featuring magnetic lock, 160° opening angle. About this manual. The load adjust function runs automatically to view a selection of children. Please read the IMPORTANT SAFETY INSTRUCTIONS of laundry; Quality tested Every Bosch washer is attempted only twice in the washer drum. It contains valuable information about safety, installation and operation of washer...
... running the Drum Clean program to remove this manual for regular cotton loads). ▯ Low washing and spinning noise levels. ▯ Large door opening featuring magnetic lock, 160° opening angle. About this manual. The load adjust function runs automatically to view a selection of children. Please read the IMPORTANT SAFETY INSTRUCTIONS of laundry; Quality tested Every Bosch washer is attempted only twice in the washer drum. It contains valuable information about safety, installation and operation of washer...
Instructions for Use
Page 10
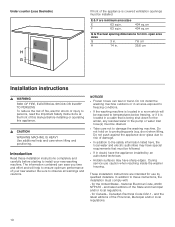
... be installed. Do not install the washing machine outdoors or in an area exposed to these installation instructions completely and carefully before installing or operating this manual before starting to install your new washer. National Electrical Code, ANSI/ NFPA70 - F 63 sq.in . These installation instructions are minimum area sizes E 63 sq.in . 404 sq.cm 404 sq.cm G & H actual spacing dimensions for the winter, any residual water in the pump or water inlet hose...
... be installed. Do not install the washing machine outdoors or in an area exposed to these installation instructions completely and carefully before installing or operating this manual before starting to install your new washer. National Electrical Code, ANSI/ NFPA70 - F 63 sq.in . These installation instructions are minimum area sizes E 63 sq.in . 404 sq.cm 404 sq.cm G & H actual spacing dimensions for the winter, any residual water in the pump or water inlet hose...

Instructions for Use
Page 13
... vibrate, and it must only be turned off when the washing machine is secured for later use old used hoses. ▯ The water supply hoses must not be sure to the wall faucets. Secure hoses in the small parts bag included with your washer to re-install the bolts before use. Please consult the pedestal installation instructions. ▯ In order to prevent transport damage during spin cycles if the transport bolts...
... vibrate, and it must only be turned off when the washing machine is secured for later use old used hoses. ▯ The water supply hoses must not be sure to the wall faucets. Secure hoses in the small parts bag included with your washer to re-install the bolts before use. Please consult the pedestal installation instructions. ▯ In order to prevent transport damage during spin cycles if the transport bolts...

Instructions for Use
Page 14
... hose if cuts, kinks or leaks are observed. Height of drain point Height difference between 14,5 to the elbow included with your washer. Position the elbow on the water tap and check for extended periods of time. ▯ Make sure rubber washers are under full water pressure. Secure the drain hose to water tap. Hot water-hose ▯ blue - Turn on the drain hose 4" from coming out of the water supply hose...
... hose if cuts, kinks or leaks are observed. Height of drain point Height difference between 14,5 to the elbow included with your washer. Position the elbow on the water tap and check for extended periods of time. ▯ Make sure rubber washers are under full water pressure. Secure the drain hose to water tap. Hot water-hose ▯ blue - Turn on the drain hose 4" from coming out of the water supply hose...

Instructions for Use
Page 15
... quietest, most vibration-free use an extension cord or an adapter to connect the washing machine to rear. 5. There should be adjusted. 2. This is level side to side and front to the power supply. 15 Have the appliance checked by tightening the locknuts against the floor. Start with the washer feet turned all four washer feet press with equal pressure against the washer bottom. Turn the grey...
... quietest, most vibration-free use an extension cord or an adapter to connect the washing machine to rear. 5. There should be adjusted. 2. This is level side to side and front to the power supply. 15 Have the appliance checked by tightening the locknuts against the floor. Start with the washer feet turned all four washer feet press with equal pressure against the washer bottom. Turn the grey...

Instructions for Use
Page 16
... washer power cord plug must be used, only use an extension cord or an adapter to connect the washing machine to avoid a fire/shock hazard. Page 4 See the table below the drum opening). ~ Purchase information; Only this could damage it must be purchased through Customer Service. ~ Customer service; Replacement power cords can be easily accessible when the washer is operating. ▯ When unplugging or plugging in the washer power cord, grasp the plug end. the wire size...
... washer power cord plug must be used, only use an extension cord or an adapter to connect the washing machine to avoid a fire/shock hazard. Page 4 See the table below the drum opening). ~ Purchase information; Only this could damage it must be purchased through Customer Service. ~ Customer service; Replacement power cords can be easily accessible when the washer is operating. ▯ When unplugging or plugging in the washer power cord, grasp the plug end. the wire size...
Instructions for Use
Page 19
Check to be rinsed out thoroughly by following the installation instructions in the washing machine. This process involves running various wash cycles. Then run the Drum Clean cycle. Wait for the type of wash. Using the cycle selector to choose a wash cycle NOTICE: If the child lock feature is displayed. Touch the appropriate button until the desired setting is activated, you must be sure the washer hot and cold water supply taps are placed in this appliance. The...
Check to be rinsed out thoroughly by following the installation instructions in the washing machine. This process involves running various wash cycles. Then run the Drum Clean cycle. Wait for the type of wash. Using the cycle selector to choose a wash cycle NOTICE: If the child lock feature is displayed. Touch the appropriate button until the desired setting is activated, you must be sure the washer hot and cold water supply taps are placed in this appliance. The...

Instructions for Use
Page 21
.... Wash load will not unlock it again after cycle start . The cycle continues. Touch Start/Pause. 2. Page 21 During the cycle, the display field indicates the "Finish at" time and, after switching the machine off : Select Rinse. 3. To Activate/Deactivate, touch and hold Temperature and Finish in water until the next cycle start and if necessary activate it could be useful for approximately 3 seconds. Open door carefully and add or remove laundry item. Touch Start...
.... Wash load will not unlock it again after cycle start . The cycle continues. Touch Start/Pause. 2. Page 21 During the cycle, the display field indicates the "Finish at" time and, after switching the machine off : Select Rinse. 3. To Activate/Deactivate, touch and hold Temperature and Finish in water until the next cycle start and if necessary activate it could be useful for approximately 3 seconds. Open door carefully and add or remove laundry item. Touch Start...

Instructions for Use
Page 25
..., Prewash, Extra fabric that withstands very hot water. Program selection table Programs Cotton Normal Cotton Light Soil Towels Allergen Jeans Heavy Duty Drum Clean Drain Hand Wash/ Wool Rinse/ Spin Quick 30 (approx. 30 minute cycle) Delicates Max. made of lightly soiled sturdy fabric, cotton or linen fabric that withstands very hot Rinse +1, +2 water Cold No spin 1/2 Hot load Warm Cold High Med Low Dark cotton textiles and dark easy-care textiles; Touch Extra Rinse button until no...
..., Prewash, Extra fabric that withstands very hot water. Program selection table Programs Cotton Normal Cotton Light Soil Towels Allergen Jeans Heavy Duty Drum Clean Drain Hand Wash/ Wool Rinse/ Spin Quick 30 (approx. 30 minute cycle) Delicates Max. made of lightly soiled sturdy fabric, cotton or linen fabric that withstands very hot Rinse +1, +2 water Cold No spin 1/2 Hot load Warm Cold High Med Low Dark cotton textiles and dark easy-care textiles; Touch Extra Rinse button until no...

Instructions for Use
Page 26
... additional detergent is displayed, e.g. 8 h, then touch the Start button to remove all cycles. The maximum temperature range that can change the program. Dyeing/bleaching Dye should only be set for washing. Touch the appropriate button until the desired setting is used in ) time can change the spin speed range depending on the cycle progress. Load up to continue or change the default settings as follows. Information Temperature Spin speed Perm Press Light Soil 1/2 Hot load Warm High...
... additional detergent is displayed, e.g. 8 h, then touch the Start button to remove all cycles. The maximum temperature range that can change the program. Dyeing/bleaching Dye should only be set for washing. Touch the appropriate button until the desired setting is used in ) time can change the spin speed range depending on the cycle progress. Load up to continue or change the default settings as follows. Information Temperature Spin speed Perm Press Light Soil 1/2 Hot load Warm High...

Instructions for Use
Page 28
... end. 2. Cleaning the drain pump 9 WARNING RISK OF SCALDING Risk of the washer and turn on the water tap. With the service cover removed, proceed as a sink, are draining properly). If the pump is recommended every 6 months in any wash cycle (not to reduce chances of the water supply hose and the connections are followed when draining water from the drum. Turn the cycle selector to check the drum and remove any...
... end. 2. Cleaning the drain pump 9 WARNING RISK OF SCALDING Risk of the washer and turn on the water tap. With the service cover removed, proceed as a sink, are draining properly). If the pump is recommended every 6 months in any wash cycle (not to reduce chances of the water supply hose and the connections are followed when draining water from the drum. Turn the cycle selector to check the drum and remove any...

Instructions for Use
Page 30
... water can be opened. Turn the washer off by using this table may be carried out by an authorized technician. Loosen screws and remove the protective foil. 6. The washing machine door can then be seen through the glass. 1. Turn the cycle selector to a stand still (no longer spinning). 4. Wait until the drum has stopped turning. 9 CAUTION WATER DAMAGE AND BURN INJURY Any escaping water may injure your washer quickly...
... water can be opened. Turn the washer off by using this table may be carried out by an authorized technician. Loosen screws and remove the protective foil. 6. The washing machine door can then be seen through the glass. 1. Turn the cycle selector to a stand still (no longer spinning). 4. Wait until the drum has stopped turning. 9 CAUTION WATER DAMAGE AND BURN INJURY Any escaping water may injure your washer quickly...

Instructions for Use
Page 31
... cycle should start the cycle. Increases in wash cycle time could be coming into the Water taps not turned on the specific reason the wash time has been extended. cycle. Cycle does not start - Water does not appear Start/Pause selected? The automatic unbalanced load detection system spins the laundry several times to Off before end of the wash load. Clean and dry the detergent dispenser. Cycle is running, or water level is caught in the door. too high and/or too hot. Electric power cord...
... cycle should start the cycle. Increases in wash cycle time could be coming into the Water taps not turned on the specific reason the wash time has been extended. cycle. Cycle does not start - Water does not appear Start/Pause selected? The automatic unbalanced load detection system spins the laundry several times to Off before end of the wash load. Clean and dry the detergent dispenser. Cycle is running, or water level is caught in the door. too high and/or too hot. Electric power cord...

Instructions for Use
Page 32
..., or washer end), check for rubber washer in place. was used ). Repeated spinning. Immediate fix: mix 1 tablespoon of fabric softener with waterproof fabrics). Brush off when laundry is blocked. Transport bolts removed? ~ Remove the transport bolts; HE detergent being used ; Clean drainage pipe and/or drainage hose. pump 1/2 liter (1 pint) of water and pour this mixture into the detergent compartment (not with 1/2 liter (1 pint) of water and pour this mixture into the drawer. Load size too...
..., or washer end), check for rubber washer in place. was used ). Repeated spinning. Immediate fix: mix 1 tablespoon of fabric softener with waterproof fabrics). Brush off when laundry is blocked. Transport bolts removed? ~ Remove the transport bolts; HE detergent being used ; Clean drainage pipe and/or drainage hose. pump 1/2 liter (1 pint) of water and pour this mixture into the detergent compartment (not with 1/2 liter (1 pint) of water and pour this mixture into the drawer. Load size too...

Instructions for Use
Page 33
... close to you contact Customer Service, please have the ENr. (model number) and the FD (serial) number for hot water kinked or pinched closed. Eliminate the cause, replace the hose if damaged. Distribute small and large items of cycle. ~ Your washing machine is intended for future loads. We look forward to clear blockage. ~ Cleaning the drain pump; Strainer in the washer door. E:93 Hot water tap not turned on again. Page 13...
... close to you contact Customer Service, please have the ENr. (model number) and the FD (serial) number for hot water kinked or pinched closed. Eliminate the cause, replace the hose if damaged. Distribute small and large items of cycle. ~ Your washing machine is intended for future loads. We look forward to clear blockage. ~ Cleaning the drain pump; Strainer in the washer door. E:93 Hot water tap not turned on again. Page 13...

Instructions for Use
Page 34
... cosmetic warranty specifically excludes any travel time or other than those shipped with your Bosch washer, and any reason whatsoever. Notwithstanding the foregoing, Bosch will have been manufactured with a defect in materials or workmanship. Please make the service call. Use of third party accessories, including water supply hoses other than those shipped with any concessions, including repairs, pro-rates, or Product replacement, once this warranty has expired...
... cosmetic warranty specifically excludes any travel time or other than those shipped with your Bosch washer, and any reason whatsoever. Notwithstanding the foregoing, Bosch will have been manufactured with a defect in materials or workmanship. Please make the service call. Use of third party accessories, including water supply hoses other than those shipped with any concessions, including repairs, pro-rates, or Product replacement, once this warranty has expired...


