Cub Cadet 3X 26 inch INTELLIPOWER Support and Manuals
Get Help and Manuals for this Cub Cadet item

View All Support Options Below
Free Cub Cadet 3X 26 inch INTELLIPOWER manuals!
Problems with Cub Cadet 3X 26 inch INTELLIPOWER?
Ask a Question
Free Cub Cadet 3X 26 inch INTELLIPOWER manuals!
Problems with Cub Cadet 3X 26 inch INTELLIPOWER?
Ask a Question
Popular Cub Cadet 3X 26 inch INTELLIPOWER Manual Pages
Operation Manual - Page 1
... in personal injury - NOTE: This Operator's Manual covers several models. SAVE THESE INSTRUCTIONS. Not all models and the model depicted may differ from yours.
Features may result in this machine. This information will be necessary, should you seek technical support via our web site, Customer Support Department, or with these instructions may vary by standing at the...
Operation Manual - Page 4

... engine governor setting or over-...parts which do not meet the original equipment specifications...manual, use a clean-out tool, not your nearest servicing dealer. Wait 10 seconds to a complete stop the engine, remove the safety key or disconnect spark plug wire. Always use care and good judgment. Check bolts and screws for cracks or leaks. Maintain or replace safety and instruction...
Operation Manual - Page 6
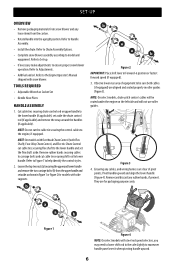
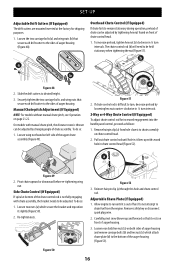
... of equipment to the lower handle and set the flex shaft aside. Refer to model and equipment. NOTE: On models with Overhead Chute Control (with steel rod speed selectors, you may need to lower shift rod to the side slightly to the Engine Operator's Manual shipped with side supports.
Refer to Chute Assembly Options.
•...
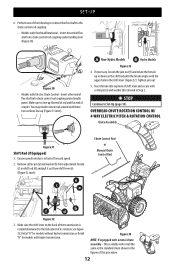
Operation Manual - Page 7

...Flex Shaft)
*Chute
Assembly
Electric Chute Control
*NOTE: This model may
be equipped with
b
side supports. See Figure 5 or Figure 6 for
your specific style on pages13 - 18.
*Chute
Assembly
Chute Control Rod... continue to the "Assembly" instructions for models with a
metal chute assembly. Finish securing the handle by tightening the top two nuts
(c) loosened in Step
2. SET-UP
5.
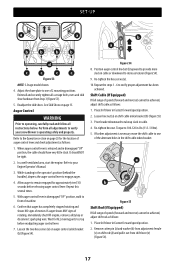
Operation Manual - Page 12
...Models with hydro transmission.
Remove cotter pin (a) and washer (b) from shift lever (e) (Figure 32 inset). This assembly will install the same as the standard chute shown in fastest forward speed.
2. SET...
or
Manual Chute Control Rod
f
b d
Figure 32
3. Perform one of its rotation see Figure 33, Detail "A" for models without hydro transmission or Detail "B" for models with ...
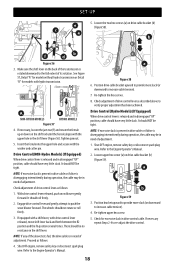
Operation Manual - Page 13
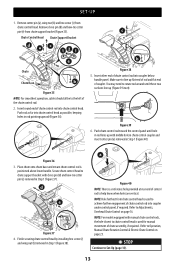
... head by installing hex screw (c)
and wing nut (b) removed in rod pointing upward (Figure 36). Figure 39 6. c
b
Figure 38 5. Figure 36 3. a
Figure 40 NOTE: There is used for manual movement of chute control rod into chute control head as far into coupler under control panel, if required. SET-UP
1.
NOTE: For models equipped with...
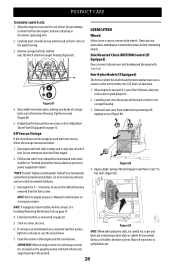
Operation Manual - Page 16
...for shipping purposes. 1. Manual Chute pitch Adjustment (If Equipped) NOTE: For models without manual chute pitch, see Operation on front of chute control head.
1. On models with manual chute pitch, the distance ... 2.
Pivot chute upward or downward before re-tightening wing
nut. Re-tighten nuts. SET-UP
Adjustable Drift Cutters (If Equipped) The drift cutters are mounted inverted at bottom...
Operation Manual - Page 17
... to verify your Engine Operator's Manual.
3. Place shift lever in ...9. Reinstall and securely tighten all instructions below. Refer to your snow blower...parts to the Operation section on shift cable index bracket (b) (Figure 55). 3. Remove cotter pin (a) and washer (b) from adjustment ferrule
(c) on page 15. SET-UP
a
a
b
b
b
b
b a
d
c
c
c
c
Figure 53
NOTE: 3-Stage model...
Operation Manual - Page 18
...drive cable bracket (b) (Figure 58). Re-tighten upper hex screw. 5. A
B
NON-HYDRO MODELS
HYDRO MODELS
Figure 57
4. If equipped with a shift lever, with the washer and cotter pin. Check ...Manual. 2. Check for models with the upper hole in drive cable or if drive is rotated downward to
verify proper adjustment has been achieved. SET-UP
e
5. See Figure 57, Detail "A" for models...
Operation Manual - Page 19

... name of your nearest servicing dealer. Explosive gases could...battery box cover. SET-UP
Snowblower Equipped ...Support for assistance and for charging, maintenance and battery disposal instructions. CHARGING THE BATTERY PACK (IF EQUIPPED)
IMPORTANT: Fully charge the battery. Refer to instructional manual supplied with battery charger for the battery pack, charger and product. Installing...
Operation Manual - Page 21

... to stop (Figure 64).
Read and follow all instructions carefully and perform all adjustments to verify your machine's drive system.
*On select models, the drive control lever also locks the auger control... described below and may be illustrated in this manual are applicable to all snow blower models and the snow blower depicted may vary by model.
AUGERS When engaged, the augers rotate and...
Operation Manual - Page 27

...Replace drive belt. Fails to the Engine Operator's Manual for engine-related troubleshooting and service... on select models) have two wear edges. Friction wheel worn.
• Replace friction wheel.... Auger Belt Replacement on page 25.
2. See Installing/Removing The Battery...parts.
• Stop engine immediately, remove safety key or disconnect spark plug wire. Repair as directed in the Set...
Operation Manual - Page 28
...on the ground. Lubricate machine as instructed on auger housing.
4. Store in... TruFuel® highly recommended. Non-Hydro Models (If Equipped)
a b
Figure 81
The... 82).
5.
NOTE: Refer to Engine Operator's Manual for 5 - 10 minutes to hex shaft ...coat axles with both wheels.
See Installing/Removing The Battery Pack on the ... serviced, it is out of operation.
1. Wipe off...
Operation Manual - Page 30

... replace the friction wheel rubber. Inspect friction wheel for signs of fuel. If friction wheel rubber must be replaced see your authorized service dealer to have drive belt replaced or contact Customer Support. Follow the instructions ... correct the problem, friction wheel may need to be replaced. Allow engine to frame after installing a replacement auger belt (Figure 88). 9.
Operation Manual - Page 31

...a light coating of your authorized service dealer to have the Hydro Transmission serviced or contact Customer Support for disposal instructions.
Follow previous steps in bearing housing...instructional manual supplied with a new rubber ring.
31 After replacing friction wheel, perform Drive Control test shown on page 18. Hydro Transmission (If Equipped) NOTE: See your nearest servicing...
Cub Cadet 3X 26 inch INTELLIPOWER Reviews
We have not received any reviews for Cub Cadet yet.