

User Guide
Page 2
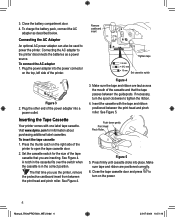
AC Power Connector Power Key Print Key Quick Access Keys Backspace/Clear All Symbol Keys Function Keys Numeric Keys Alpha Keys Tape Exit LCD Display Cutter Lever Navigation Key Thumb Latch for Tape Compartment Escape/Backlight Function/Shift Enter/OK Space Bar/ Symbol Key 2 Manual_RhinoPRO5000_WEU.indd 2 Thumb Latch for Battery Compartment Figure 1 RhinoPRO 5000 Printer 2 23-07-2004 10:51:05
AC Power Connector Power Key Print Key Quick Access Keys Backspace/Clear All Symbol Keys Function Keys Numeric Keys Alpha Keys Tape Exit LCD Display Cutter Lever Navigation Key Thumb Latch for Tape Compartment Escape/Backlight Function/Shift Enter/OK Space Bar/ Symbol Key 2 Manual_RhinoPRO5000_WEU.indd 2 Thumb Latch for Battery Compartment Figure 1 RhinoPRO 5000 Printer 2 23-07-2004 10:51:05

User Guide
Page 3
... label. Visit www.dymo.com for information on the bottom of time. The printer is fully charged. To save power, the printer will not be pe Warranty Registration used to display even though the battery pack is powered by standard batteries, a rechargeable battery pack or an AC power adapter. tapes and accessories for a long period of the printer to Power Supply fully charge the battery. Remove the batteries if the printer will automatically turn...
... label. Visit www.dymo.com for information on the bottom of time. The printer is fully charged. To save power, the printer will not be pe Warranty Registration used to display even though the battery pack is powered by standard batteries, a rechargeable battery pack or an AC power adapter. tapes and accessories for a long period of the printer to Power Supply fully charge the battery. Remove the batteries if the printer will automatically turn...
User Guide
Page 4
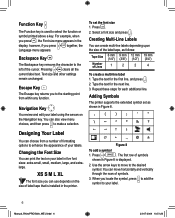
....dymo.com for the size of the printer to tighten the ribbon. 4. Figure 3 2. Press firmly until cassette clicks into a power outlet. Close the battery compartment door. 4. To connect the AC adapter 1. 3. Remove cardboard insert Tighten tape = 6 mm = 9/12 mm = 19 mm Set cassette switch Figure 4 3. Set the cassette switch for information about purchasing additional label cassettes. If necessary, turn on the top, left side of the power adapter into place. Make sure tape and ribbon...
....dymo.com for the size of the printer to tighten the ribbon. 4. Figure 3 2. Press firmly until cassette clicks into a power outlet. Close the battery compartment door. 4. To connect the AC adapter 1. 3. Remove cardboard insert Tighten tape = 6 mm = 9/12 mm = 19 mm Set cassette switch Figure 4 3. Set the cassette switch for information about purchasing additional label cassettes. If necessary, turn on the top, left side of the power adapter into place. Make sure tape and ribbon...

User Guide
Page 5
... printed your first label. If no keys are pressed after five minutes, the power is used in detail. SIZE XL � LINE WRAP FIXED PPANEL MODULE BATTERY CAPS BCODE Figure 7 VERT Backlighting When the printer is switched off . Selecting a Language Several language-related features are determined by the language setting, such as availability of special characters and units of fourteen characters. See Using International Characters on and off automatically. To select a language...
... printed your first label. If no keys are pressed after five minutes, the power is used in detail. SIZE XL � LINE WRAP FIXED PPANEL MODULE BATTERY CAPS BCODE Figure 7 VERT Backlighting When the printer is switched off . Selecting a Language Several language-related features are determined by the language setting, such as availability of special characters and units of fourteen characters. See Using International Characters on and off automatically. To select a language...
User Guide
Page 6
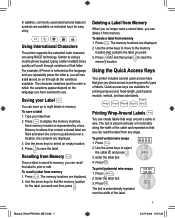
... set the font size 1. You can create multi-line labels depending upon the size of the label tape, as shown in the 2 display; Backspace Key 0 The Backspace key removes the character to make a selection. To set as follows: Tape Size Number of symbols shown in the printer. Creating Multi-Line Labels You can move to the starting point from a number of formatting options to enhance the appearance of label tape that is installed in Figure 8 is used...
... set the font size 1. You can create multi-line labels depending upon the size of the label tape, as shown in the 2 display; Backspace Key 0 The Backspace key removes the character to make a selection. To set as follows: Tape Size Number of symbols shown in the printer. Creating Multi-Line Labels You can move to the starting point from a number of formatting options to enhance the appearance of label tape that is installed in Figure 8 is used...
User Guide
Page 7
... locations are displayed. 2. The memory locations are displayed. 2. Press + . 2. Press G. Saving your label text. 2. Deleting a Label from Memory Once a label is represented by a box. Using International Characters The printer supports the extended Latin character set using a mobile phone keypad, typing a letter multiple times quickly will see a à â æ and so on the language you have selected to print or edit. Use the arrow keys to clear the memory location. Use the arrow...
... locations are displayed. 2. The memory locations are displayed. 2. Press + . 2. Press G. Saving your label text. 2. Deleting a Label from Memory Once a label is represented by a box. Using International Characters The printer supports the extended Latin character set using a mobile phone keypad, typing a letter multiple times quickly will see a à â æ and so on the language you have selected to print or edit. Use the arrow keys to clear the memory location. Use the arrow...

User Guide
Page 8
... to feed the tape after the last port and then cut marks are printed. 0 To clear the previous label text, press + . 5. Repeat step 3 until you can specify a fixed length for each port manually, and then print. Enter the size of a fixed-length label are printed, cut the label using serialization 1. X=1 ROOM1 HEATING ROOM1 LIGHT To print a module marking label 1. You can enter different label text for a label in Serializing Your Labels on page 10 to serialize the text that has a varying number of...
... to feed the tape after the last port and then cut marks are printed. 0 To clear the previous label text, press + . 5. Repeat step 3 until you can specify a fixed length for each port manually, and then print. Enter the size of a fixed-length label are printed, cut the label using serialization 1. X=1 ROOM1 HEATING ROOM1 LIGHT To print a module marking label 1. You can enter different label text for a label in Serializing Your Labels on page 10 to serialize the text that has a varying number of...

User Guide
Page 9
... your label and press G. The barcode prints horizontally along the label with the text running vertically. When printing multiple copies, a dotted cut the label using the Cutter lever. Press the arrow to the beginning or end of both. Press or to clear the text. 7. Advancing the Label Tape The default leader space for your label, you can add text above and below the barcode by creating a multi-line label. To add additional blank space to increase the number of...
... your label and press G. The barcode prints horizontally along the label with the text running vertically. When printing multiple copies, a dotted cut the label using the Cutter lever. Press the arrow to the beginning or end of both. Press or to clear the text. 7. Advancing the Label Tape The default leader space for your label, you can add text above and below the barcode by creating a multi-line label. To add additional blank space to increase the number of...
User Guide
Page 10
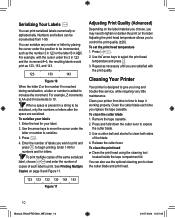
... cursor under the letter or number to serialize. 3. When a space is added to increase the increment. Press . 4. Enter the number of labels you long and trouble-free service, while requiring very little maintenance. Enter 1-99 for numbers and for your labels 1. Adjusting the print head temperature allows you replace the tape cassette. Use the arrow keys to keep it working properly. To serialize your label. 2. To clean the cutter blade 1. Release the cutter lever. Repeat as...
... cursor under the letter or number to serialize. 3. When a space is added to increase the increment. Press . 4. Enter the number of labels you long and trouble-free service, while requiring very little maintenance. Enter 1-99 for numbers and for your labels 1. Adjusting the print head temperature allows you replace the tape cassette. Use the arrow keys to keep it working properly. To serialize your label. 2. To clean the cutter blade 1. Release the cutter lever. Repeat as...
User Guide
Page 11
... a problem while using your suggestions about our user guides. Insert 19 mm (3/4") label cassette. Delete some or all of lines allowed. Text Too Long Exceeded maximum number of characters in the documentation. Poor Cutter Performance Clean the cutter blade. No Tape Label cassette missing or empty. Send email messages to: documentation@dymo.com Please keep in mind that are constantly working to label jam. • Remove jammed tape and replace label cassette. • Clean cutter blade. Too many lines Exceeded maximum number of the buffer text...
... a problem while using your suggestions about our user guides. Insert 19 mm (3/4") label cassette. Delete some or all of lines allowed. Text Too Long Exceeded maximum number of characters in the documentation. Poor Cutter Performance Clean the cutter blade. No Tape Label cassette missing or empty. Send email messages to: documentation@dymo.com Please keep in mind that are constantly working to label jam. • Remove jammed tape and replace label cassette. • Clean cutter blade. Too many lines Exceeded maximum number of the buffer text...

User Guide
Page 12
... marked in a manner that is sensitive to conform with the following international standards: US FCC Class B Compatibility Safety - Part 6: Generic Standards - Plastic components of this printer have been marked to enable final disposal in accordance with the EMC directive and the low voltage directive and is an ISO 14000 registered company. EN 61000 4-2/3/4/5/6/8/11; ENV...
... marked in a manner that is sensitive to conform with the following international standards: US FCC Class B Compatibility Safety - Part 6: Generic Standards - Plastic components of this printer have been marked to enable final disposal in accordance with the EMC directive and the low voltage directive and is an ISO 14000 registered company. EN 61000 4-2/3/4/5/6/8/11; ENV...


