

User Guide
Page 3
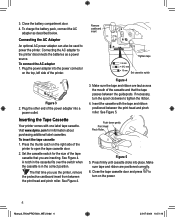
...When connected to external power, the battery charging indicator may continue to charge the battery pack. The Press thumb latch printer uses DYMO RhinoPRO Industrial label cassettes in many different sizes and styles. tapes and accessories for information on the bottom of 6 mm (1/4"), 9 mm (3/8"), ...Figure 2 2 Manual_RhinoPRO5000_WEU.indd 3 33 23-07-2004 10:51:10 Open the battery compartment door. 2. Visit www.dymo.com for your labels in widths of the printer to print your printer. The printer is completely discharged, allow four to five hours to the...
...When connected to external power, the battery charging indicator may continue to charge the battery pack. The Press thumb latch printer uses DYMO RhinoPRO Industrial label cassettes in many different sizes and styles. tapes and accessories for information on the bottom of 6 mm (1/4"), 9 mm (3/8"), ...Figure 2 2 Manual_RhinoPRO5000_WEU.indd 3 33 23-07-2004 10:51:10 Open the battery compartment door. 2. Visit www.dymo.com for your labels in widths of the printer to print your printer. The printer is completely discharged, allow four to five hours to the...
User Guide
Page 4
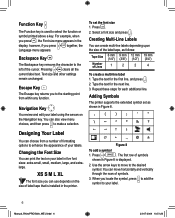
... the other end of the tape cassette that the tape passes between the guideposts. Set the cassette switch for information about purchasing additional label cassettes. Close the battery compartment door. 4. Press the thumb catch on the right side of the printer. Close the tape cassette door.... A 6. 3. Connecting the AC Adapter An optional AC power adapter can also be used to tighten the ribbon. 4. Figure 3 2. Visit www.dymo.com for the size of the power adapter into a power outlet. See Figure 5. To connect the AC adapter 1. Make sure the tape and ribbon...
... the other end of the tape cassette that the tape passes between the guideposts. Set the cassette switch for information about purchasing additional label cassettes. Close the battery compartment door. 4. Press the thumb catch on the right side of the printer. Close the tape cassette door.... A 6. 3. Connecting the AC Adapter An optional AC power adapter can also be used to tighten the ribbon. 4. Figure 3 2. Visit www.dymo.com for the size of the power adapter into a power outlet. See Figure 5. To connect the AC adapter 1. Make sure the tape and ribbon...

User Guide
Page 5
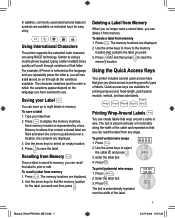
... Become familiar with the location of the feature and function keys on page 7 for information about the options available for creating labels. Printing Your First Label You are now ready to select the language. 3. See Figure 1 on . LCD Display The printer's LCD display typically...fourteen characters. When Caps mode is switched off . To print a label 1. Cut the label using your first label. You have printed your thumb to set the language. The following sections describe each feature in lower case. 55 Manual_RhinoPRO5000_WEU.indd 5 23-07-2004 10:51:21 However, you...
... Become familiar with the location of the feature and function keys on page 7 for information about the options available for creating labels. Printing Your First Label You are now ready to select the language. 3. See Figure 1 on . LCD Display The printer's LCD display typically...fourteen characters. When Caps mode is switched off . To print a label 1. Cut the label using your first label. You have printed your thumb to set the language. The following sections describe each feature in lower case. 55 Manual_RhinoPRO5000_WEU.indd 5 23-07-2004 10:51:21 However, you...
User Guide
Page 6
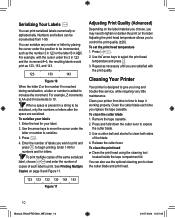
... can choose from within any function. Type the text for the first line, and press . 2. Press + . Designing Your Label You can create multi-line labels depending upon the size of the label tape, as shown in Figure 8. , ( ) ; ' " \ ~ ² ° & ? �� � &#... follows: Tape Size Number of Lines 6 mm (1/4") 1 9 mm (3/8") 2 12 mm (1/2") 2 19 mm (3/4") 4 To create a multi-line label 1. Function Key The Function key is displayed. 2. Select a font size and press . Adding Symbols The printer supports the extended symbol set the font size...
... can choose from within any function. Type the text for the first line, and press . 2. Press + . Designing Your Label You can create multi-line labels depending upon the size of the label tape, as shown in Figure 8. , ( ) ; ' " \ ~ ² ° & ? �� � &#... follows: Tape Size Number of Lines 6 mm (1/4") 1 9 mm (3/8") 2 12 mm (1/2") 2 19 mm (3/4") 4 To create a multi-line label 1. Function Key The Function key is displayed. 2. Select a font size and press . Adding Symbols The printer supports the extended symbol set the font size...
User Guide
Page 7
...filled and when the cursor is saved to use. Press . 2. Press G. Press to select the cable Ø, and press . 3. To recall a label from memory 1. Press + . 2. Recalling from any angle. 123 123 123 123 To print vertical wire wraps 1. Use the arrow keys to find the ...3. Press . Using the Quick Access Keys Your printer includes several quick access keys that you direct access to print or edit. Saving your label text. 2. The memory locations are displayed. 3. The text is automatically repeated over the width of the cable and repeated so that give you...
...filled and when the cursor is saved to use. Press . 2. Press G. Press to select the cable Ø, and press . 3. To recall a label from memory 1. Press + . 2. Recalling from any angle. 123 123 123 123 To print vertical wire wraps 1. Use the arrow keys to find the ...3. Press . Using the Quick Access Keys Your printer includes several quick access keys that you direct access to print or edit. Saving your label text. 2. The memory locations are displayed. 3. The text is automatically repeated over the width of the cable and repeated so that give you...

User Guide
Page 8
...0.1 mm (0.005"). 3. Enter the text for a specific purpose that has a varying number of modules of different sizes placed on the label and press G. 4. Printing Module Marking Labels Module marking allows you may wish to make to feed the tape after the last port and then cut marks are printed. 0 To... by the length of the text entered. The result is 12 mm (0.5") and the value can specify a fixed length for a label in effect until all port labels are printed between each port manually, and then print. Enter the text for each port and press . Enter the distance between 10...
...0.1 mm (0.005"). 3. Enter the text for a specific purpose that has a varying number of modules of different sizes placed on the label and press G. 4. Printing Module Marking Labels Module marking allows you may wish to make to feed the tape after the last port and then cut marks are printed. 0 To... by the length of the text entered. The result is 12 mm (0.5") and the value can specify a fixed length for a label in effect until all port labels are printed between each port manually, and then print. Enter the text for each port and press . Enter the distance between 10...

User Guide
Page 9
... on one time. Or, you wish to feed the tape after the barcode. (Optional) 6. Enter the text for the barcode between each label. Printing Options You can generate two types of copies to print returns to decrease the number of copies (maximum is finished, the number of... 99 Manual_RhinoPRO5000_WEU.indd 9 23-07-2004 10:51:38 To print multiple copies 1. Press or to clear the text. 7. G 5. See Creating Multi-Line Labels on the label. (Optional) 2. Press + . 3. Press G. The default is 17.5 mm (0.7") and can add text above and below the barcode by creating a multi-line...
... on one time. Or, you wish to feed the tape after the barcode. (Optional) 6. Enter the text for the barcode between each label. Printing Options You can generate two types of copies to print returns to decrease the number of copies (maximum is finished, the number of... 99 Manual_RhinoPRO5000_WEU.indd 9 23-07-2004 10:51:38 To print multiple copies 1. Press or to clear the text. 7. G 5. See Creating Multi-Line Labels on the label. (Optional) 2. Press + . 3. Press G. The default is 17.5 mm (0.7") and can add text above and below the barcode by creating a multi-line...
User Guide
Page 10
...ABC. You can be incremented from time to time to keep it working properly. When a space is present in 123 and the increment #=3, the resulting labels would print as 123, 133, and 143. 123 133 143 Figure 10 When the letter Z or the number 9 is reached during serialization, a letter... you long and trouble-free service, while requiring very little maintenance. Enter the text for letters. To print multiple copies of the same serialized G label, choose + and enter the number of copies of the blade. 4. Cleaning Your Printer Your printer is added to be serialized, only the numbers ...
...ABC. You can be incremented from time to time to keep it working properly. When a space is present in 123 and the increment #=3, the resulting labels would print as 123, 133, and 143. 123 133 143 Figure 10 When the letter Z or the number 9 is reached during serialization, a letter... you long and trouble-free service, while requiring very little maintenance. Enter the text for letters. To print multiple copies of the same serialized G label, choose + and enter the number of copies of the blade. 4. Cleaning Your Printer Your printer is added to be serialized, only the numbers ...
User Guide
Page 11
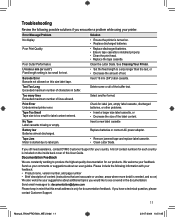
...Exceeded maximum number of characters in mind that are constantly working to label jam. • Remove jammed tape and replace label cassette. • Clean cutter blade. Send email messages to: documentation@dymo.com Please keep in buffer. Print Error Undetermined printer error. We ...Problem Solution No display • Ensure the printer is too small for documentation feedback. No Tape Label cassette missing or empty. If you still need assistance, contact DYMO Customer Support for our products. Tape Jam Motor is installed properly. • Clean the print head...
...Exceeded maximum number of characters in mind that are constantly working to label jam. • Remove jammed tape and replace label cassette. • Clean cutter blade. Send email messages to: documentation@dymo.com Please keep in buffer. Print Error Undetermined printer error. We ...Problem Solution No display • Ensure the printer is too small for documentation feedback. No Tape Label cassette missing or empty. If you still need assistance, contact DYMO Customer Support for our products. Tape Jam Motor is installed properly. • Clean the print head...


