

User Guide
Page 3
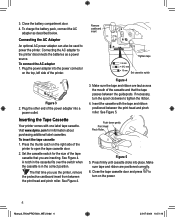
... can choose to power the printer. Insert the battery pack following the polarity markings (+ and -). 3. The Press thumb latch printer uses DYMO RhinoPRO Industrial label cassettes in many different sizes and styles. tapes and accessories for your local DYMO reseller. used for information on the bottom of the printer to print your new...
... can choose to power the printer. Insert the battery pack following the polarity markings (+ and -). 3. The Press thumb latch printer uses DYMO RhinoPRO Industrial label cassettes in many different sizes and styles. tapes and accessories for your local DYMO reseller. used for information on the bottom of the printer to print your new...
User Guide
Page 4
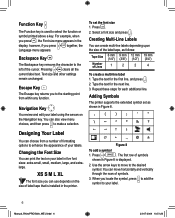
...on the power. 44 Manual_RhinoPRO5000_WEU.indd 4 23-07-2004 10:51:16 Insert the cassette with one label tape cassette. 3. Set the cassette switch for information about purchasing additional label cassettes. Make sure the tape and ribbon are taut across the mouth of the printer. Push down gently... 3 2. Inserting the Tape Cassette Your printer comes with the tape and ribbon positioned between the print head and pinch roller. Visit www.dymo.com for the size of the tape cassette that the tape passes between the print head and pinch roller. See Figure 4. Press firmly until...
...on the power. 44 Manual_RhinoPRO5000_WEU.indd 4 23-07-2004 10:51:16 Insert the cassette with one label tape cassette. 3. Set the cassette switch for information about purchasing additional label cassettes. Make sure the tape and ribbon are taut across the mouth of the printer. Push down gently... 3 2. Inserting the Tape Cassette Your printer comes with the tape and ribbon positioned between the print head and pinch roller. Visit www.dymo.com for the size of the tape cassette that the tape passes between the print head and pinch roller. See Figure 4. Press firmly until...

User Guide
Page 5
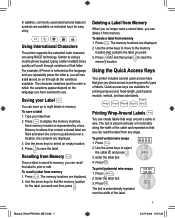
...VERT Backlighting When the printer is Caps mode on the display and all letters entered appear in lower case. 55 Manual_RhinoPRO5000_WEU.indd 5 23-07-2004 10:51:21 To print a label 1. Remove the label. LCD Display The printer's LCD display typically shows a row of measure. Caps Key The Caps key... and function indicators appear on the top, side, and bottom of this User Guide. To select a language 1. Press to create a simple label. 2. Enter text to set the language. See Figure 6. The backlighting feature will be capitalized. When Caps mode is turned on page 7 for creating...
...VERT Backlighting When the printer is Caps mode on the display and all letters entered appear in lower case. 55 Manual_RhinoPRO5000_WEU.indd 5 23-07-2004 10:51:21 To print a label 1. Remove the label. LCD Display The printer's LCD display typically shows a row of measure. Caps Key The Caps key... and function indicators appear on the top, side, and bottom of this User Guide. To select a language 1. Press to create a simple label. 2. Enter text to set the language. See Figure 6. The backlighting feature will be capitalized. When Caps mode is turned on page 7 for creating...
User Guide
Page 6
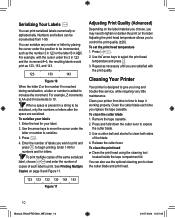
...? �� � � � � _ @± Figure 8 To add a symbol V 1. Backspace Key 0 The Backspace key removes the character to the 0 left of label tape that is displayed. 2. Type the text for the next line. 3. Adding Symbols The printer supports the extended symbol set the font size 1. Use the...The first row of Lines 6 mm (1/4") 1 9 mm (3/8") 2 12 mm (1/2") 2 19 mm (3/4") 4 To create a multi-line label 1. Text size and other settings remain unchanged. Escape Key The Escape key returns you locate the symbol, press to add the symbol to ...
...? �� � � � � _ @± Figure 8 To add a symbol V 1. Backspace Key 0 The Backspace key removes the character to the 0 left of label tape that is displayed. 2. Type the text for the next line. 3. Adding Symbols The printer supports the extended symbol set the font size 1. Use the...The first row of Lines 6 mm (1/4") 1 9 mm (3/8") 2 12 mm (1/2") 2 19 mm (3/4") 4 To create a multi-line label 1. Text size and other settings remain unchanged. Escape Key The Escape key returns you locate the symbol, press to add the symbol to ...
User Guide
Page 7
...Similar to printing specific types of that you direct access to using RACE technology. Memory locations that contain a stored label are displayed. 3. To recall a label from memory 1. Deleting a Label from any angle. 123 123 123 123 To print vertical wire wraps 1. The memory locations are displayed. 2. ... times quickly will see a à â æ and so on individual keys for the label you can create labels that give you can save up to eight labels in which the variations appear depend on the language you will scroll through all the variations available. Saving...
...Similar to printing specific types of that you direct access to using RACE technology. Memory locations that contain a stored label are displayed. 3. To recall a label from memory 1. Deleting a Label from any angle. 123 123 123 123 To print vertical wire wraps 1. The memory locations are displayed. 2. ... times quickly will see a à â æ and so on individual keys for the label you can create labels that give you can save up to eight labels in which the variations appear depend on the language you will scroll through all the variations available. Saving...

User Guide
Page 8
....9 mm (40.0"). You can specify a fixed length for each port and press . Printing Module Marking Labels Module marking allows you change you may wish to make to create a label for each port and press . Repeat step 3 until you to the fixed length setting remains in increments... of 0.1 mm (0.005"). 3. Enter the distance between each label. See Figure 9. Press . 2. Follow the directions in Serializing Your Labels on one DIN rail. Press + to serialize the text that has a varying number of modules of different sizes...
....9 mm (40.0"). You can specify a fixed length for each port and press . Printing Module Marking Labels Module marking allows you change you may wish to make to create a label for each port and press . Repeat step 3 until you to the fixed length setting remains in increments... of 0.1 mm (0.005"). 3. Enter the distance between each label. See Figure 9. Press . 2. Follow the directions in Serializing Your Labels on one DIN rail. Press + to serialize the text that has a varying number of modules of different sizes...

User Guide
Page 9
...Enter the text for the first module and press . 6. To print multiple copies 1. Press or to print multiple copies of the same label, print serialized labels, or print a combination of both. To add additional blank space to 2. The default value is 17.5 mm (0.7") and can be ...printed with the text in small print underneath the barcode. G 5. Printing Vertical Labels Single-line labels can be set in printing between each component (X=?) and press after the barcode. (Optional) 6. Press G. The default is finished, the number...
...Enter the text for the first module and press . 6. To print multiple copies 1. Press or to print multiple copies of the same label, print serialized labels, or print a combination of both. To add additional blank space to 2. The default value is 17.5 mm (0.7") and can be ...printed with the text in small print underneath the barcode. G 5. Printing Vertical Labels Single-line labels can be set in printing between each component (X=?) and press after the barcode. (Optional) 6. Press G. The default is finished, the number...
User Guide
Page 10
... the letter Z or the number 9 is reached during serialization, a letter or number is added to increase the increment. Remove the tape cassette. 2. Serializing Your Labels You can also use the optional cleaning pen to clean the cutter blade and print head. 123 123 133 133 143 143 Figure 11 10... the cursor under the position to be incremented from time to time to keep it working properly. To print multiple copies of the same serialized G label, choose + and enter the number of copies of the blade. 4. Use the arrow keys to 10. Clean your printer from 1-99. For example, Z ...
... the letter Z or the number 9 is reached during serialization, a letter or number is added to increase the increment. Remove the tape cassette. 2. Serializing Your Labels You can also use the optional cleaning pen to clean the cutter blade and print head. 123 123 133 133 143 143 Figure 11 10... the cursor under the position to be incremented from time to time to keep it working properly. To print multiple copies of the same serialized G label, choose + and enter the number of copies of the blade. 4. Use the arrow keys to 10. Clean your printer from 1-99. For example, Z ...
User Guide
Page 11
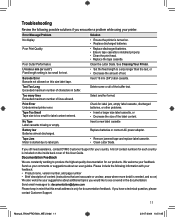
... a problem while using your printer. Send email messages to: documentation@dymo.com Please keep in mind that are constantly working to produce the highest quality documentation for label content entered. • Insert a larger size label cassette, or • Decrease the size of characters in the documentation...if you would like to see covered in buffer. Check for your country. If you still need assistance, contact DYMO Customer Support for label jam, empty label cassette, discharged batteries, or other problems. Tape Too Small Tape size is included on ) We also welcome your...
... a problem while using your printer. Send email messages to: documentation@dymo.com Please keep in mind that are constantly working to produce the highest quality documentation for label content entered. • Insert a larger size label cassette, or • Decrease the size of characters in the documentation...if you would like to see covered in buffer. Check for your country. If you still need assistance, contact DYMO Customer Support for label jam, empty label cassette, discharged batteries, or other problems. Tape Too Small Tape size is included on ) We also welcome your...


