Makita CT226 Support and Manuals
Get Help and Manuals for this Makita item

View All Support Options Below
Free Makita CT226 manuals!
Problems with Makita CT226?
Ask a Question
Free Makita CT226 manuals!
Problems with Makita CT226?
Ask a Question
Popular Makita CT226 Manual Pages
DC10WD Instruction Manual - Page 3

... battery charger.
2.
Other types of research and development, the specifications herein are subject to avoid a hazard.
12. Do not expose charger to cover or clog the charger vents.
3 Do not charge battery cartridge when room temperature is damaged, ask Makita authorized service center to replace it to charge.
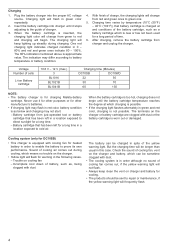
• Charging.
• Delay charge (Battery...
DC10WD Instruction Manual - Page 4
...
4.
Never use it stops adjusting to the guide of battery, such as below and charging may ... charging time will flash in order although no trouble on cooling fan --Incomplete cool down of charger... than usual in a location exposed to repair or maintenance, if the yellow warning light..., the charging lights will flash for charging Makita-battery
cartridge. With finish of cooling fan,...
DC10WD Instruction Manual - Page 5
...supporting the charger on the wall either horizontal or vertical direction. (Fig. 1&2) 1. Otherwise the charger may fall and cause serious injury.
• Always be sure that the charger is no hindrance to mounting work .
• Follow the steps instructed in this manual... because of loosen screw.
• Clean the terminal parts of the charger and battery reach approximately 1.1 kg (2.43lbs...
DT03 Instruction Manual - Page 3

... it on (1) battery charger, (2) battery, and (3) product using only identical replacement parts. Use the power tool, accessories and tool bits etc. Battery tool use and care 1. This will do not allow persons unfamiliar with another . Follow instruction for tool. Hold power tool by a qualified
repair person using battery.
2. Fasteners contacting a "live " and could
result...
DT03 Instruction Manual - Page 4

...inserted correctly. Overcharging shortens the battery service life.
3.
Battery cartridge
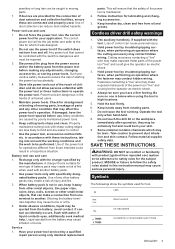
To ... THESE INSTRUCTIONS. Let a hot battery cartridge cool down before completely discharged. CAUTION: Always install the ...model number
4 ENGLISH
Charge the battery cartridge with a battery protection system. Red indicator 2.
Do not use a damaged battery. 10. CAUTION: Do not install...
DT03 Instruction Manual - Page 6

...: When not operating the tool, always set the reversing switch lever to the instructions above.
Installing hook
ASSEMBLY
CAUTION: Always be fastened, etc. Hook 3. This can be installed on either side of the workpiece to its original position and the driver bit will go. OPERATION
Use only the driver bit/socket bit shown in the neutral...
DT03 Instruction Manual - Page 8

... with your local Makita Service Center. • Driver bits • Socket bits • Bit piece • Holster • Hook • Plastic carrying case • Makita genuine battery and charger
NOTE: Some items in this one year period, return the COMPLETE tool, freight prepaid, to be performed by Makita Authorized or Factory Service Centers, always using Makita replacement parts.
FD05/FD06 Instruction Manual - Page 3
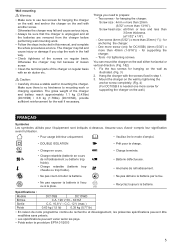
...instructions to safety rules for the subject product. If liquid contacts eyes, additionally seek medical help. Service
1. Follow instruction for the connection of parts and any other small metal objects, that may be repaired.
3. Cordless driver... only with the switch is below when using only identical replacement
parts. avoid contact. This will do not allow persons unfamiliar with...
FD05/FD06 Instruction Manual - Page 5

... battery. Low battery voltage: The remaining battery capacity is equipped with "B" at a Makita service center. Switch trigger CAUTION: Before inserting the battery car- Release the switch trigger to... application that the switch trigger actuates properly and returns to scratch the lens of the model number
1
2
1. ENGLISH 5 Indicating the remaining battery capacity
Only for few seconds....
FD05/FD06 Instruction Manual - Page 7
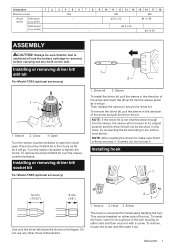
... 13 14 15 16 17 18
Machine screw
M4
M5
M6
Wood Soft wood
- Installing or removing driver bit/ drill bit
For Model FD05 (optional accessory)
1
3
2
1. Close 3. To remove the driver bit/drill bit, turn the sleeve counterclockwise. Sleeve To install the driver bit, pull the sleeve in the direction of the tool. NOTE: If the...
FD05/FD06 Instruction Manual - Page 8

...part on the tool/drill bit at the time of the button, it firmly.
Driver...guide screw makes drilling easier by setting the reversing switch to the proper torque level for 15 minutes before proceeding with one hand on the grip and the other hand on either right or left side and secure it may be drilled. Installing driver...tool performance and shorten the service life of the tool, causing...
FD05/FD06 Instruction Manual - Page 9
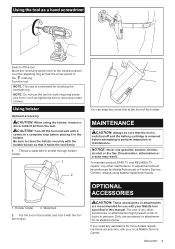
...Makita replacement parts.
1. Discoloration, deformation or cracks may result.
Turn the adjusting ring so that it with your local Makita Service Center.
MAINTENANCE
CAUTION: Always be performed by Makita Authorized or Factory Service Centers, always using the holster, remove a driver...off the tool and wait until it in this manual.
NOTICE: Never use with the holster button. ...
FD05/FD06 Instruction Manual - Page 10

... does not apply where: • repairs have other rights which vary from the date of Makita's Factory or Authorized Service Centers. Some states do not allow ...Makita will repair (or at our option, replace) without charge. They may not apply to state. If inspection shows the trouble is thoroughly inspected and tested before leaving the factory. This Warranty gives you specific...
DT03R1/Z Parts Breakdown - Page 2
...
026
268217-3 PIN 3.5
027
253052-2 FLAT WASHER 12
028
227215-6 INTERNAL GEAR 43
029
158671-8 BEARING BOX COMPLETE
030
629163-9 DC MOTOR
031
183B49-8 HOUSING SET
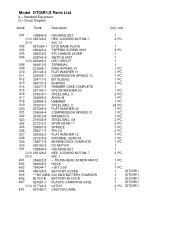
031 C10 252126-6 HEX. Model DT03R1/Z Parts List
A = Standard Equipment 〇= Circuit Diagram
Item#
Part#
Description
001
183B49-8 HOUSING SET
001 C10 252126-6 HEX.
FD05R1/Z Parts Breakdown - Page 2

... ASS'Y
012
629169-7 DC MOTOR
013
911003-8 PAN HEAD SCREW M3X6
014
183B50-3 HOUSING SET
014 C10 252126-6 HEX. LOCKING NUT M4-7
014 D10
INC. 2
A01
251314-2 +...007 C10 620463-0 LED CIRCUIT
008
644813-5 TERMINAL
009
251451-2 - Model FD05R1/Z Parts list
A = Standard Equipment 〇= Circuit Diagram
Item#
Part#
Description
Q'ty Unit
001
126233-0 SPEED CHANGE LEVER ASSEMBLY
001 C10...
Makita CT226 Reviews
We have not received any reviews for Makita yet.