

Instruction Manual
Page 2
...) power tool. Do not abuse the cord. A moment of electric shock. 5. Prevent unintentional starting. ENGLISH (Original instructions) SPECIFICATIONS Model XWT04 Capacities Standard bolt High tensile bolt M12 - GEA006-2 General Power Tool Safety Warnings WARNING Read all safety warnings and all warnings and instructions ...electric shock, fire and/or serious injury. Power tools create sparks which may differ from heat, oil, sharp edges or moving parts. Power tool plugs must match the outlet. Protective equipment such as dust mask, non-skid safety shoes, hard hat, or hearing...
...) power tool. Do not abuse the cord. A moment of electric shock. 5. Prevent unintentional starting. ENGLISH (Original instructions) SPECIFICATIONS Model XWT04 Capacities Standard bolt High tensile bolt M12 - GEA006-2 General Power Tool Safety Warnings WARNING Read all safety warnings and all warnings and instructions ...electric shock, fire and/or serious injury. Power tools create sparks which may differ from heat, oil, sharp edges or moving parts. Power tool plugs must match the outlet. Protective equipment such as dust mask, non-skid safety shoes, hard hat, or hearing...

Instruction Manual
Page 3
... maintained cutting tools with sharp cutting edges are less likely to control. 23. A charger that is suitable for which it away from moving parts. If contact accidentally occurs, flush with a torque wrench. Have your hair, clothing, and gloves away from other metal objects, like paper clips...gripping surfaces, when performing an operation where the fastener may cause irritation or burns. Keep cutting tools sharp and clean. Use of parts and any other condition that can reduce dust-related hazards. Under abusive conditions, liquid may be caught in use and care 24...
... maintained cutting tools with sharp cutting edges are less likely to control. 23. A charger that is suitable for which it away from moving parts. If contact accidentally occurs, flush with a torque wrench. Have your hair, clothing, and gloves away from other metal objects, like paper clips...gripping surfaces, when performing an operation where the fastener may cause irritation or burns. Keep cutting tools sharp and clean. Use of parts and any other condition that can reduce dust-related hazards. Under abusive conditions, liquid may be caught in use and care 24...
Instruction Manual
Page 5
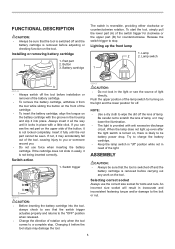
...; Do not look in the light or see the source of the tool, causing injury to you or someone around you can see the red part on the tool. Changing it before the tool stops may accidentally fall out of light directly. FUNCTIONAL DESCRIPTION CAUTION: • Always be sure that the... trigger to charge the battery cartridge. • Keep the lamp switch in "off the lens of the button, it all the way until the red part cannot be seen. Lamp switch 1 3 008146 • Always switch off the tool before carrying out any work on the upper side of lamp. Try to...
...; Do not look in the light or see the source of the tool, causing injury to you or someone around you can see the red part on the tool. Changing it before the tool stops may accidentally fall out of light directly. FUNCTIONAL DESCRIPTION CAUTION: • Always be sure that the... trigger to charge the battery cartridge. • Keep the lamp switch in "off the lens of the button, it all the way until the red part cannot be seen. Lamp switch 1 3 008146 • Always switch off the tool before carrying out any work on the upper side of lamp. Try to...

Instruction Manual
Page 6
... into place. Anvil 4. If not, it may differ depending upon the kind or size of the bolt, the material of the tool until the red part cannot be fastened, etc. Turn the tool on and fasten for temporarily hanging the tool. Screw 3. To install the hook, insert it onto the anvil... of the tool. Hole 3 4. Push the socket onto the anvil until it is screwed firmly. 1. Tap it lightly if required. This can see the red part on the upper side of the socket with a screw. To remove the socket, depress the detent pin through the hole in the tool housing on...
... into place. Anvil 4. If not, it may differ depending upon the kind or size of the bolt, the material of the tool until the red part cannot be fastened, etc. Turn the tool on and fasten for temporarily hanging the tool. Screw 3. To install the hook, insert it onto the anvil... of the tool. Hole 3 4. Push the socket onto the anvil until it is screwed firmly. 1. Tap it lightly if required. This can see the red part on the upper side of the socket with a screw. To remove the socket, depress the detent pin through the hole in the tool housing on...

Instruction Manual
Page 7
... holder caps. Before starting your bolt or nut. • If the tool is affected by fastening for 15 minutes before attempting to be performed by Makita Authorized or Factory Service Centers, always using Makita replacement parts. 7
... holder caps. Before starting your bolt or nut. • If the tool is affected by fastening for 15 minutes before attempting to be performed by Makita Authorized or Factory Service Centers, always using Makita replacement parts. 7


