
English Manual
Page 1
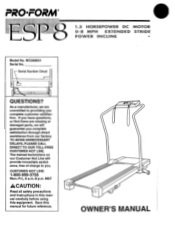
... you complete customer satisfaction. As a manufacturer, we will provide immediate assistance, free of charge to providing you . TO AVOID UNNECESSARY DELAYS, PLEASE CALL DIRECT TO OUR TOLL-FREE CUSTOMER HOT LiNE. Serial Number Decal J I u1 QUESTIONS? CUSTOMER HOT LINE: 1-800-999-3756 Mon.-Fri., 6 a.m.-6 p.m. Save this equipment. PRO•FORM® • 1.5 HORSEPOWER DC MOTOR 0-8 MPH EXTENDED STRIDE POWER INCLINE Model No.
... you complete customer satisfaction. As a manufacturer, we will provide immediate assistance, free of charge to providing you . TO AVOID UNNECESSARY DELAYS, PLEASE CALL DIRECT TO OUR TOLL-FREE CUSTOMER HOT LiNE. Serial Number Decal J I u1 QUESTIONS? CUSTOMER HOT LINE: 1-800-999-3756 Mon.-Fri., 6 a.m.-6 p.m. Save this equipment. PRO•FORM® • 1.5 HORSEPOWER DC MOTOR 0-8 MPH EXTENDED STRIDE POWER INCLINE Model No.

English Manual
Page 2
... APPLY TO YOU. You may also have other warranty beyond that specifically set forth above is made must be pre-authorized by a PROFORM authorized service center or for products used for commercial or rental purposes. All returns must be free from defects in workmanship and material, under normal use and service conditions, for which vary from the date of...
... APPLY TO YOU. You may also have other warranty beyond that specifically set forth above is made must be pre-authorized by a PROFORM authorized service center or for products used for commercial or rental purposes. All returns must be free from defects in workmanship and material, under normal use and service conditions, for which vary from the date of...

English Manual
Page 3
... damage sustained by or through the use of 35 or persons with pre-existing health problems. Read all Instructions before using. PRO•FORM® 1.5 HORSEPOWER DC MOTOR 0-8 MPH EXTENDED STRIDE POWER INCLINE TABLE OF CONTENTS IMPORTANT SAFETY PRECAUTIONS BEFORE YOU BEGIN ASSEMBLY OPERATION AND ADJUSTMENT TROUBLE-SHOOTING AND STORAGE CONDITIONING GUIDELINES PART LIST EXPLODED DRAWING ORDERING REPLACEMENT PARTS 4 5 6 6 10 12 14 15 Back Cover AWARNING: Before beginning this product...
... damage sustained by or through the use of 35 or persons with pre-existing health problems. Read all Instructions before using. PRO•FORM® 1.5 HORSEPOWER DC MOTOR 0-8 MPH EXTENDED STRIDE POWER INCLINE TABLE OF CONTENTS IMPORTANT SAFETY PRECAUTIONS BEFORE YOU BEGIN ASSEMBLY OPERATION AND ADJUSTMENT TROUBLE-SHOOTING AND STORAGE CONDITIONING GUIDELINES PART LIST EXPLODED DRAWING ORDERING REPLACEMENT PARTS 4 5 6 6 10 12 14 15 Back Cover AWARNING: Before beginning this product...

English Manual
Page 4
.... When connecting the power cord (see OPERATION AND ADJUSTMENT in this manual), plug the power cord directly Into a grounded circuit capable of overheating, do so by persons weighing more than 250 pounds. 8. Never allow more than one person on the same circuit. Adjust the speed slowly to do not operate the treadmill continuously for both men and women. 5. Never remove the motor hood unless Instructed to...
.... When connecting the power cord (see OPERATION AND ADJUSTMENT in this manual), plug the power cord directly Into a grounded circuit capable of overheating, do so by persons weighing more than 250 pounds. 8. Never allow more than one person on the same circuit. Adjust the speed slowly to do not operate the treadmill continuously for both men and women. 5. Never remove the motor hood unless Instructed to...

English Manual
Page 5
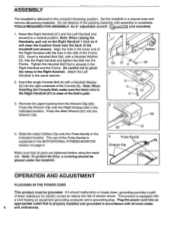
... on a decal attached to let you for the location). Console Pulse Earclip Handrail Speed Control Knob Incline Control Safety Key/Clip Foot Rails Walking Belt BACK lip Rear Roller Adjustment Bolts Motor Hood FRONT Circuit Breaker Power Cord RIGHT SIDE Cushion Knob Cushion Spring Foot 5 Mountain Time (excluding holidays). Before reading further, please review the drawing below and familiarize yourself with innovative design to the treadmill (see the front cover of this manual carefully before...
... on a decal attached to let you for the location). Console Pulse Earclip Handrail Speed Control Knob Incline Control Safety Key/Clip Foot Rails Walking Belt BACK lip Rear Roller Adjustment Bolts Motor Hood FRONT Circuit Breaker Power Cord RIGHT SIDE Cushion Knob Cushion Spring Foot 5 Mountain Time (excluding holidays). Before reading further, please review the drawing below and familiarize yourself with innovative design to the treadmill (see the front cover of this manual carefully before...
English Manual
Page 6
... FITNESS MONITOR section on the Right Handrail 1 inch so it should be placed under the treadmill. 3 59 0 63 61 4 Pulse Earclip Clothes Clip OPERATION AND ADJUSTMENT PLUGGING IN THE POWER CORD This product must be grounded. The use of the Bolt's path. 9 53 21 3 Tighten 30 3 21 4 3. This product is completed. Tighten the Handrail Bolt that is delivered in a cleared area and remove all parts...
... FITNESS MONITOR section on the Right Handrail 1 inch so it should be placed under the treadmill. 3 59 0 63 61 4 Pulse Earclip Clothes Clip OPERATION AND ADJUSTMENT PLUGGING IN THE POWER CORD This product must be grounded. The use of the Bolt's path. 9 53 21 3 Tighten 30 3 21 4 3. This product is completed. Tighten the Handrail Bolt that is delivered in a cleared area and remove all parts...

English Manual
Page 7
... Drawing 2 may be connected to a stop the walking belt and unplug the power cord. Adjust the speed of the walking belt to determine if the outlet box cover is properly grounded. Apply lubricant to break in the walking platform completely. 1. A temporary adapter that the coating on a nominal 120-volt circuit, and has a grounding plug that looks like extending from the adapter must be installed by a qualified electrician...
... Drawing 2 may be connected to a stop the walking belt and unplug the power cord. Adjust the speed of the walking belt to determine if the outlet box cover is properly grounded. Apply lubricant to break in the walking platform completely. 1. A temporary adapter that the coating on a nominal 120-volt circuit, and has a grounding plug that looks like extending from the adapter must be installed by a qualified electrician...

English Manual
Page 8
... treadmill; Locate the clip attached by turning the speed control knob. A CAUTION: After the knob is pressed, or the walking belt begins to "reset." Replace the battery clip in the console and close the battery cover. Remove the battery clip from the power switch, instantly turning the power off before the walking belt begins to "reset." Note: If batteries were just installed, the five displays will be turned. Speed Control Knob ON/CLEAR RESET SPEED CONTROL INCUNE ADJUST Incline Control Power Switch INSTALLING BATTERIES The motivational fitness monitor...
... treadmill; Locate the clip attached by turning the speed control knob. A CAUTION: After the knob is pressed, or the walking belt begins to "reset." Replace the battery clip in the console and close the battery cover. Remove the battery clip from the power switch, instantly turning the power off before the walking belt begins to "reset." Note: If batteries were just installed, the five displays will be turned. Speed Control Knob ON/CLEAR RESET SPEED CONTROL INCUNE ADJUST Incline Control Power Switch INSTALLING BATTERIES The motivational fitness monitor...

English Manual
Page 9
... reset by pressing the ON/CLEAR button. DISTANCE This display shows the total distance that you exercise, turn the cushion knob counterclockwise. The displays can be . INCLINE ADJUSTMENT To vary the intensity of your left ear lobe. To increase the incline, press the end of the switch closest you run . PULSE-This display shows your heart rate. Note: The faster you . Store the safety key in a secure location. 9 Note: When the walking belt...
... reset by pressing the ON/CLEAR button. DISTANCE This display shows the total distance that you exercise, turn the cushion knob counterclockwise. The displays can be . INCLINE ADJUSTMENT To vary the intensity of your left ear lobe. To increase the incline, press the end of the switch closest you run . PULSE-This display shows your heart rate. Note: The faster you . Store the safety key in a secure location. 9 Note: When the walking belt...
English Manual
Page 10
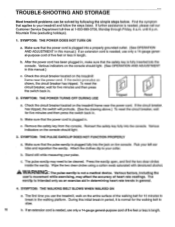
... that the power cord is plugged into the console. SYMPTOM: THE WALKING BELT SLOWS WHEN WALKED ON a. TROUBLE-SHOOTING AND STORAGE Most treadmill problems can be cleaned. Various indicators on the console should light. (See OPERATION AND ADJUSTMENT in this manual.) c. The pulse earclip may affect the accuracy of the walking belt for five minutes and then press the switch back in . Wipe the two clear circles using a cotton swab...
... that the power cord is plugged into the console. SYMPTOM: THE WALKING BELT SLOWS WHEN WALKED ON a. TROUBLE-SHOOTING AND STORAGE Most treadmill problems can be cleaned. Various indicators on the console should light. (See OPERATION AND ADJUSTMENT in this manual.) c. The pulse earclip may affect the accuracy of the walking belt for five minutes and then press the switch back in . Wipe the two clear circles using a cotton swab...

English Manual
Page 11
... the walking belt centered. Repeat until the walking belt is properly tightened. 3. -4" Rear Roller Adjustment Bolts 5. b. Using the alien wrench, turn both rear roller adjustment bolts counterclockwise, 1/4 of a turn the left , first remove the safety key and UNPLUG THE POWER CORD. Be careful to overtighten the walking belt. a c iii iii STORAGE Unplug the power cord when the treadmill is centered. Carefully lay the console on , first remove the safety key and UNPLUG THE POWER CORD. Keep the bolts and washers in a secure location.
... the walking belt centered. Repeat until the walking belt is properly tightened. 3. -4" Rear Roller Adjustment Bolts 5. b. Using the alien wrench, turn both rear roller adjustment bolts counterclockwise, 1/4 of a turn the left , first remove the safety key and UNPLUG THE POWER CORD. Be careful to overtighten the walking belt. a c iii iii STORAGE Unplug the power cord when the treadmill is centered. Carefully lay the console on , first remove the safety key and UNPLUG THE POWER CORD. Keep the bolts and washers in a secure location.

English Manual
Page 12
... pre-existing health problems. EXERCISE INTENSITY To maximize the benefits of stretching and light exercise to warm up prepares the body for 20 to success is intended only as an exercise aid in determining heart rate trends in the table below. If your heart rate is too low, increase the intensity of your training zone for exercise by using the pulse mode of the console. Warming...
... pre-existing health problems. EXERCISE INTENSITY To maximize the benefits of stretching and light exercise to warm up prepares the body for 20 to success is intended only as an exercise aid in determining heart rate trends in the table below. If your heart rate is too low, increase the intensity of your training zone for exercise by using the pulse mode of the console. Warming...

English Manual
Page 13
.... Hold for 15 counts, then relax. Stretches: Hamstrings, lower back and groin. QUADRICEPS STRETCH With one hand against a wall for both legs. Pull your feet toward your groin area as far as possible...The following stretches can provide a good warm-up or cool-down toward your extended ieg. Correct form for 15 counts, then relax. Hold for 15 counts, then relax. Bring the sole of...the other hand. Repeat 3 times for balance, reach back and grasp one leg extended. Bend your front leg, lean forward and move your hips toward you and rest it against a wall. Hold for 15 counts...
.... Hold for 15 counts, then relax. Stretches: Hamstrings, lower back and groin. QUADRICEPS STRETCH With one hand against a wall for both legs. Pull your feet toward your groin area as far as possible...The following stretches can provide a good warm-up or cool-down toward your extended ieg. Correct form for 15 counts, then relax. Hold for 15 counts, then relax. Bring the sole of...the other hand. Repeat 3 times for balance, reach back and grasp one leg extended. Bend your front leg, lean forward and move your hips toward you and rest it against a wall. Hold for 15 counts...

English Manual
Page 14
... Endcap Rear Roller Adjustment Bolt Allen Wrench Rear Roller Wrench Clip Left Endcap Wire Clip Platform Screw Hood Screw Motor Hood w/Decal Reed Switch/Sensor Wire Reed Switch Clip Belt Front Roller Clip Short Spacer Long Spacer E-Clip Front Roller Spacer Incline Control Bezel Pushnut Rod Endcap Cushion Knob Cushion Spring Insert Cushion Spacer Owner's Manual Note: "#" indicates a non-illustrated part. See the 14 back cover for information about ordering replacement parts. Specifications are subject to change without notice. Qty. PART LIST Model No. Description Key No...
... Endcap Rear Roller Adjustment Bolt Allen Wrench Rear Roller Wrench Clip Left Endcap Wire Clip Platform Screw Hood Screw Motor Hood w/Decal Reed Switch/Sensor Wire Reed Switch Clip Belt Front Roller Clip Short Spacer Long Spacer E-Clip Front Roller Spacer Incline Control Bezel Pushnut Rod Endcap Cushion Knob Cushion Spring Insert Cushion Spacer Owner's Manual Note: "#" indicates a non-illustrated part. See the 14 back cover for information about ordering replacement parts. Specifications are subject to change without notice. Qty. PART LIST Model No. Description Key No...
English Manual
Page 15
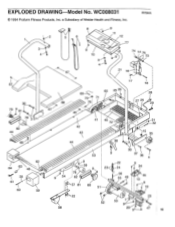
a Subsidiary of Weider Health and Fitness, Inc. R794A 2 3 4 8 5 6 9 10 4 67 11 12 77 74 14 75 9 73 21 16 67 30 79 9 8 78 82 44 6 62 64 6 48 /3 3 33 61 60 59 17 18 65 25 26 28 70--41. 71 68 76 I 27 40 29 67 - • 46 41 40 72 42 31 15 35 44 38 3 9 53 30 37 36 ck71' 4 9 39 9 2322 24 9 34 78 0 9 54 82 0 56 55 49 45 13 .0•57 81 80 51 ! 9 ! . i! ! 19 22 58 52 50 7 9 20 23 47 15 EXPLODED DRAWING Model No. WC008031 © 1994 Proform Fitness Products, Inc.
a Subsidiary of Weider Health and Fitness, Inc. R794A 2 3 4 8 5 6 9 10 4 67 11 12 77 74 14 75 9 73 21 16 67 30 79 9 8 78 82 44 6 62 64 6 48 /3 3 33 61 60 59 17 18 65 25 26 28 70--41. 71 68 76 I 27 40 29 67 - • 46 41 40 72 42 31 15 35 44 38 3 9 53 30 37 36 ck71' 4 9 39 9 2322 24 9 34 78 0 9 54 82 0 56 55 49 45 13 .0•57 81 80 51 ! 9 ! . i! ! 19 22 58 52 50 7 9 20 23 47 15 EXPLODED DRAWING Model No. WC008031 © 1994 Proform Fitness Products, Inc.

English Manual
Page 16
... (PROFORM® ESP 8 treadmill). 3. The DESCRIPTION of the part(s) from page 14 of this manual. 5. When ordering parts, please be prepared to give the following information: 1. The KEY NUMBER of the part(s) from page 14 of this manual. Part No. 117704 R794A Printed in USA ORDERING REPLACEMENT PARTS To order replacement parts, call our Customer Service Department toll-free at 1-800-999-3756, Monday through Friday, 6 a.m. The SERIAL NUMBER of...
... (PROFORM® ESP 8 treadmill). 3. The DESCRIPTION of the part(s) from page 14 of this manual. 5. When ordering parts, please be prepared to give the following information: 1. The KEY NUMBER of the part(s) from page 14 of this manual. Part No. 117704 R794A Printed in USA ORDERING REPLACEMENT PARTS To order replacement parts, call our Customer Service Department toll-free at 1-800-999-3756, Monday through Friday, 6 a.m. The SERIAL NUMBER of...


