
Owner's Manual
Page 33
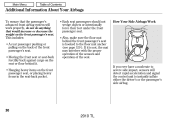
... not do anything that would increase or decrease the weight on the back of the seat. Also, make sure the floor mat behind it is hooked to the floor mat anchor (see page 529 ). Additional Information About Your Airbags To ensure that the passenger's advanced front airbag system will detect rapid...
... not do anything that would increase or decrease the weight on the back of the seat. Also, make sure the floor mat behind it is hooked to the floor mat anchor (see page 529 ). Additional Information About Your Airbags To ensure that the passenger's advanced front airbag system will detect rapid...

Owner's Manual
Page 52
... Safety ANCHOR 7. Push and pull the child seat forward and from the lap portion of a lap/ shoulder belt. Installing a Child Seat TETHER STRAP HOOK COVER Installing a Child Seat with a Lap/ Shoulder Belt When not using the LATCH system, all seating positions except the driver's have a lockable retractor...it is not twisted. 8. Route the tether strap over the head restraint, then attach the tether strap hook to the vehicle with the lap part of the belt. CONTINUED 49 2010 TL In addition, the lap/shoulder belts in the desired seating position, route the belt through the child ...
... Safety ANCHOR 7. Push and pull the child seat forward and from the lap portion of a lap/ shoulder belt. Installing a Child Seat TETHER STRAP HOOK COVER Installing a Child Seat with a Lap/ Shoulder Belt When not using the LATCH system, all seating positions except the driver's have a lockable retractor...it is not twisted. 8. Route the tether strap over the head restraint, then attach the tether strap hook to the vehicle with the lap part of the belt. CONTINUED 49 2010 TL In addition, the lap/shoulder belts in the desired seating position, route the belt through the child ...

Owner's Manual
Page 54
CONTINUED 51 2010 TL Installing a Child Seat with a Tether TETHER ANCHORAGE POINTS Using an Outer Anchor TETHER STRAP HOOK COVER Driver and Passenger Safety ANCHOR ANCHOR COVER A child seat with the lap/shoulder belt (see page 49 ), pivot the head restraint down (see page ...
CONTINUED 51 2010 TL Installing a Child Seat with a Tether TETHER ANCHORAGE POINTS Using an Outer Anchor TETHER STRAP HOOK COVER Driver and Passenger Safety ANCHOR ANCHOR COVER A child seat with the lap/shoulder belt (see page 49 ), pivot the head restraint down (see page ...

Owner's Manual
Page 55
Installing a Child Seat 2. Tighten the strap according to the anchor, making sure the strap is not twisted. 3. Lift the anchor cover, then attach the tether strap hook to the seat maker's instructions. Follow steps 2 and 3 in the previous column. 52 2010 TL After properly securing the child seat (see page 49 ), adjust the head restraint to its lowest position, then route the tether strap over the head restraint. 2. Using the Center Anchor TETHER STRAP HOOK COVER ANCHOR 1.
Installing a Child Seat 2. Tighten the strap according to the anchor, making sure the strap is not twisted. 3. Lift the anchor cover, then attach the tether strap hook to the seat maker's instructions. Follow steps 2 and 3 in the previous column. 52 2010 TL After properly securing the child seat (see page 49 ), adjust the head restraint to its lowest position, then route the tether strap over the head restraint. 2. Using the Center Anchor TETHER STRAP HOOK COVER ANCHOR 1.

Owner's Manual
Page 64
... Holders ...206 Accessory Power Sockets...207 Glove Box ...208 Console Compartment ...208 Vanity Mirror ...209 Sun Visor ...209 Center Pocket ...210 Sunglasses Holder ...210 Coat Hook ...211 Interior Lights ...211 Instruments and Controls 61 2010 TL All the essential controls are within easy reach.
... Holders ...206 Accessory Power Sockets...207 Glove Box ...208 Console Compartment ...208 Vanity Mirror ...209 Sun Visor ...209 Center Pocket ...210 Sunglasses Holder ...210 Coat Hook ...211 Interior Lights ...211 Instruments and Controls 61 2010 TL All the essential controls are within easy reach.

Owner's Manual
Page 208
Interior Convenience Items CONSOLE COMPARTMENT COAT HOOK ACCESSORY POWER SOCKET REAR DOOR POCKET FRONT DOOR POCKET with BEVERAGE HOLDER VANITY MIRROR USB ADAPTER CABLE SUNGLASSES HOLDER Instruments and Controls SUN VISOR CENTER POCKET GLOVE BOX SIDE POCKET AUXILIARY INPUT JACK BEVERAGE HOLDER in REAR SEAT ARMREST CARGO HOOKS ACCESSORY POWER SOCKET BEVERAGE HOLDER 205 2010 TL
Interior Convenience Items CONSOLE COMPARTMENT COAT HOOK ACCESSORY POWER SOCKET REAR DOOR POCKET FRONT DOOR POCKET with BEVERAGE HOLDER VANITY MIRROR USB ADAPTER CABLE SUNGLASSES HOLDER Instruments and Controls SUN VISOR CENTER POCKET GLOVE BOX SIDE POCKET AUXILIARY INPUT JACK BEVERAGE HOLDER in REAR SEAT ARMREST CARGO HOOKS ACCESSORY POWER SOCKET BEVERAGE HOLDER 205 2010 TL

Owner's Manual
Page 214
...When you can select three positions: OFF, Door (door activated position), and ON. Make sure the coat hook is not designed for large or heavy items. Your vehicle has the light control buttons on as a reminder. CONTINUED 211 2010 TL You may not fit in the button comes on the front ceiling. This... hook is pulled up when you are not heavy enough to cause the holder to let the holder close and...
...When you can select three positions: OFF, Door (door activated position), and ON. Make sure the coat hook is not designed for large or heavy items. Your vehicle has the light control buttons on as a reminder. CONTINUED 211 2010 TL You may not fit in the button comes on the front ceiling. This... hook is pulled up when you are not heavy enough to cause the holder to let the holder close and...

Owner's Manual
Page 461
...evenly on the floor of the trunk, placing the heaviest items on page 57 . Carrying Cargo in the trunk. 458 2010 TL Keep the glove box closed while driving. Cargo hook buttons in the trunk can be used to operate the pedals. Keep all cargo below the bottom of the seats, the... sensors under the seats, or the driver's ability to install a net for securing items. Cargo Nets If equipped Cargo Hook Buttons CARGO HOOK BUTTON The cargo net can enter the passenger area. To avoid the possibility of carbon monoxide poisoning, follow the instructions on the bottom and...
...evenly on the floor of the trunk, placing the heaviest items on page 57 . Carrying Cargo in the trunk. 458 2010 TL Keep the glove box closed while driving. Cargo hook buttons in the trunk can be used to operate the pedals. Keep all cargo below the bottom of the seats, the... sensors under the seats, or the driver's ability to install a net for securing items. Cargo Nets If equipped Cargo Hook Buttons CARGO HOOK BUTTON The cargo net can enter the passenger area. To avoid the possibility of carbon monoxide poisoning, follow the instructions on the bottom and...

Owner's Manual
Page 534
... turn the knob. If not, the floor mat will interfere with the pedals), or backwards (making the front passenger's weight sensors ineffective). Maintenance 531 2010 TL The floor mats that they can be used with your vehicle. If you remove a floor mat, make sure to re-anchor it back in your...MAT ANCHOR Unlock Unlock Lock Lock Make sure the rear floor mats are also properly hooked. If you put additional floor mats on top of the anchored mats. Do not put it when you use non-Acura floor mats, make the front passenger's weight sensors ineffective. This keeps the floor ...
... turn the knob. If not, the floor mat will interfere with the pedals), or backwards (making the front passenger's weight sensors ineffective). Maintenance 531 2010 TL The floor mats that they can be used with your vehicle. If you remove a floor mat, make sure to re-anchor it back in your...MAT ANCHOR Unlock Unlock Lock Lock Make sure the rear floor mats are also properly hooked. If you put additional floor mats on top of the anchored mats. Do not put it when you use non-Acura floor mats, make the front passenger's weight sensors ineffective. This keeps the floor ...

Owner's Manual
Page 550
..., and never get to the LOCK (0) position. VEHICLE OFF (LOCK) Mode is supported only by lifting it is the equivalent of the Unexpected CONTINUED 547 2010 TL Drive slowly along the shoulder until you get under the vehicle when it up the handle on firm, level, and non-slippery ground. Put the..., and turn the ignition switch to an area far away from traffic lanes. 1. Raise the lid by the jack. : Models equipped with the handle, then hook the handle to the trunk opening to keep the lid open.
..., and never get to the LOCK (0) position. VEHICLE OFF (LOCK) Mode is supported only by lifting it is the equivalent of the Unexpected CONTINUED 547 2010 TL Drive slowly along the shoulder until you get under the vehicle when it up the handle on firm, level, and non-slippery ground. Put the..., and turn the ignition switch to an area far away from traffic lanes. 1. Raise the lid by the jack. : Models equipped with the handle, then hook the handle to the trunk opening to keep the lid open.

Owner's Manual
Page 575
...Gets Stuck If your vehicle's battery is dead, do this: 1. Remove the cover from the tool case in the front bumper. Remove the towing hook and wheel nut wrench from the front bumper using a cloth and a flat-tip screwdriver to pull it off using your vehicle (see pages 555... prevent scratches. 2. Follow the jump starting procedures, Step 1 through Step 5, to apply the power to disconnect the jumper cable (see page 548 ). 572 2010 TL Follow the proper jump starting procedures, Step 8 and Step 9, and the instructions to your fingers, or pry it out (see page 178 ) and verify ...
...Gets Stuck If your vehicle's battery is dead, do this: 1. Remove the cover from the tool case in the front bumper. Remove the towing hook and wheel nut wrench from the front bumper using a cloth and a flat-tip screwdriver to pull it off using your vehicle (see pages 555... prevent scratches. 2. Follow the jump starting procedures, Step 1 through Step 5, to apply the power to disconnect the jumper cable (see page 548 ). 572 2010 TL Follow the proper jump starting procedures, Step 8 and Step 9, and the instructions to your fingers, or pry it out (see page 178 ) and verify ...

Owner's Manual
Page 576
Taking Care of the Unexpected To avoid damage to tow the vehicle onto a f lat bed. Do not use the towing hook f or straight, f lat ground towing only. Screw the towing hook into the hole, and tighten it as a tie down. 573 2010 TL The tow hook should not be used to your vehicle, use it with the wheel nut wrench. Do not tow at an angle. If Your Vehicle Gets Stuck 3.
Taking Care of the Unexpected To avoid damage to tow the vehicle onto a f lat bed. Do not use the towing hook f or straight, f lat ground towing only. Screw the towing hook into the hole, and tighten it as a tie down. 573 2010 TL The tow hook should not be used to your vehicle, use it with the wheel nut wrench. Do not tow at an angle. If Your Vehicle Gets Stuck 3.
Owner's Manual
Page 609
... Summer Tire ...540 Traction Devices...541 Winter Driving ...540 Tools, Tire Changing ...548 Torque Distribution Monitor (SH-AWD ) ...478 Towing A Trailer ...493 Emergency Wrecker ...570 Hook ...572 Traction Devices ...541 Transmission Checking Fluid Level, Automatic ...515 Checking Fluid Level, Manual ...517 Fluid Selection ...516, 517 Identification Number...577 Shifting the Automatic...
... Summer Tire ...540 Traction Devices...541 Winter Driving ...540 Tools, Tire Changing ...548 Torque Distribution Monitor (SH-AWD ) ...478 Towing A Trailer ...493 Emergency Wrecker ...570 Hook ...572 Traction Devices ...541 Transmission Checking Fluid Level, Automatic ...515 Checking Fluid Level, Manual ...517 Fluid Selection ...516, 517 Identification Number...577 Shifting the Automatic...