
Owner's Manual
Page 25
... increase the chance of injury during a crash is out of position in the front seat can be seriously or fatally injured in a crash by striking interior parts of the vehicle or being struck by an inflating front airbag. Sitting improperly can result in serious injury or death in a crash. If you...
... increase the chance of injury during a crash is out of position in the front seat can be seriously or fatally injured in a crash by striking interior parts of the vehicle or being struck by an inflating front airbag. Sitting improperly can result in serious injury or death in a crash. If you...
Owner's Manual
Page 45
Children who have outgrown child seats are also at risk of the child seat with enough force to be injured by striking interior vehicle parts during a collision, an inflating front airbag can be injured by an inflating passenger's front airbag. Even though your vehicle has an advanced front ...
Children who have outgrown child seats are also at risk of the child seat with enough force to be injured by striking interior vehicle parts during a collision, an inflating front airbag can be injured by an inflating passenger's front airbag. Even though your vehicle has an advanced front ...
Owner's Manual
Page 62
... enter the vehicle in normal driving if you must drive with the engine running, even in a collision that expose you . If you maintain your vehicle's interior and create a hazardous condition.
... enter the vehicle in normal driving if you must drive with the engine running, even in a collision that expose you . If you maintain your vehicle's interior and create a hazardous condition.
Owner's Manual
Page 65
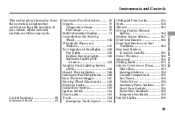
...Seat Heaters and Seat Ventilation ...183 Rear Seat Heaters (Canadian models) ...185 Power Windows ...186 Moonroof ...189 Parking Brake ...191 Interior Convenience Items ...192 Glove Box ...193 Beverage Holders ...194 Console Compartment ...195 Sun Visors ...196 Vanity Mirror ...196 Accessory Power... Sockets...197 Front Door Pockets ...198 Power Rear Sunshade ...198 Integrated Sunshades ...199 Interior Lights ...200 Instruments and Controls Control Locations ...60 Instrument Panel ...61 59 All the essential controls are within easy reach. ...
...Seat Heaters and Seat Ventilation ...183 Rear Seat Heaters (Canadian models) ...185 Power Windows ...186 Moonroof ...189 Parking Brake ...191 Interior Convenience Items ...192 Glove Box ...193 Beverage Holders ...194 Console Compartment ...195 Sun Visors ...196 Vanity Mirror ...196 Accessory Power... Sockets...197 Front Door Pockets ...198 Power Rear Sunshade ...198 Integrated Sunshades ...199 Interior Lights ...200 Instruments and Controls Control Locations ...60 Instrument Panel ...61 59 All the essential controls are within easy reach. ...

Owner's Manual
Page 89
...SETUP (see page 115) 118 120 DOOR/WINDOW SETUP (see page 108) CUSTOMIZE MENU DOOR UNLOCK MODE KEYLESS ACCESS LIGHT FLASH KEYLESS ACCESS BEEP INTERIOR LIGHT DIMMING TIME HEADLIGHT AUTO OFF TIMER AUTO LIGHT SENSITIVITY CUSTOMIZE SET UP DRIVER DOOR ONLY ALL DOORS ON Causes some exterior lights to sound... when you lock/ OFF unlock the doors. 60 SEC Changes how long (in seconds) the interior 30 SEC lights stay on after you lock/unlock the doors. Multi-Information Display CUSTOMIZE ENTRY CHG SETTING (see page 87) CUSTOMIZE GROUP KEYLESS ...
...SETUP (see page 115) 118 120 DOOR/WINDOW SETUP (see page 108) CUSTOMIZE MENU DOOR UNLOCK MODE KEYLESS ACCESS LIGHT FLASH KEYLESS ACCESS BEEP INTERIOR LIGHT DIMMING TIME HEADLIGHT AUTO OFF TIMER AUTO LIGHT SENSITIVITY CUSTOMIZE SET UP DRIVER DOOR ONLY ALL DOORS ON Causes some exterior lights to sound... when you lock/ OFF unlock the doors. 60 SEC Changes how long (in seconds) the interior 30 SEC lights stay on after you lock/unlock the doors. Multi-Information Display CUSTOMIZE ENTRY CHG SETTING (see page 87) CUSTOMIZE GROUP KEYLESS ...

Owner's Manual
Page 121
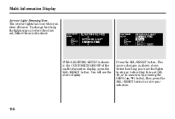
... page 118 Instruments and Controls see page 116 see the setting you press the INFO ( / ) button, the screen changes as shown in the lighting setup: INTERIOR LIGHT DIMMING TIME HEADLIGHT AUTO OFF TIMER AUTO LIGHT SENSITIVITY While CUSTOMIZE GROUP is shown on the multi-information display, select LIGHTING SETUP by pressing...
... page 118 Instruments and Controls see page 116 see the setting you press the INFO ( / ) button, the screen changes as shown in the lighting setup: INTERIOR LIGHT DIMMING TIME HEADLIGHT AUTO OFF TIMER AUTO LIGHT SENSITIVITY While CUSTOMIZE GROUP is shown on the multi-information display, select LIGHTING SETUP by pressing...
Owner's Manual
Page 122
..., follow these instructions: While LIGHTING SETUP is shown in the CUSTOMIZE GROUP of the multi-information display, press the SEL/RESET button. Multi-Information Display Interior Light Dimming Time The interior lights fade out when you want the lights to enter your selection. 116
..., follow these instructions: While LIGHTING SETUP is shown in the CUSTOMIZE GROUP of the multi-information display, press the SEL/RESET button. Multi-Information Display Interior Light Dimming Time The interior lights fade out when you want the lights to enter your selection. 116

Owner's Manual
Page 123
...the above display for several seconds, then the screen goes back to CUSTOMIZE SETUP. If this happens, you need to CUSTOMIZE MENU. To exit INTERIOR LIGHT DIMMING TIME without changing the current setting, select EXIT by pressing the INFO ( / ) button, then press the SEL/RESET button. The... screen goes back to repeat the interior light dimming time setup. Multi-Information Display Instruments and Controls When your choice is set , you will see the above display for several seconds, ...
...the above display for several seconds, then the screen goes back to CUSTOMIZE SETUP. If this happens, you need to CUSTOMIZE MENU. To exit INTERIOR LIGHT DIMMING TIME without changing the current setting, select EXIT by pressing the INFO ( / ) button, then press the SEL/RESET button. The... screen goes back to repeat the interior light dimming time setup. Multi-Information Display Instruments and Controls When your choice is set , you will see the above display for several seconds, ...

Owner's Manual
Page 160
If your vehicle's battery goes dead or is disconnected, you can open the trunk from getting into the interior. See Carbon Monoxide Hazard on the trunk lid. If the doors are locked, press the trunk release switch on the trunk lid with the remote ...
If your vehicle's battery goes dead or is disconnected, you can open the trunk from getting into the interior. See Carbon Monoxide Hazard on the trunk lid. If the doors are locked, press the trunk release switch on the trunk lid with the remote ...
Owner's Manual
Page 178
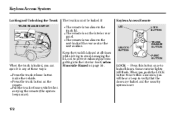
... doors are locked and the security system is locked, you will flash. The remote is too close to prevent exhaust gas from getting into the interior. Keyless Access Remote LED LOCK BUTTON UNLOCK BUTTON TRUNK RELEASE BUTTON PANIC BUTTON When the trunk is set. 172 The remote is on the...
... doors are locked and the security system is locked, you will flash. The remote is too close to prevent exhaust gas from getting into the interior. Keyless Access Remote LED LOCK BUTTON UNLOCK BUTTON TRUNK RELEASE BUTTON PANIC BUTTON When the trunk is set. 172 The remote is on the...
Owner's Manual
Page 179
... trunk if the built-in key is in the ignition or the ignition switch is in the DOOR position) will go off . To change the ''INTERIOR LIGHT DIMMING TIME,'' see page 187 ). If you unlock the doors with the remote before 30 seconds have elapsed, the ceiling light will come on...
... trunk if the built-in key is in the ignition or the ignition switch is in the DOOR position) will go off . To change the ''INTERIOR LIGHT DIMMING TIME,'' see page 187 ). If you unlock the doors with the remote before 30 seconds have elapsed, the ceiling light will come on...

Owner's Manual
Page 182
Changes or modifications not expressly approved by the FCC: This device complies with Industry Canada Standard RSS-210. On the dashboard. On the rear interior panel. In the door pockets. Ignition Switch Operating Range The engine may not run, and some malfunctions may occur, if the remote is subject to ...
Changes or modifications not expressly approved by the FCC: This device complies with Industry Canada Standard RSS-210. On the dashboard. On the rear interior panel. In the door pockets. Ignition Switch Operating Range The engine may not run, and some malfunctions may occur, if the remote is subject to ...
Owner's Manual
Page 198
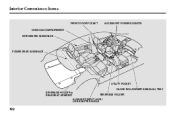
Interior Convenience Items FRONT DOOR POCKET CONSOLE COMPARTMENT INTEGRATED SUNSHADE ACCESSORY POWER SOCKETS POWER REAR SUNSHADE UTILITY POCKET GLOVE BOX/OWNER'S MANUAL TRAY BEVERAGE HOLDER in BEVERAGE HOLDER REAR SEAT ARMREST AUXILIARY INPUT JACK/ USB ADAPTER CABLE 192
Interior Convenience Items FRONT DOOR POCKET CONSOLE COMPARTMENT INTEGRATED SUNSHADE ACCESSORY POWER SOCKETS POWER REAR SUNSHADE UTILITY POCKET GLOVE BOX/OWNER'S MANUAL TRAY BEVERAGE HOLDER in BEVERAGE HOLDER REAR SEAT ARMREST AUXILIARY INPUT JACK/ USB ADAPTER CABLE 192
Owner's Manual
Page 199
RELEASE BUTTON Instruments and Controls An open the tray, push the release button up . 193 Interior Convenience Items Glove Box Open the glove box by pulling the handle. To open glove box can cause serious injury to your passenger in key. ...
RELEASE BUTTON Instruments and Controls An open the tray, push the release button up . 193 Interior Convenience Items Glove Box Open the glove box by pulling the handle. To open glove box can cause serious injury to your passenger in key. ...

Owner's Manual
Page 200
... separator up Press LID BOTTOM PLATE SEPARATOR BUTTON BOTTOM PLATE Be careful when you or your passengers. For a long container, press the button in the interior. Spilled liquids can scald you are using the beverage holders...
... separator up Press LID BOTTOM PLATE SEPARATOR BUTTON BOTTOM PLATE Be careful when you or your passengers. For a long container, press the button in the interior. Spilled liquids can scald you are using the beverage holders...

Owner's Manual
Page 201
Open the beverage holder by pulling up on the latch on the lever and lift the armrest. To open the console compartment, pull up on . Interior Convenience Items Console Compartment LATCH LEVER LEVER Instruments and Controls The rear beverage holder is in the console compartment lid. To use the tray, pull up on the front. To close, lower the armrest, and push it down until it latches. The console compartment light comes on when the parking lights are on the lever, and lift the armrest pad. 195 You can put small items in the tray located in the rear seat armrest.
Open the beverage holder by pulling up on the latch on the lever and lift the armrest. To open the console compartment, pull up on . Interior Convenience Items Console Compartment LATCH LEVER LEVER Instruments and Controls The rear beverage holder is in the console compartment lid. To use the tray, pull up on the front. To close, lower the armrest, and push it down until it latches. The console compartment light comes on when the parking lights are on the lever, and lift the armrest pad. 195 You can put small items in the tray located in the rear seat armrest.

Owner's Manual
Page 202
... on when you are getting into or out of the sun visor, pull up the cover. 196 To use a sun visor at the side window. Interior Convenience Items Sun Visors Do not use a sun visor, pull it down.
... on when you are getting into or out of the sun visor, pull up the cover. 196 To use a sun visor at the side window. Interior Convenience Items Sun Visors Do not use a sun visor, pull it down.
Owner's Manual
Page 203
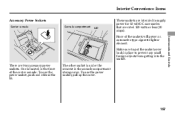
.... 197 Make sure to put the socket cover back in place to supply power for 12 volt DC accessories that are two accessory power sockets. Interior Convenience Items Accessory Power Sockets Center console Console compartment LID These sockets are intended to prevent any small foreign objects from getting into the socket.
.... 197 Make sure to put the socket cover back in place to supply power for 12 volt DC accessories that are two accessory power sockets. Interior Convenience Items Accessory Power Sockets Center console Console compartment LID These sockets are intended to prevent any small foreign objects from getting into the socket.

Owner's Manual
Page 204
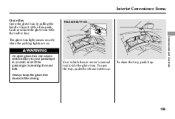
... Power Rear Sunshade POWER REAR SUNSHADE BUTTON When you shift to raise the rear sunshade. Push the button again to raise it . 198 LID The interior of each front door has an extendable pocket for and clear any obstacles, then push the button again. To use it again, shift to another...
... Power Rear Sunshade POWER REAR SUNSHADE BUTTON When you shift to raise the rear sunshade. Push the button again to raise it . 198 LID The interior of each front door has an extendable pocket for and clear any obstacles, then push the button again. To use it again, shift to another...

Owner's Manual
Page 205
... the hooks on the top, insert the sunshade into the holder, and pull the sunshade all the way up. To use only by the sunshades. Interior Convenience Items Integrated Sunshades HOLDER TAB The hooks are intended for use a sunshade, hold the tab on the window frame. 199 Do not hang any...
... the hooks on the top, insert the sunshade into the holder, and pull the sunshade all the way up. To use only by the sunshades. Interior Convenience Items Integrated Sunshades HOLDER TAB The hooks are intended for use a sunshade, hold the tab on the window frame. 199 Do not hang any...
