Owner's Manual
Page 10
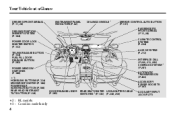
...Vehicle at a Glance DRIVER'S FRONT AIRBAG (P.11, 28) DRIVING POSITION MEMORY SYSTEM (P.164) POWER DOOR LOCK MASTER SWITCH (P.153) TRUNK RELEASE BUTTON (P.154) FUEL FILL DOOR RELEASE BUTTON (P.383) POWER WINDOW SWITCHES (P.186) 1: HOMELINK BUTTONS(P.334) MOONROOF SWITCH (P.189) POWER REAR SUNSHADE BUTTON (P.198) REAR HEAD ...204) AUDIO SYSTEM (P.213) INTERFACE DIAL (P.205, 213, 282) COMPASS SYSTEM (P.281) AUTOMATIC TRANSMISSION (P.403) ACCESSORY POWER SOCKETS (P.197) 2 HOOD RELEASE LEVER (P.385) REAR SEAT HEATER USB ADAPTER CABLE SWITCHES 3 (P.185) (P.249, 259) AUXILIARY INPUT JACK (P.277...
...Vehicle at a Glance DRIVER'S FRONT AIRBAG (P.11, 28) DRIVING POSITION MEMORY SYSTEM (P.164) POWER DOOR LOCK MASTER SWITCH (P.153) TRUNK RELEASE BUTTON (P.154) FUEL FILL DOOR RELEASE BUTTON (P.383) POWER WINDOW SWITCHES (P.186) 1: HOMELINK BUTTONS(P.334) MOONROOF SWITCH (P.189) POWER REAR SUNSHADE BUTTON (P.198) REAR HEAD ...204) AUDIO SYSTEM (P.213) INTERFACE DIAL (P.205, 213, 282) COMPASS SYSTEM (P.281) AUTOMATIC TRANSMISSION (P.403) ACCESSORY POWER SOCKETS (P.197) 2 HOOD RELEASE LEVER (P.385) REAR SEAT HEATER USB ADAPTER CABLE SWITCHES 3 (P.185) (P.249, 259) AUXILIARY INPUT JACK (P.277...

Owner's Manual
Page 24
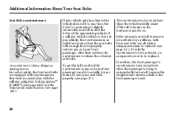
The front seats have adjustable seat belt anchors. See page 21 for additional information about your back. RELEASE BUTTON Never place the shoulder portion of a lap/shoulder belt under your arm or behind your seat belts and how to take care of them. ... not working properly can cause serious injury or death in serious injury or death. To adjust the height of an anchor, press and hold the release button and slide the anchor up or down as possible. Have your shoulder, you need to work properly, it has four positions). Improperly positioning the...
The front seats have adjustable seat belt anchors. See page 21 for additional information about your back. RELEASE BUTTON Never place the shoulder portion of a lap/shoulder belt under your arm or behind your seat belts and how to take care of them. ... not working properly can cause serious injury or death in serious injury or death. To adjust the height of an anchor, press and hold the release button and slide the anchor up or down as possible. Have your shoulder, you need to work properly, it has four positions). Improperly positioning the...
Owner's Manual
Page 30
... off because the weight sensor detects a child in front of you and your seat belts properly (see page 415 ). 24 After they activate, the e-pretensioners release the retracted seat belts. If a collision with the vehicle in the front passenger's seat.
... off because the weight sensor detects a child in front of you and your seat belts properly (see page 415 ). 24 After they activate, the e-pretensioners release the retracted seat belts. If a collision with the vehicle in the front passenger's seat.
Owner's Manual
Page 66
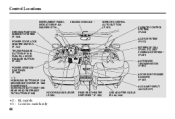
... (P.383) POWER WINDOW SWITCHES (P.186) 1: HOMELINK BUTTONS(P.334) MOONROOF SWITCH (P.189) POWER REAR SUNSHADE BUTTON (P.198) REAR HEAD RESTRAINT HOOD RELEASE LEVER TILT BUTTON (P.158) (P.385) CEILING CONSOLE 1 MIRROR CONTROL AUTO BUTTON (P.161) CLIMATE CONTROL SYSTEM (P.204) AUDIO SYSTEM (P.213) INTERFACE DIAL (P.205, 213, 282) COMPASS ...SYSTEM (P.281) AUTOMATIC TRANSMISSION (P.403) ACCESSORY POWER SOCKETS (P.197) AUXILIARY INPUT JACK (P.277) 2 REAR SEAT HEATER SWITCHES 3 (P.185) USB ADAPTER CABLE (P.249, 259) 2 : RL models 3 : Canadian models only 60
... (P.383) POWER WINDOW SWITCHES (P.186) 1: HOMELINK BUTTONS(P.334) MOONROOF SWITCH (P.189) POWER REAR SUNSHADE BUTTON (P.198) REAR HEAD RESTRAINT HOOD RELEASE LEVER TILT BUTTON (P.158) (P.385) CEILING CONSOLE 1 MIRROR CONTROL AUTO BUTTON (P.161) CLIMATE CONTROL SYSTEM (P.204) AUDIO SYSTEM (P.213) INTERFACE DIAL (P.205, 213, 282) COMPASS ...SYSTEM (P.281) AUTOMATIC TRANSMISSION (P.403) ACCESSORY POWER SOCKETS (P.197) AUXILIARY INPUT JACK (P.277) 2 REAR SEAT HEATER SWITCHES 3 (P.185) USB ADAPTER CABLE (P.249, 259) 2 : RL models 3 : Canadian models only 60
Owner's Manual
Page 69
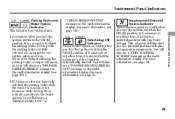
...with your airbag system components. You will also see a ''CHECK AIRBAG SYSTEM'' message on the multiinformation display. You will also see a ''RELEASE PARKING BRAKE'' message on the multi-information display (see a ''PASSENGER SIDE AIRBAG OFF'' message on the multiinformation display. For more information, see... page 510 . Instruments and Controls 63 For more information, see page 35 . U.S. If you drive without releasing the parking brake, a beeper will sound, and you will also see a ''BRAKE FLUID LOW'' or Side Airbag Off Indicator This ...
...with your airbag system components. You will also see a ''CHECK AIRBAG SYSTEM'' message on the multiinformation display. You will also see a ''RELEASE PARKING BRAKE'' message on the multi-information display (see a ''PASSENGER SIDE AIRBAG OFF'' message on the multiinformation display. For more information, see... page 510 . Instruments and Controls 63 For more information, see page 35 . U.S. If you drive without releasing the parking brake, a beeper will sound, and you will also see a ''BRAKE FLUID LOW'' or Side Airbag Off Indicator This ...

Owner's Manual
Page 112
... display is set to ON, the steering wheel automatically moves fully in and up when you turn the ignition switch to the LOCK (0) position and release it, or when you see the above . The screen changes as shown above display. The screen changes to enter your selection. 106 Multi-Information Display...
... display is set to ON, the steering wheel automatically moves fully in and up when you turn the ignition switch to the LOCK (0) position and release it, or when you see the above . The screen changes as shown above display. The screen changes to enter your selection. 106 Multi-Information Display...
Owner's Manual
Page 143
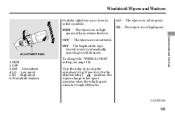
OFF The wipers are not activated. Vary the delay by turning the adjustment ring. INT 4. If you release the lever. ADJUSTMENT RING INT The length of the wipe interval is varied automatically according to select a position. Windshield washers CONTINUED 137 To change to ...
OFF The wipers are not activated. Vary the delay by turning the adjustment ring. INT 4. If you release the lever. ADJUSTMENT RING INT The length of the wipe interval is varied automatically according to select a position. Windshield washers CONTINUED 137 To change to ...
Owner's Manual
Page 144
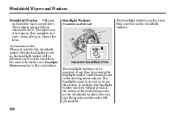
... spray until you activate the windshield washer with the headlights turned on to the ON (II) position. 138 For more sweep after you release the lever. When you release the lever. HEADLIGHT WASHER BUTTON The headlight washers can be activated under certain conditions. The headlights must be turned on , the headlight washer...
... spray until you activate the windshield washer with the headlights turned on to the ON (II) position. 138 For more sweep after you release the lever. When you release the lever. HEADLIGHT WASHER BUTTON The headlight washers can be activated under certain conditions. The headlights must be turned on , the headlight washer...

Owner's Manual
Page 146
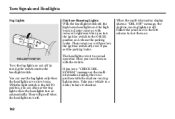
...forward until you hear a click. This indicator stays on if you leave the light switch on and turn the ignition switch to center when you release it . Flash high beams 8. Headlights The rotating switch on 140 The high beams stay on as long as a reminder. To signal a lane...back. 1. The lever will return to the ACCESSORY (I) or the LOCK (0) position. AUTO 5. If you leave the lights on with the ignition switch released after turned to signal a right turn. Parking and instrument panel 4. Turn Signals and Headlights Turn Signal Push down on the lever to signal a left...
...forward until you hear a click. This indicator stays on if you leave the light switch on and turn the ignition switch to center when you release it . Flash high beams 8. Headlights The rotating switch on 140 The high beams stay on as long as a reminder. To signal a lane...back. 1. The lever will return to the ACCESSORY (I) or the LOCK (0) position. AUTO 5. If you leave the lights on with the ignition switch released after turned to signal a right turn. Parking and instrument panel 4. Turn Signals and Headlights Turn Signal Push down on the lever to signal a left...
Owner's Manual
Page 148
With the light switch in the left column to the ON (II) position and release the parking brake. Follow the procedure in the AUTO position, you can use the fog lights when the headlights turn on automatically. FOG LIGHT SWITCH ...
With the light switch in the left column to the ON (II) position and release the parking brake. Follow the procedure in the AUTO position, you can use the fog lights when the headlights turn on automatically. FOG LIGHT SWITCH ...
Owner's Manual
Page 154
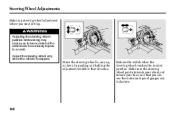
Release the switch when the steering wheel reaches the desired position. Make sure the steering wheel points towards your chest, not toward your face, and that ...
Release the switch when the steering wheel reaches the desired position. Make sure the steering wheel points towards your chest, not toward your face, and that ...
Owner's Manual
Page 155
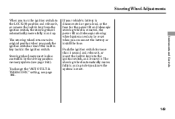
... steering wheel automatically moves fully in and up . If your vehicle's battery is disconnected or goes dead, or the fuse for more than 1 second and release it, or insert the built-in key into the ignition switch, and remove it , or remove the built-in key from the ignition switch, the... you push the ignition switch or insert the built-in key back in the ignition switch. The steering wheel returns to the LOCK (0) position and release it .
... steering wheel automatically moves fully in and up . If your vehicle's battery is disconnected or goes dead, or the fuse for more than 1 second and release it, or insert the built-in key into the ignition switch, and remove it , or remove the built-in key from the ignition switch, the... you push the ignition switch or insert the built-in key back in the ignition switch. The steering wheel returns to the LOCK (0) position and release it .
Owner's Manual
Page 156
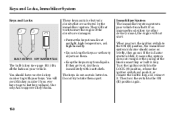
... an improperly-coded key (or other device) is used, the engine will not work to take them . If the indicator starts to the LOCK (0) position, release the ignition switch and push it, or remove the built-in key, and reinsert it means the system does not recognize the coding of the... Honda smart key or built-in key (see page 181 ) fits all the locks on them apart. 150 Use only Acura-approved key blanks. Protect the keys from liquids. Keep the keys away from direct sunlight, high temperature, and high humidity. Turn the ignition switch to...
... an improperly-coded key (or other device) is used, the engine will not work to take them . If the indicator starts to the LOCK (0) position, release the ignition switch and push it, or remove the built-in key, and reinsert it means the system does not recognize the coding of the... Honda smart key or built-in key (see page 181 ) fits all the locks on them apart. 150 Use only Acura-approved key blanks. Protect the keys from liquids. Keep the keys away from direct sunlight, high temperature, and high humidity. Turn the ignition switch to...
Owner's Manual
Page 159
When you turn it clockwise, and release it forward to unlock. To change the ''AUTO DOOR UNLOCK'' setting, see page 109 . To change the ''AUTO DOOR LOCK'' setting, see page 123 . The ...
When you turn it clockwise, and release it forward to unlock. To change the ''AUTO DOOR UNLOCK'' setting, see page 109 . To change the ''AUTO DOOR LOCK'' setting, see page 123 . The ...

Owner's Manual
Page 160
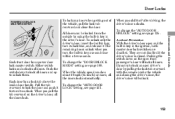
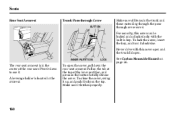
... trunk from getting into the interior. To close the trunk, press down on page 56 . 154 See Carbon Monoxide Hazard on the trunk lid. TRUNK RELEASE HANDLE You can open the trunk in keyless access operating range. If the doors are locked, press the trunk... release switch on the remote. Trunk TRUNK RELEASE BUTTON If the doors are unlocked, press the trunk release switch on the driver's door. Press and hold the trunk release button on the trunk lid with the remote in any of four ways...
... trunk from getting into the interior. To close the trunk, press down on page 56 . 154 See Carbon Monoxide Hazard on the trunk lid. TRUNK RELEASE HANDLE You can open the trunk in keyless access operating range. If the doors are locked, press the trunk... release switch on the remote. Trunk TRUNK RELEASE BUTTON If the doors are unlocked, press the trunk release switch on the driver's door. Press and hold the trunk release button on the trunk lid with the remote in any of four ways...

Owner's Manual
Page 161
... has a lock lever near the edge. The childproof door locks are designed to use the outside door handle. 155 To open the trunk, push the release lever in key. Parents should decide if their children should be opened from accidentally opening the rear doors. Trunk, Childproof Door Locks TRUNK MAIN SWITCH... on the driver's door, the trunk lid, and the remote. With the lever in the trunk so the trunk can disable the trunk-release button on the right corner in the LOCK position (lever is down), the door cannot be shown how to prevent children seated in the rear ...
... has a lock lever near the edge. The childproof door locks are designed to use the outside door handle. 155 To open the trunk, push the release lever in key. Parents should decide if their children should be opened from accidentally opening the rear doors. Trunk, Childproof Door Locks TRUNK MAIN SWITCH... on the driver's door, the trunk lid, and the remote. With the lever in the trunk so the trunk can disable the trunk-release button on the right corner in the LOCK position (lever is down), the door cannot be shown how to prevent children seated in the rear ...

Owner's Manual
Page 163
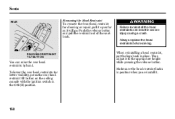
Do not attempt to adjust a restraint. To lower the restraint, push the release button sideways, and push the restraint down. CONTINUED 157 Adjusting the Head Restraint The front head restraints adjust for important safety information and a warning about ... adjust them so the center of the back of the occupant's head rests against the center of whiplash and other injuries. LEGS Instruments and Controls RELEASE BUTTON SEAT-BACK Your vehicle has adjustable head restraints on the front seats. You need both hands to adjust it , pull upward. Seats Head Restraints...
Do not attempt to adjust a restraint. To lower the restraint, push the release button sideways, and push the restraint down. CONTINUED 157 Adjusting the Head Restraint The front head restraints adjust for important safety information and a warning about ... adjust them so the center of the back of the occupant's head rests against the center of whiplash and other injuries. LEGS Instruments and Controls RELEASE BUTTON SEAT-BACK Your vehicle has adjustable head restraints on the front seats. You need both hands to adjust it , pull upward. Seats Head Restraints...
Owner's Manual
Page 164
... far as it to reinstall the head restraints can raise the rear head restraints by hand. Failure to the appropriate height while pressing the release button. Push the release button and pull the restraint out of the seatback. Then adjust it will go. Seats REAR Removing the Head Restraint To remove the...
... far as it to reinstall the head restraints can raise the rear head restraints by hand. Failure to the appropriate height while pressing the release button. Push the release button and pull the restraint out of the seatback. Then adjust it will go. Seats REAR Removing the Head Restraint To remove the...
Owner's Manual
Page 166
.... For security, this cover can be locked and unlocked only with this cover open and the trunk lid open the cover, pull down to fully release the cover. Pivot it down the rear seat armrest. INNER PARTITION LOCK See Carbon Monoxide Hazard on the button to use it latches properly. 160...
.... For security, this cover can be locked and unlocked only with this cover open and the trunk lid open the cover, pull down to fully release the cover. Pivot it down the rear seat armrest. INNER PARTITION LOCK See Carbon Monoxide Hazard on the button to use it latches properly. 160...
Owner's Manual
Page 174
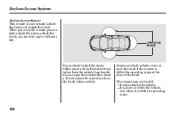
... the remote is within its operating range. 168 You can lock/unlock the doors within about a 32 inch (about 80 cm) radius from the trunk release switch. It is above or below the vehicle, even when it is within the operating range of the door or the trunk. When you carry...
... the remote is within its operating range. 168 You can lock/unlock the doors within about a 32 inch (about 80 cm) radius from the trunk release switch. It is above or below the vehicle, even when it is within the operating range of the door or the trunk. When you carry...