
Owner's Manual
Page 9
... The Maintenance Minder™ shows you when you need to know if you pull up to the main controls in this manual. Refer to your new vehicle, and how to tow a trailer. Index Service Information Summary A summary of the supplemental restraint system, and valuable information on how to handle ... you need when you 're planning to contact us for maintenance service. Driving The proper way to load luggage and other convenience features. Taking Care of your new vehicle, and how to start the engine, shift the transmission, and park; Before Driving What gasoline to use and care of ...
... The Maintenance Minder™ shows you when you need to know if you pull up to the main controls in this manual. Refer to your new vehicle, and how to tow a trailer. Index Service Information Summary A summary of the supplemental restraint system, and valuable information on how to handle ... you need when you 're planning to contact us for maintenance service. Driving The proper way to load luggage and other convenience features. Taking Care of your new vehicle, and how to start the engine, shift the transmission, and park; Before Driving What gasoline to use and care of ...

Owner's Manual
Page 175
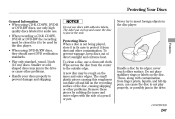
... folded. Adjust the steering wheel to the memory unless the ignition switch is parked. 1. You cannot add a new driving position to a comfortable position (see page 149). Driving Position Memory System Your vehicle has a memory feature for best visibility (see page 148. Storing a Driving Position in Memory Store a driving position only when the...
... folded. Adjust the steering wheel to the memory unless the ignition switch is parked. 1. You cannot add a new driving position to a comfortable position (see page 149). Driving Position Memory System Your vehicle has a memory feature for best visibility (see page 148. Storing a Driving Position in Memory Store a driving position only when the...

Owner's Manual
Page 218
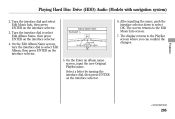
... the additional information on the right explains the error messages you may see in the display while playing a disc, press the eject button. If the new disc plays, there is a problem with the first disc. If the code does not disappear, or the disc(s) cannot be skipped. If the error message... cycle repeats and you see page 248). Press the eject button, and pull out the disc. Do not try to a dealer. Features Servo Error 211 If you cannot clear it for serious damage, signs of the player.
... the additional information on the right explains the error messages you may see in the display while playing a disc, press the eject button. If the new disc plays, there is a problem with the first disc. If the code does not disappear, or the disc(s) cannot be skipped. If the error message... cycle repeats and you see page 248). Press the eject button, and pull out the disc. Do not try to a dealer. Features Servo Error 211 If you cannot clear it for serious damage, signs of the player.
Owner's Manual
Page 254
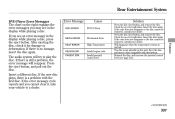
..., round, 5-inch (12 cm) discs. Wipe across the disc from finger prints, liquids, and felt-tip pens, can flake off and fall on the disc. Features ● ● Handle a disc by rubbing the inner and outer edges with contamination from the center to not play properly, or possibly jam in its... edges; Do not place stabilizer rings or labels on the recording surface of direct sunlight and extreme heat. A new disc may jam in the drive or cause other problems. Remove these pieces by its case to be rough on the inner and outer edges...
..., round, 5-inch (12 cm) discs. Wipe across the disc from finger prints, liquids, and felt-tip pens, can flake off and fall on the disc. Features ● ● Handle a disc by rubbing the inner and outer edges with contamination from the center to not play properly, or possibly jam in its... edges; Do not place stabilizer rings or labels on the recording surface of direct sunlight and extreme heat. A new disc may jam in the drive or cause other problems. Remove these pieces by its case to be rough on the inner and outer edges...
Owner's Manual
Page 272
... system) 2. Turn the interface dial to select OK. On the Enter an album name screen, input the new Original Playlist name. The screen returns to the Playlist screen where you can confirm the changes. Features CONTINUED 265 After inputting the name, push the interface selector down to select Edit Album Name, then...
... system) 2. Turn the interface dial to select OK. On the Enter an album name screen, input the new Original Playlist name. The screen returns to the Playlist screen where you can confirm the changes. Features CONTINUED 265 After inputting the name, push the interface selector down to select Edit Album Name, then...

Owner's Manual
Page 274
... the name, push the selector down to change the artist name of the Original Playlist and User Playlist Features You can confirm the changes. CONTINUED 267 On the Edit Track Name screen, input the new track name on the Enter a track name screen. 6. The display returns to the Playlist screen where you...
... the name, push the selector down to change the artist name of the Original Playlist and User Playlist Features You can confirm the changes. CONTINUED 267 On the Edit Track Name screen, input the new track name on the Enter a track name screen. 6. The display returns to the Playlist screen where you...

Owner's Manual
Page 284
IN NO CASE WILL GRACENOTE BE LIABLE FOR ANY CONSEQUENTIAL OR INCIDENTAL DAMAGES OR FOR ANY LOST PROFITS OR LOST REVENUES. ©Gracenote 2010 Features 277 Gracenote is not obligated to provide you with navigation system) Gracenote makes no representations or warranties, express or implied, regarding the accuracy of any ... GRACENOTE SOFTWARE OR ANY GRACENOTE SERVER. No warranty is free to discontinue its services at any time. Playing Hard Disc Drive (HDD) Audio (Models with new enhanced or additional data types or categories that Gracenote may provide in the Gracenote Servers.
IN NO CASE WILL GRACENOTE BE LIABLE FOR ANY CONSEQUENTIAL OR INCIDENTAL DAMAGES OR FOR ANY LOST PROFITS OR LOST REVENUES. ©Gracenote 2010 Features 277 Gracenote is not obligated to provide you with navigation system) Gracenote makes no representations or warranties, express or implied, regarding the accuracy of any ... GRACENOTE SOFTWARE OR ANY GRACENOTE SERVER. No warranty is free to discontinue its services at any time. Playing Hard Disc Drive (HDD) Audio (Models with new enhanced or additional data types or categories that Gracenote may provide in the Gracenote Servers.
Owner's Manual
Page 344
... damage, insert the disc again. Error Message DISC ERROR Cause FOCUS Error Solution Press the disc eject button, and remove the disc. If the new disc plays, there is not playable in the display while playing a disc, press the eject button. Press the eject button, and pull out... the disc. MECH ERROR HEAT ERROR REGION ERR PARENT ERR Mechanical Error High Temperature Invalid region code Invalid parental control level Features CONTINUED 337 After ejecting the disc, check it , take your dealer. The disc is a problem with this unit. If you see an error...
... damage, insert the disc again. Error Message DISC ERROR Cause FOCUS Error Solution Press the disc eject button, and remove the disc. If the new disc plays, there is not playable in the display while playing a disc, press the eject button. Press the eject button, and pull out... the disc. MECH ERROR HEAT ERROR REGION ERR PARENT ERR Mechanical Error High Temperature Invalid region code Invalid parental control level Features CONTINUED 337 After ejecting the disc, check it , take your dealer. The disc is a problem with this unit. If you see an error...

Owner's Manual
Page 346
... it out of the center console compartment. Slide the cover back into place on the earpiece, then press down on the left earpiece. Install the new battery in the earpiece as shown in place. Rear Entertainment System Replacing Batteries COVER Auxiliary Input Jacks Features BATTERY TAB Each headphone uses one AAA battery.
... it out of the center console compartment. Slide the cover back into place on the earpiece, then press down on the left earpiece. Install the new battery in the earpiece as shown in place. Rear Entertainment System Replacing Batteries COVER Auxiliary Input Jacks Features BATTERY TAB Each headphone uses one AAA battery.

Owner's Manual
Page 384
...''Phonebook.'' 2. It is easier for that name. 5. Say ''Phonebook.'' 2. When asked, say the name entry you want to complete the deletion. Features ● ● CONTINUED 377 Say the name you want to delete and follow the HFL prompts to edit. 4. Follow the HFL prompts and say ...the new number for HFL to complete the edit. Press and release the HFL Talk button before a command. 1. Say ''Delete'' after the prompts. 3. ...
...''Phonebook.'' 2. It is easier for that name. 5. Say ''Phonebook.'' 2. When asked, say the name entry you want to complete the deletion. Features ● ● CONTINUED 377 Say the name you want to delete and follow the HFL prompts to edit. 4. Follow the HFL prompts and say ...the new number for HFL to complete the edit. Press and release the HFL Talk button before a command. 1. Say ''Delete'' after the prompts. 3. ...

Owner's Manual
Page 386
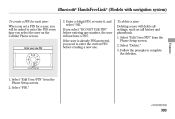
... prompts. 3. To change your dealer will have to reset it to lock the HFL system for you, or you will have to confirm the number. Features 3. Bluetooth® HandsFreeLink® (Models without navigation system) To set a 4-digit passcode to use HFL each time you start the vehicle. Follow the HFL prompts... the code, your security pass code: Press and release the HFL Talk button before a command. 1. Say ''System setup.'' 2. Follow the HFL prompts and say the new 4-digit passcode. 4. Follow the HFL prompts to set. 4. CONTINUED 379
... prompts. 3. To change your dealer will have to reset it to lock the HFL system for you, or you will have to confirm the number. Features 3. Bluetooth® HandsFreeLink® (Models without navigation system) To set a 4-digit passcode to use HFL each time you start the vehicle. Follow the HFL prompts... the code, your security pass code: Press and release the HFL Talk button before a command. 1. Say ''System setup.'' 2. Follow the HFL prompts and say the new 4-digit passcode. 4. Follow the HFL prompts to set. 4. CONTINUED 379

Owner's Manual
Page 398
... icon appears next to continue. Bluetooth® HandsFreeLink® (Models with navigation system) To change the setting. Delete the current pass-key. 4. CONTINUED 391 Enter a new pass-key, and select ''OK.'' BLUETOOTH ICON 1. Select ''OK'' to the selected phone. For a randomly generated pass-key each time you the currently linked phone... Phone'' from the Phone Setup screen. 2. Select the phone you change the pass-key setting: Delete the number first To delete a paired phone: TRASH ICON Features 1.
... icon appears next to continue. Bluetooth® HandsFreeLink® (Models with navigation system) To change the setting. Delete the current pass-key. 4. CONTINUED 391 Enter a new pass-key, and select ''OK.'' BLUETOOTH ICON 1. Select ''OK'' to the selected phone. For a randomly generated pass-key each time you the currently linked phone... Phone'' from the Phone Setup screen. 2. Select the phone you change the pass-key setting: Delete the number first To delete a paired phone: TRASH ICON Features 1.
Owner's Manual
Page 400
... for each user: When you set a PIN for a user, you will be asked to enter the PIN every time you need to complete the deletion. Features 1. If the user is already PIN-protected, you select the user on the Cellular Phone screen. 3. Select ''PIN.'' CONTINUED 393 Follow the prompts to enter... a user: Deleting a user will not have a PIN. Enter a 4-digit PIN, re-enter it, and select ''OK.'' If you select ''DO NOT USE PIN'' before creating a new one. Select ''Delete.'' 3.
... for each user: When you set a PIN for a user, you will be asked to enter the PIN every time you need to complete the deletion. Features 1. If the user is already PIN-protected, you select the user on the Cellular Phone screen. 3. Select ''PIN.'' CONTINUED 393 Follow the prompts to enter... a user: Deleting a user will not have a PIN. Enter a 4-digit PIN, re-enter it, and select ''OK.'' If you select ''DO NOT USE PIN'' before creating a new one. Select ''Delete.'' 3.

Owner's Manual
Page 408
... call on hold and answer the incoming call. If you want to hang up the original call and answer the new call , disregard it and continue with Industry Canada Standard RSS-210. Features 401 Bluetooth® HandsFreeLink® (Models with navigation system) Call Waiting Bluetooth® Wireless Technology As required by Honda...
... call on hold and answer the incoming call. If you want to hang up the original call and answer the new call , disregard it and continue with Industry Canada Standard RSS-210. Features 401 Bluetooth® HandsFreeLink® (Models with navigation system) Call Waiting Bluetooth® Wireless Technology As required by Honda...

Owner's Manual
Page 410
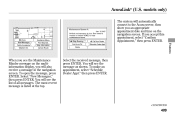
New Messages will be shown. The information screen will be shown. Select the message you have new messages, an envelope icon appears in the lower left hand part of all messages will be at the top. CONTINUED 403 To view previously read by pressing ENTER. Press the INFO button. models only) Reading Messages If you want to read messages: Features A list of the navigation screen. To open a message: Press ENTER on the interface selector, then select New Message from the navigation system map menu. AcuraLink® (U.S.
New Messages will be shown. The information screen will be shown. Select the message you have new messages, an envelope icon appears in the lower left hand part of all messages will be at the top. CONTINUED 403 To view previously read by pressing ENTER. Press the INFO button. models only) Reading Messages If you want to read messages: Features A list of the navigation screen. To open a message: Press ENTER on the interface selector, then select New Message from the navigation system map menu. AcuraLink® (U.S.
Owner's Manual
Page 416
... display, you an appropriate appointment date and time on the navigation screen. Select ''New Messages,'' then press ENTER. AcuraLink® (U.S. models only) The system will automatically connect to the Acura server, then show you will also receive a message in the navigation screen. CONTINUED... 409 The most recent message is listed at the top. Select the received message, then press ENTER. To make an appointment, select ''Schedule Dealer Appt.'' then press ENTER. Features...
... display, you an appropriate appointment date and time on the navigation screen. Select ''New Messages,'' then press ENTER. AcuraLink® (U.S. models only) The system will automatically connect to the Acura server, then show you will also receive a message in the navigation screen. CONTINUED... 409 The most recent message is listed at the top. Select the received message, then press ENTER. To make an appointment, select ''Schedule Dealer Appt.'' then press ENTER. Features...
Owner's Manual
Page 422
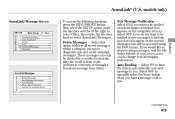
Messages can only be notified of new messages (envelope icon appears on the screen). com to select AcuraLink/Messages. Features CONTINUED 415 AcuraLink® (U.S. models only) AcuraLink/Message Screen To access the following functions, press the INFO/PHONE button, then ...the interface knob to change your messaging preferences. Delete Messages - Select this option to stop receiving messages, visit the My Acura website at www.owners.acura. New Message Notification - Select ON if you want to be accessed using the INFO menu. Auto Reading - Select ON to...
Messages can only be notified of new messages (envelope icon appears on the screen). com to select AcuraLink/Messages. Features CONTINUED 415 AcuraLink® (U.S. models only) AcuraLink/Message Screen To access the following functions, press the INFO/PHONE button, then ...the interface knob to change your messaging preferences. Delete Messages - Select this option to stop receiving messages, visit the My Acura website at www.owners.acura. New Message Notification - Select ON if you want to be accessed using the INFO menu. Auto Reading - Select ON to...
