

Owner's Manual
Page 3
.... OnStar® and Radio Steering Wheel Buttons 5. Dome Override Button Refer to Owner Manual for further information. Trip and Fuel Information 14. Clock 20. Internal Light Dimming Switch 10. Storage Area 19. StabiliTrak® Disable Button 22. 1 2 3 4 5 4 6 7 1 1 Driver Information 8 9 10 11 12 13 14 15 16 17 18 19 20 21...
.... OnStar® and Radio Steering Wheel Buttons 5. Dome Override Button Refer to Owner Manual for further information. Trip and Fuel Information 14. Clock 20. Internal Light Dimming Switch 10. Storage Area 19. StabiliTrak® Disable Button 22. 1 2 3 4 5 4 6 7 1 1 Driver Information 8 9 10 11 12 13 14 15 16 17 18 19 20 21...

Owner's Manual
Page 4
...Center (DIC) Display/Odometer 18. The message center can be taken to ensure your safety and to prevent damage. Tire Pressure Monitor Light 5. Safety Belt Reminder Light 10 11. Fuel Gauge 20. It is important to read your Owner Manual and become familiar with the information that is designed ...to let you by the lights, gauges and indicators, particularly the message center, and what action can provide critical information to prevent damage to you know about many important ...
...Center (DIC) Display/Odometer 18. The message center can be taken to ensure your safety and to prevent damage. Tire Pressure Monitor Light 5. Safety Belt Reminder Light 10 11. Fuel Gauge 20. It is important to read your Owner Manual and become familiar with the information that is designed ...to let you by the lights, gauges and indicators, particularly the message center, and what action can provide critical information to prevent damage to you know about many important ...
Owner's Manual
Page 5
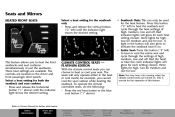
...be used for further information. CLIMATE CONTROL SEATS - The seats will only operate either in the button will glow for each setting chosen: three lights for high, two for medium and one for both the seatback and seat cushion • Press and release the horizontal button ("1" above )....SEATS 2 1 Select a heat setting for the seatback only • Press and release the vertical button ("2" left) until the indicator light shows the desired setting. A light in the heat or cool mode; Three heat settings are turned on the driver and front passenger door panels. for low. To ...
...be used for further information. CLIMATE CONTROL SEATS - The seats will only operate either in the button will glow for each setting chosen: three lights for high, two for medium and one for both the seatback and seat cushion • Press and release the horizontal button ("1" above )....SEATS 2 1 Select a heat setting for the seatback only • Press and release the vertical button ("2" left) until the indicator light shows the desired setting. A light in the heat or cool mode; Three heat settings are turned on the driver and front passenger door panels. for low. To ...

Owner's Manual
Page 7
... Turn the self-dimming function on or off • Press and hold this has happened. Create a load floor on ESV models • Release the 1 load floor panels from the seatback and slide the pins into the holes provided on top ... push if exiting the third row with no assistance) the seat forward until it is flat. (Note: On ESV models, you must first remove the headrest and store it is designed to lock during initial buckling, and you ... automatically dims to the proper level to minimize glare from lights behind you may be unaware that this button ("1" right) for further information.
... Turn the self-dimming function on or off • Press and hold this has happened. Create a load floor on ESV models • Release the 1 load floor panels from the seatback and slide the pins into the holes provided on top ... push if exiting the third row with no assistance) the seat forward until it is flat. (Note: On ESV models, you must first remove the headrest and store it is designed to lock during initial buckling, and you ... automatically dims to the proper level to minimize glare from lights behind you may be unaware that this button ("1" right) for further information.

Owner's Manual
Page 11
... XM Satellite Radio bands • Press the BAND button until all available numbers will flash. • Wait for amber lights ("2" above ) for two seconds. Reference your DVD/Navigation Instructional Audio CD for amber lights to load more CDs. Select CD Track • Option 1: PREV/NEXT on radio. • Option 2: SEEK arrows on...
... XM Satellite Radio bands • Press the BAND button until all available numbers will flash. • Wait for amber lights ("2" above ) for two seconds. Reference your DVD/Navigation Instructional Audio CD for amber lights to load more CDs. Select CD Track • Option 1: PREV/NEXT on radio. • Option 2: SEEK arrows on...

Owner's Manual
Page 12
.... E S V STEERING WHEEL CONTROLS (ONSTAR®/RADIO) • To activate Personal Calling, press button "1" below. The indicator light will erase all of your device should be turned off while programming the transmitter. Do not hold the newly trained HomeLink button and ...observe the indicator light. Release both the desired button on constantly, programming is complete and your hand-held transmitter. E S C A L A D E / E S C A L A D E HomeLink...
.... E S V STEERING WHEEL CONTROLS (ONSTAR®/RADIO) • To activate Personal Calling, press button "1" below. The indicator light will erase all of your device should be turned off while programming the transmitter. Do not hold the newly trained HomeLink button and ...observe the indicator light. Release both the desired button on constantly, programming is complete and your hand-held transmitter. E S C A L A D E / E S C A L A D E HomeLink...

Owner's Manual
Page 13
... reach the desired lower speed, and then release it. Manually activate the headlamps, all exterior tail/marker lamps and the instrument panel/radio lights • Turn the exterior lamps knob to the parking lamp position ( ) ("3" below ). 3 2 4 Setting Cruise Control: 1. Manually ...illuminate the parking lamps, taillamps, instrument panel/radio lights, license plate lamps • Turn the exterior lamps knob to this position ( ) ("4" below ). CRUISE CONTROL Cruise control allows you to maintain a...
... reach the desired lower speed, and then release it. Manually activate the headlamps, all exterior tail/marker lamps and the instrument panel/radio lights • Turn the exterior lamps knob to the parking lamp position ( ) ("3" below ). 3 2 4 Setting Cruise Control: 1. Manually ...illuminate the parking lamps, taillamps, instrument panel/radio lights, license plate lamps • Turn the exterior lamps knob to this position ( ) ("4" below ). CRUISE CONTROL Cruise control allows you to maintain a...

Owner's Manual
Page 15
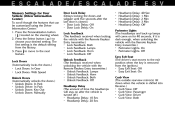
... features: • Automatic Locking • Automatic Unlocking • Delayed Locking • Remote Lock Feedback • Remote/Unlock Feedback • Headlamp Delay at Exit • Perimeter Lighting • Easy Exit Driver Seat • Curb View Assist • Alarm Warning Type • Display Language • Display Units Vehicle Personalization MEMORY POSITIONS FOR DRIVER...
... features: • Automatic Locking • Automatic Unlocking • Delayed Locking • Remote Lock Feedback • Remote/Unlock Feedback • Headlamp Delay at Exit • Perimeter Lighting • Easy Exit Driver Seat • Curb View Assist • Alarm Warning Type • Display Language • Display Units Vehicle Personalization MEMORY POSITIONS FOR DRIVER...
Owner's Manual
Page 16
...Lock Feedback: Off Unlock Feedback (The feedback received when unlocking the vehicle with the Remote Keyless Entry transmitter.) • Perimeter Lights: On • Perimeter Lights: Off Easy Exit Seat (The driver's seat moves to the exit position when the key is removed from the factory. ... Delay: 20 Sec Headlamp Headlamp Headlamp Headlamp Headlamp Delay: Delay: Delay: Delay: Delay: E S V 40 Sec 1 Min 2 Min 3 Min Off Perimeter Lights (The headlamps and back-up lamps will come on the steering wheel. 2. Press the Select button ( ) to the next feature. Press the Personalization button ...
...Lock Feedback: Off Unlock Feedback (The feedback received when unlocking the vehicle with the Remote Keyless Entry transmitter.) • Perimeter Lights: On • Perimeter Lights: Off Easy Exit Seat (The driver's seat moves to the exit position when the key is removed from the factory. ... Delay: 20 Sec Headlamp Headlamp Headlamp Headlamp Headlamp Delay: Delay: Delay: Delay: Delay: E S V 40 Sec 1 Min 2 Min 3 Min Off Perimeter Lights (The headlamps and back-up lamps will come on the steering wheel. 2. Press the Select button ( ) to the next feature. Press the Personalization button ...

