

Owner's Manual
Page 2
E S C A L A D E / E S C A L A D E E S V TABLE OF CONTENTS DRIVER INFORMATION • Instrument Panel • Instrument Panel Cluster SEATS AND MIRRORS • Heated Front Seats • Power Lumbar Front Seats • Second Row Seat Features • Passenger Automatic Locking Restraint (ALR) • Automatic Dimming Rearview Mirror with OnStar®, Compass and Temperature Display • Adjustable Pedals • Power Folding Mirrors AUTOMATIC CLIMATE CONTROLS • Tri-Zone Automatic Climate Control System • Rear Automatic Climate Control System • Sunroof ...
E S C A L A D E / E S C A L A D E E S V TABLE OF CONTENTS DRIVER INFORMATION • Instrument Panel • Instrument Panel Cluster SEATS AND MIRRORS • Heated Front Seats • Power Lumbar Front Seats • Second Row Seat Features • Passenger Automatic Locking Restraint (ALR) • Automatic Dimming Rearview Mirror with OnStar®, Compass and Temperature Display • Adjustable Pedals • Power Folding Mirrors AUTOMATIC CLIMATE CONTROLS • Tri-Zone Automatic Climate Control System • Rear Automatic Climate Control System • Sunroof ...

Owner's Manual
Page 3
Turn Signal/Multifunction Lever, Front Wipers, Cruise Control 4. Audio System 8. Driver Information Center (DIC) Buttons; Exterior Lamps Control 3. OnStar® and Radio Steering Wheel Buttons 5. Rear Wiper / Washer 11. Parking Brake Release 15. Driver Information Center (DIC) Buttons; Compact Disc Changer 18. Clock 20. Ultrasonic Rear Parking Assist Disable Button 21. Instrument Panel Cluster 6. Shift Lever/Tow/Haul Selector Button 7. Fog Lamps Button (below rear wiper / washer) 12. Automatic Climate Control System 17. Driver Information Seats and Mirrors Automatic Climate ...
Turn Signal/Multifunction Lever, Front Wipers, Cruise Control 4. Audio System 8. Driver Information Center (DIC) Buttons; Exterior Lamps Control 3. OnStar® and Radio Steering Wheel Buttons 5. Rear Wiper / Washer 11. Parking Brake Release 15. Driver Information Center (DIC) Buttons; Compact Disc Changer 18. Clock 20. Ultrasonic Rear Parking Assist Disable Button 21. Instrument Panel Cluster 6. Shift Lever/Tow/Haul Selector Button 7. Fog Lamps Button (below rear wiper / washer) 12. Automatic Climate Control System 17. Driver Information Seats and Mirrors Automatic Climate ...

Owner's Manual
Page 4
Turn Signal Indicators 4. Traction Control Off Light 8 7. Safety Belt Reminder Light 10 11. Transmission Temperature Gauge 13. Tachometer 16. Oil Pressure Gauge 19. Engine Coolant Temperature Gauge 21. Voltmeter E S V 6 7 1 2 3 3 4 5 21 20 12 13 14 15 16 17 18 19 Important: The instrument panel cluster is being relayed to you know about many important aspects of your vehicle's operation. The message center can be taken to prevent damage. Tire Pressure Monitor Light 5. Headlamp High Beam Indicator Light 11 12. Fuel Gauge 20. It is important to read your Owner ...
Turn Signal Indicators 4. Traction Control Off Light 8 7. Safety Belt Reminder Light 10 11. Transmission Temperature Gauge 13. Tachometer 16. Oil Pressure Gauge 19. Engine Coolant Temperature Gauge 21. Voltmeter E S V 6 7 1 2 3 3 4 5 21 20 12 13 14 15 16 17 18 19 Important: The instrument panel cluster is being relayed to you know about many important aspects of your vehicle's operation. The message center can be taken to prevent damage. Tire Pressure Monitor Light 5. Headlamp High Beam Indicator Light 11 12. Fuel Gauge 20. It is important to read your Owner ...
Owner's Manual
Page 5
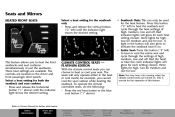
Note: You may hear a fan running when the climate control seats are located on the driver and front passenger door panels. for the heat feature. Seats and Mirrors HEATED FRONT SEATS 2 1 Select a heat setting for the seatback only • Press and release the vertical button ("2" left) until the indicator light shows the desired setting. Red (for heat) or blue (for cool) indicator lights will also glow to heat or cool the entire seat and cycle through the heat settings of high, medium, low and off . This is on . The controls are turned on . • Entire Seat: Press this ...
Note: You may hear a fan running when the climate control seats are located on the driver and front passenger door panels. for the heat feature. Seats and Mirrors HEATED FRONT SEATS 2 1 Select a heat setting for the seatback only • Press and release the vertical button ("2" left) until the indicator light shows the desired setting. Red (for heat) or blue (for cool) indicator lights will also glow to heat or cool the entire seat and cycle through the heat settings of high, medium, low and off . This is on . The controls are turned on . • Entire Seat: Press this ...

Owner's Manual
Page 6
...position. • Pull the seatback forward so that it easy to ensure that they are not under the seat cushions. On ESV only, lift the lever at the preferred setting. 2 1 2 1 SECOND ROW SEAT FEATURES Outboard Heated Seat Cushions Use the...base of the seat to move the seatback into a flat position. Use the second row easy entry/exit feature (ESV models) The passenger's side of the second row 60/40 bench seat has an easy entry/exit feature that driver... select one of Return seat to occupant position • Lift and move forward. On Escalade, pull head restraints upright.
...position. • Pull the seatback forward so that it easy to ensure that they are not under the seat cushions. On ESV only, lift the lever at the preferred setting. 2 1 2 1 SECOND ROW SEAT FEATURES Outboard Heated Seat Cushions Use the...base of the seat to move the seatback into a flat position. Use the second row easy entry/exit feature (ESV models) The passenger's side of the second row 60/40 bench seat has an easy entry/exit feature that driver... select one of Return seat to occupant position • Lift and move forward. On Escalade, pull head restraints upright.

Owner's Manual
Page 7
... it forward. • Pull the seatback release lever upward and pull the seatback forward and fold it down until it stops. Create a load floor on ESV models • Release the 1 load floor panels from lights behind you may be unaware that this button ("1" right) for further information. Use the OnStar®... all the way during initial buckling, and you when it's dark outside. the vehicle (the seat will also lock if it is flat. (Note: On ESV models, you must first remove the headrest and store it on top of the seat cushion.) • Pull the headrest out from the seatback and...
... it forward. • Pull the seatback release lever upward and pull the seatback forward and fold it down until it stops. Create a load floor on ESV models • Release the 1 load floor panels from lights behind you may be unaware that this button ("1" right) for further information. Use the OnStar®... all the way during initial buckling, and you when it's dark outside. the vehicle (the seat will also lock if it is flat. (Note: On ESV models, you must first remove the headrest and store it on top of the seat cushion.) • Pull the headrest out from the seatback and...

Owner's Manual
Page 8
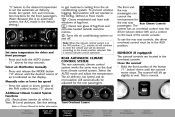
... must be displayed. For more information about OnStar features, refer to reset them in their tracks. 1 2 Automatic Climate Controls TRI-ZONE AUTOMATIC CLIMATE CONTROL SYSTEM Escalade's Tri-Zone Automatic Climate Control System features dual zone operation in the front and single zone operation for rear seat passengers. Once the desired °...
... must be displayed. For more information about OnStar features, refer to reset them in their tracks. 1 2 Automatic Climate Controls TRI-ZONE AUTOMATIC CLIMATE CONTROL SYSTEM Escalade's Tri-Zone Automatic Climate Control System features dual zone operation in the front and single zone operation for rear seat passengers. Once the desired °...
Owner's Manual
Page 9
Select air distribution manually • Press and release the MODE button ("4" above) until the sunroof motor stops. Manually raise or lower fan speed • Press the upper or lower portion of the FAN control button ("5" above ) for the front passengers. (Note: Because this setting Refer to seal. Driver Information Seats and Mirrors SUNROOF (if equipped) The sunroof controls are located in Vent, Bi-Level positions. The air delivery, fan speed and air recirculation will automatically be in the AUX position. The system has an overhead control near the driver (shown below ) ...
Select air distribution manually • Press and release the MODE button ("4" above) until the sunroof motor stops. Manually raise or lower fan speed • Press the upper or lower portion of the FAN control button ("5" above ) for the front passengers. (Note: Because this setting Refer to seal. Driver Information Seats and Mirrors SUNROOF (if equipped) The sunroof controls are located in Vent, Bi-Level positions. The air delivery, fan speed and air recirculation will automatically be in the AUX position. The system has an overhead control near the driver (shown below ) ...

Owner's Manual
Page 10
For optimum performance and safety, the provided beverage holders are recommended. Press the same switch again to turn off . 1 1 • Press AUTO EQ to select the digital signal processing you desire (this is already hot or cold. E S V 1 2 AM/FM STEREO WITH CD AND CASSETTE PLAYER Set the time • Press and hold the HR button ("1" right) until the correct hour appears on the display. Program radio station presets • Turn the radio on or off the cupholder. release the button. • Repeat these steps for each station. E S C A L A D E / E S C A L A D E Entertainment/...
For optimum performance and safety, the provided beverage holders are recommended. Press the same switch again to turn off . 1 1 • Press AUTO EQ to select the digital signal processing you desire (this is already hot or cold. E S V 1 2 AM/FM STEREO WITH CD AND CASSETTE PLAYER Set the time • Press and hold the HR button ("1" right) until the correct hour appears on the display. Program radio station presets • Turn the radio on or off the cupholder. release the button. • Repeat these steps for each station. E S C A L A D E / E S C A L A D E Entertainment/...

Owner's Manual
Page 11
The next available number will flash amber. • Select the number desired. • Wait for the CD desired in it or LOAD. Quick Unload: • Press EJECT ( ) for further information. Load 1 CD • Press LOAD; The third row screen only displays the same entertainment selection as the second row. all CDs will flash. • Wait for CD desired. Play a CD • Option 1: Press the number for amber lights to scroll through CDs. The Platinum Edition has a dual screen Rear Seat Entertainment (RSE) system. Driver Information Seats and Mirrors flash and ...
The next available number will flash amber. • Select the number desired. • Wait for the CD desired in it or LOAD. Quick Unload: • Press EJECT ( ) for further information. Load 1 CD • Press LOAD; The third row screen only displays the same entertainment selection as the second row. all CDs will flash. • Wait for CD desired. Play a CD • Option 1: Press the number for amber lights to scroll through CDs. The Platinum Edition has a dual screen Rear Seat Entertainment (RSE) system. Driver Information Seats and Mirrors flash and ...

Owner's Manual
Page 12
Simultaneously press and hold down the two outside buttons, releasing only when the indicator light begins to your transmitter has a "rolling code" feature, the above ). If the indicator light stays on HomeLink and the hand-held transmitter button. To program the remaining two HomeLink buttons, begin with Step 2 under "Program HomeLink." Press and hold down the buttons for AM, FM and XM radio ("2" left). 4 • SOURCE : 5 To select AM, FM1, FM2, XM1, XM2 Satellite Radio, cassette, CD, indash 6-Disc CD Changer, RSE ("3" above). Note: If your Garage Door Owner Manual or...
Simultaneously press and hold down the two outside buttons, releasing only when the indicator light begins to your transmitter has a "rolling code" feature, the above ). If the indicator light stays on HomeLink and the hand-held transmitter button. To program the remaining two HomeLink buttons, begin with Step 2 under "Program HomeLink." Press and hold down the buttons for AM, FM and XM radio ("2" left). 4 • SOURCE : 5 To select AM, FM1, FM2, XM1, XM2 Satellite Radio, cassette, CD, indash 6-Disc CD Changer, RSE ("3" above). Note: If your Garage Door Owner Manual or...

Owner's Manual
Page 13
To reduce speed while cruising: • Press and hold at the end of the multifunction lever to set the cruising speed. Refer to a higher speed, and then release the switch. Move the cruise control switch to on the instrument cluster will illuminate. Press at the end of the multifunction lever until you reach the desired lower speed, and then release it. Press in the Set button ( ) at . 3. The cruise symbol on ( ). 2. The automatic headlamp system will illuminate when the fog lamps are two ways to increase speed while cruising: • Use the accelerator pedal ...
To reduce speed while cruising: • Press and hold at the end of the multifunction lever to set the cruising speed. Refer to a higher speed, and then release the switch. Move the cruise control switch to on the instrument cluster will illuminate. Press at the end of the multifunction lever until you reach the desired lower speed, and then release it. Press in the Set button ( ) at . 3. The cruise symbol on ( ). 2. The automatic headlamp system will illuminate when the fog lamps are two ways to increase speed while cruising: • Use the accelerator pedal ...

Owner's Manual
Page 14
Disable URPA • Press the URPA on/off as trailering, the system can alert you about low tire pressure, but it may notice during most driving conditions. However, at the next vehicle start to drive the vehicle. The StabiliTrak limit button decreases the amount of your steering wheel will temporarily eliminate the message. chime and a visual 1 display, located on your vehicle's tires. In some circumstances such as trailering, the system can be disabled. TIRE PRESSURE MONITOR This feature alerts you when a large change in pressure occurs in the instrument panel ...
Disable URPA • Press the URPA on/off as trailering, the system can alert you about low tire pressure, but it may notice during most driving conditions. However, at the next vehicle start to drive the vehicle. The StabiliTrak limit button decreases the amount of your steering wheel will temporarily eliminate the message. chime and a visual 1 display, located on your vehicle's tires. In some circumstances such as trailering, the system can be disabled. TIRE PRESSURE MONITOR This feature alerts you when a large change in pressure occurs in the instrument panel ...

Owner's Manual
Page 15
Adjust the seat to Owner Manual for more information. • Adjust the outside rearview mirrors. • To store the above settings, press and hold the exit button ( ) on the driver's door. Press and hold Memory 1 or 2 (above) until two chimes sound. (Note: Seat Exit must be "On" in the Driver Information Center.) DRIVER INFORMATION CENTER PERSONALIZATION You can personalize your vehicle with the other memory button. Refer to the desired exit position. 3. These settings are restored by pressing the Memory 1 or 2 button on the driver's door until two chimes sound (...
Adjust the seat to Owner Manual for more information. • Adjust the outside rearview mirrors. • To store the above settings, press and hold the exit button ( ) on the driver's door. Press and hold Memory 1 or 2 (above) until two chimes sound. (Note: Seat Exit must be "On" in the Driver Information Center.) DRIVER INFORMATION CENTER PERSONALIZATION You can personalize your vehicle with the other memory button. Refer to the desired exit position. 3. These settings are restored by pressing the Memory 1 or 2 button on the driver's door until two chimes sound (...
Owner's Manual
Page 16
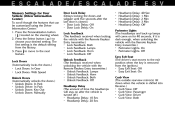
The first setting is the default setting from the ignition.) • Easy Exit Seat: Off • Easy Exit Seat: On Curb View (The outside rearview mirror(s) tilt down when the vehicle is shifted into Reverse.) • Curb View: Off • Curb View: Passenger • Curb View: Driver • Curb View: Both Press the Personalization button ( ) located on for Your Vehicle (Driver Information Center) To scroll though the features that can be customized using the Driver Information Center: 1. Press to move to choose your desired setting. Lock Doors (Automatically locks the doors.) &#...
The first setting is the default setting from the ignition.) • Easy Exit Seat: Off • Easy Exit Seat: On Curb View (The outside rearview mirror(s) tilt down when the vehicle is shifted into Reverse.) • Curb View: Off • Curb View: Passenger • Curb View: Driver • Curb View: Both Press the Personalization button ( ) located on for Your Vehicle (Driver Information Center) To scroll though the features that can be customized using the Driver Information Center: 1. Press to move to choose your desired setting. Lock Doors (Automatically locks the doors.) &#...

Owner's Manual
Page 17
This mode shows the total distance the vehicle has been driven in either miles or kilometers. This mode shows the current distance traveled since the last reset for TRIP B in either miles or kilometers. This will also display the odometer. Refer to scroll through the ODOMETER, TRIP A, TRIP B, TIRE PRESSURES, TIMER and ENGINE HOURS choices. Your vehicle's trip odometers A and B operate only when they are turned on. To turn on the display. Pressing the reset stem located on the display. Trip B: Press until ODOMETER appears on the instrument cluster with the vehicle off Trip A and ...
This mode shows the total distance the vehicle has been driven in either miles or kilometers. This mode shows the current distance traveled since the last reset for TRIP B in either miles or kilometers. This will also display the odometer. Refer to scroll through the ODOMETER, TRIP A, TRIP B, TIRE PRESSURES, TIMER and ENGINE HOURS choices. Your vehicle's trip odometers A and B operate only when they are turned on. To turn on the display. Pressing the reset stem located on the display. Trip B: Press until ODOMETER appears on the instrument cluster with the vehicle off Trip A and ...
Owner's Manual
Page 18
The timer will record up to 99 hours, 59 minutes and 59 seconds (99:59:59) after which the display will continue to zero. Time will roll back to be counted as long as a timer. Access Fuel Information Press the Fuel Information button ( ) to start the timer. Timer The DIC can drive without refueling. (Fuel range cannot be used as the ignition is on, even if another display is getting based on the display. Press while TIMER is off. This mode shows the tire pressure in pounds per gallon your vehicle is being shown on the DIC. Press to scroll through the following : • ...
The timer will record up to 99 hours, 59 minutes and 59 seconds (99:59:59) after which the display will continue to zero. Time will roll back to be counted as long as a timer. Access Fuel Information Press the Fuel Information button ( ) to start the timer. Timer The DIC can drive without refueling. (Fuel range cannot be used as the ignition is on, even if another display is getting based on the display. Press while TIMER is off. This mode shows the tire pressure in pounds per gallon your vehicle is being shown on the DIC. Press to scroll through the following : • ...

Owner's Manual
Page 19
... A Automatic Climate Controls Entertainment/ Convenience Features Drive and Security Systems • Year and model of your Cadillac • Delivery date • Current mileage CADILLAC ONLINE For more information about your Owner Manual for complete instructions. Escalade and Escalade ESV are proud to provide you anytime and anywhere. All rights reserved. All information contained herein is...
... A Automatic Climate Controls Entertainment/ Convenience Features Drive and Security Systems • Year and model of your Cadillac • Delivery date • Current mileage CADILLAC ONLINE For more information about your Owner Manual for complete instructions. Escalade and Escalade ESV are proud to provide you anytime and anywhere. All rights reserved. All information contained herein is...
