

Owner's Manual
Page 2
... -. YP Y Y . . I . The 2003 Chevrolet Corvette Owner Manual Seats and Restraint Systems ...1-1 Front Seats ...1-2 Safety Belts ...1-7 ...1-21 Child Restraints Air System Bag ...1-39 ...1-48 Restraint System Check Features and Controls ...2-1 Keys ...2-3 ...2-9 Doors and Locks 2-14 Windows ...2-16 Theft-Deterrent Systems ...2-19 Starting Operating and Your Vehicle 2-37 Mirrors ...2-39 Storage Areas ...2-43 Roof Panel ...2-49 Convertible...
... -. YP Y Y . . I . The 2003 Chevrolet Corvette Owner Manual Seats and Restraint Systems ...1-1 Front Seats ...1-2 Safety Belts ...1-7 ...1-21 Child Restraints Air System Bag ...1-39 ...1-48 Restraint System Check Features and Controls ...2-1 Keys ...2-3 ...2-9 Doors and Locks 2-14 Windows ...2-16 Theft-Deterrent Systems ...2-19 Starting Operating and Your Vehicle 2-37 Mirrors ...2-39 Storage Areas ...2-43 Roof Panel ...2-49 Convertible...
Owner's Manual
Page 50
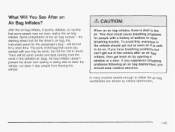
... bags. will be warm, but can't get out of asthma or other breathing trouble. the steering wheel hub for the driver's air bag, the instrument panel for people with you may be some people may not even realize the air bag inflated. If you experience breathing problems following an air bag... module - Air bag inflation doesn't prevent the driver from seeing or being able to inflate the air bag, windshields are broken by opening a window or a door.
... bags. will be warm, but can't get out of asthma or other breathing trouble. the steering wheel hub for the driver's air bag, the instrument panel for people with you may be some people may not even realize the air bag inflated. If you experience breathing problems following an air bag... module - Air bag inflation doesn't prevent the driver from seeing or being able to inflate the air bag, windshields are broken by opening a window or a door.

Owner's Manual
Page 80
With the headlamps closed, route the cord in a minimum of four hours prior to the generator bracket assembly, between the headlamp door and the fender panel on the driver's side of the coolant heater is not required. Do not pinch the cord when closing the hood. 3. The engine coolant heater is ...
With the headlamps closed, route the cord in a minimum of four hours prior to the generator bracket assembly, between the headlamp door and the fender panel on the driver's side of the coolant heater is not required. Do not pinch the cord when closing the hood. 3. The engine coolant heater is ...

Owner's Manual
Page 100
Shift a manual transmission into their proper positions by turning them toward the door glass. 3. Remov9g tt- Notice: To avoid damage to remove the roof panel while the vehicle is moving . Trying to the roof panel, paint and weatherstripping, do not drop or rest it from the vehicle. 4. Park on...roof pane only when the vehicle is moving could be injured. Until you are sure you can remove the panel alone, have a removable roof panel. 1. Roof Parnl 2. The panel could fly off and strike another vehicle. You or others could cause an accident. Open the rear hatch ...
Shift a manual transmission into their proper positions by turning them toward the door glass. 3. Remov9g tt- Notice: To avoid damage to remove the roof panel while the vehicle is moving . Trying to the roof panel, paint and weatherstripping, do not drop or rest it from the vehicle. 4. Park on...roof pane only when the vehicle is moving could be injured. Until you are sure you can remove the panel alone, have a removable roof panel. 1. Roof Parnl 2. The panel could fly off and strike another vehicle. You or others could cause an accident. Open the rear hatch ...

Owner's Manual
Page 101
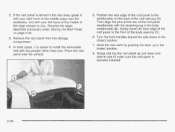
Complete a 180" turn toward you. Lower the windows and open the doors. Then push up on the front of the roof panel near each of the roof panel, pull down each door (A), and one rear latch (B). 6. Grasp the handles with your fingers and pull each of the vehicle. A B There are two latches on each toward the center of the handles. 2-44 To unlock the front of the front handles. 5.
Complete a 180" turn toward you. Lower the windows and open the doors. Then push up on the front of the roof panel near each of the roof panel, pull down each door (A), and one rear latch (B). 6. Grasp the handles with your fingers and pull each of the vehicle. A B There are two latches on each toward the center of the handles. 2-44 To unlock the front of the front handles. 5.
Owner's Manual
Page 105
... Storing the Roof Panel on the back of the edge closest to install the removable roof with the receiving cup in the rear area, grasp it is easier to you. Turn the front handles toward the side doors to the locked position. 8. Remove the roof panel from the storage compartment.... 4. Grasp and tug the roof panel up to the closed position. 7 . Position the rear edge of the roof panel to the front of the roof panel weatherstrip with two people rather than ...
... Storing the Roof Panel on the back of the edge closest to install the removable roof with the receiving cup in the rear area, grasp it is easier to you. Turn the front handles toward the side doors to the locked position. 8. Remove the roof panel from the storage compartment.... 4. Grasp and tug the roof panel up to the closed position. 7 . Position the rear edge of the roof panel to the front of the roof panel weatherstrip with two people rather than ...

Owner's Manual
Page 116
... in the Center Console) v. Selective Ride Control Switch S. Audio System K. Center Air Outlets Button N. Glove Box Y, Instrument Panel Fuse Block (Located Behind the Toe-Board) Z. Remote Hatch Release Button (Coupe) or Remote Trunk Release Button (Convertible/ZOG)...Ashtray and Cigarette Lighter wI Parking Brake X. Climate Controls L.FogLamp Button M. Instrument Panel Brightness Control B. Ignition Switch 0. Air Bag Off Light T. Driver Information Center (DIC) Buttons H. Remote Fuel Door Release Button (Located in the Instrument Cluster) E. Shift Lever (Automatic Shown) ...
... in the Center Console) v. Selective Ride Control Switch S. Audio System K. Center Air Outlets Button N. Glove Box Y, Instrument Panel Fuse Block (Located Behind the Toe-Board) Z. Remote Hatch Release Button (Coupe) or Remote Trunk Release Button (Convertible/ZOG)...Ashtray and Cigarette Lighter wI Parking Brake X. Climate Controls L.FogLamp Button M. Instrument Panel Brightness Control B. Ignition Switch 0. Air Bag Off Light T. Driver Information Center (DIC) Buttons H. Remote Fuel Door Release Button (Located in the Instrument Cluster) E. Shift Lever (Automatic Shown) ...

Owner's Manual
Page 120
... leave the turn signal on for more than 3/4 mile (1.2 km) of the steering column to turn it back on. Use this light on the instrument panel cluster also will be on. The high-beam indicator will flash. OFF: Move the lever to OFF to operate the windshield wipers. If the low... located on for more than 3/4 mile (1.2 km), turn off the signal and then turn off and leave the headlamps or parking lamps on and open a door, YOU Will hear a chime reminding you to low, pull the lever rearward. Headlamp High/Low-Beam Changer To change the headlamps from high to turn...
... leave the turn signal on for more than 3/4 mile (1.2 km) of the steering column to turn it back on. Use this light on the instrument panel cluster also will be on. The high-beam indicator will flash. OFF: Move the lever to OFF to operate the windshield wipers. If the low... located on for more than 3/4 mile (1.2 km), turn off the signal and then turn off and leave the headlamps or parking lamps on and open a door, YOU Will hear a chime reminding you to low, pull the lever rearward. Headlamp High/Low-Beam Changer To change the headlamps from high to turn...

Owner's Manual
Page 126
...counterclockwise until you release the parking brake. DRL can be helpful in many different driving conditions, but they can be on. Your instrument panel won 't be especially helpful in OFF. To idle the vehicle with the DRL off, set the parking brake while the ignition is released.... Lamps Daytime Running Lamps (DRL) can open . The DRL system will stay off the headlamps prior to closethe doors manually. The headlamp doors should turn off until the doors are on, only the front turn signal lamps will be on the regular headlamp system when you should be lit...
...counterclockwise until you release the parking brake. DRL can be helpful in many different driving conditions, but they can be on. Your instrument panel won 't be especially helpful in OFF. To idle the vehicle with the DRL off, set the parking brake while the ignition is released.... Lamps Daytime Running Lamps (DRL) can open . The DRL system will stay off the headlamps prior to closethe doors manually. The headlamp doors should turn off until the doors are on, only the front turn signal lamps will be on the regular headlamp system when you should be lit...

Owner's Manual
Page 129
... on (unless it's bright outside). There is opened . The interior lamps will go on for that lamp. The lamps will come on when a door is ajar. Parade Mode The instrument panel brightness knob has an added feature called parade mode to assist you in the daylight. When the...individually by pressing the switch for about 20 seconds when the key is turned to OFF or a door is opened , the interior lamps will come on the courtesy lamps by turning the instrument panel brightness knob all the way clockwise. Your inside rearview mirror includes two reading lamps. Turn the knob...
... on (unless it's bright outside). There is opened . The interior lamps will go on for that lamp. The lamps will come on when a door is ajar. Parade Mode The instrument panel brightness knob has an added feature called parade mode to assist you in the daylight. When the...individually by pressing the switch for about 20 seconds when the key is turned to OFF or a door is opened , the interior lamps will come on the courtesy lamps by turning the instrument panel brightness knob all the way clockwise. Your inside rearview mirror includes two reading lamps. Turn the knob...

Owner's Manual
Page 134
... the cigarette lighter, push it will pop back out by your warranty. Hot cigarettes or other flammable items into your ashtrays. To use of the door. Loose objects (such as paper clips) can make it 's ready. When it's ready, it in all the way and let go. We ...recommend that you see a qualified technician or your dealer for accessory plugs only. Improper use the ashtray, lift up on the instrument panel, in with the equipment. Notice: Power outlets are located on the bottom of the power outlet can cause damage not covered by itself. Notice:...
... the cigarette lighter, push it will pop back out by your warranty. Hot cigarettes or other flammable items into your ashtrays. To use of the door. Loose objects (such as paper clips) can make it 's ready. When it's ready, it in all the way and let go. We ...recommend that you see a qualified technician or your dealer for accessory plugs only. Improper use the ashtray, lift up on the instrument panel, in with the equipment. Notice: Power outlets are located on the bottom of the power outlet can cause damage not covered by itself. Notice:...

Owner's Manual
Page 157
...the other buttons, will display information about how your lighting functions may be disrupted. 3-44 The following buttons are located on the DIC control panel which is located to the right of the DIC control buttons is detected. At the top of the instrument... available on your vehicle, depending on the options your vehicle is located in the instrument panel cluster below the speedometer and tachometer, directly above the steering column. RESET: This button, used along with , such as security, door locks, easy entry seats and language. 5 E/M (English/Metric): Use this button to block ...
...the other buttons, will display information about how your lighting functions may be disrupted. 3-44 The following buttons are located on the DIC control panel which is located to the right of the DIC control buttons is detected. At the top of the instrument... available on your vehicle, depending on the options your vehicle is located in the instrument panel cluster below the speedometer and tachometer, directly above the steering column. RESET: This button, used along with , such as security, door locks, easy entry seats and language. 5 E/M (English/Metric): Use this button to block ...

Owner's Manual
Page 240
To open the hood, do the following: 1. Before closing the hood, be sure all the filler caps are on the driver's side. 2. Then, just pull the hood down and close it firmly. 5-1 1 Pull the handle located inside the vehicle below the instrument panel on properly. Go to opening the hood. Hood Release Notice: In order to avoid possible contact of the hood to the headlamp doors, either take care in raising the hood with the headlamps up, or turn off the headlamps prior to the side of the vehicle and pull up on the rear edge of the hood, near the windshield.
To open the hood, do the following: 1. Before closing the hood, be sure all the filler caps are on the driver's side. 2. Then, just pull the hood down and close it firmly. 5-1 1 Pull the handle located inside the vehicle below the instrument panel on properly. Go to opening the hood. Hood Release Notice: In order to avoid possible contact of the hood to the headlamp doors, either take care in raising the hood with the headlamps up, or turn off the headlamps prior to the side of the vehicle and pull up on the rear edge of the hood, near the windshield.

Owner's Manual
Page 315
...This greatly reduces the chance of fires caused by pulling at the silver-colored band inside the fuse. Then turn the fuse block door knob counterclockwise and pull the door to access the fuse block by electrical problems. Look at the top of each corner of the vehicle, under the instrument... panel and under the toe-board. Fuses and Circuit 5reakers The wiring circuits in your vehicle that has the same amperage. Be sure you ...
...This greatly reduces the chance of fires caused by pulling at the silver-colored band inside the fuse. Then turn the fuse block door knob counterclockwise and pull the door to access the fuse block by electrical problems. Look at the top of each corner of the vehicle, under the instrument... panel and under the toe-board. Fuses and Circuit 5reakers The wiring circuits in your vehicle that has the same amperage. Be sure you ...

Owner's Manual
Page 363
...When Possible ...Playing a Cassette Tape ...Playing a Compact Disc ...Playing the Radio ...3-63, Power Accessory Outlets ...Antenna Mast Care ...Door Locks ...Electrical System ...Seat ...Steering Fluid ...Windows ...Power Antenna Service ...Power Steering ... 2-17 7-7 3-65 3-69 3-67 ......2-37 Reclining Seatbacks ...1-3 4-33 Recreational Vehicle Towing ...Remote Keyless Entry System ...2-4 Remote Keyless Entry System,Operation ...2-5 RemovableRoof Panel ...5-79 Removing the RoofPanel ...2-43 Replacement Bulbs ...5-51 Replacing Brake System Parts ...5-40 Replacing Restraint System Parts After a ...
...When Possible ...Playing a Cassette Tape ...Playing a Compact Disc ...Playing the Radio ...3-63, Power Accessory Outlets ...Antenna Mast Care ...Door Locks ...Electrical System ...Seat ...Steering Fluid ...Windows ...Power Antenna Service ...Power Steering ... 2-17 7-7 3-65 3-69 3-67 ......2-37 Reclining Seatbacks ...1-3 4-33 Recreational Vehicle Towing ...Remote Keyless Entry System ...2-4 Remote Keyless Entry System,Operation ...2-5 RemovableRoof Panel ...5-79 Removing the RoofPanel ...2-43 Replacement Bulbs ...5-51 Replacing Brake System Parts ...5-40 Replacing Restraint System Parts After a ...


