
Owner's Manual
Page 1
2009 Chevrolet Silverado Owner Manual Seats and Restraint System ...1-1 Head Restraints ...1-3 Front Seats ...1-4 Rear Seats ...1-14 Safety Belts ...1-16 Child Restraints ...1-38 Airbag System... ...1-73 Restraint System Check ...1-92 ...2-1 Features and Controls Keys ...2-3 Doors and Locks ...2-9 Windows ...2-14 Theft-Deterrent Systems ...2-17 Starting and Operating Your Vehicle ...2-21 Mirrors ...2-57 Object Detection Systems ...2-62 OnStar® System ...2-71 Universal Home Remote System ...2-74 Storage...
2009 Chevrolet Silverado Owner Manual Seats and Restraint System ...1-1 Head Restraints ...1-3 Front Seats ...1-4 Rear Seats ...1-14 Safety Belts ...1-16 Child Restraints ...1-38 Airbag System... ...1-73 Restraint System Check ...1-92 ...2-1 Features and Controls Keys ...2-3 Doors and Locks ...2-9 Windows ...2-14 Theft-Deterrent Systems ...2-17 Starting and Operating Your Vehicle ...2-21 Mirrors ...2-57 Object Detection Systems ...2-62 OnStar® System ...2-71 Universal Home Remote System ...2-74 Storage...

Owner's Manual
Page 19
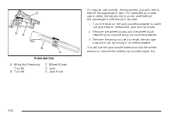
...either seatback is not locked, it latches. To tilt the seatback forward, lift the lever located on the outboard side of the seat behind the power seat control. Center Seat Your vehicle may have power reclining seatbacks, the control used . After returning the seatback to its upright position, push and pull... on the seatback to make sure it as an armrest and cupholder/ storage area for the driver and passenger when the center seat is not used to recline them is folded down. 1-13 Do not have a seatback reclined if your vehicle ...
...either seatback is not locked, it latches. To tilt the seatback forward, lift the lever located on the outboard side of the seat behind the power seat control. Center Seat Your vehicle may have power reclining seatbacks, the control used . After returning the seatback to its upright position, push and pull... on the seatback to make sure it as an armrest and cupholder/ storage area for the driver and passenger when the center seat is not used to recline them is folded down. 1-13 Do not have a seatback reclined if your vehicle ...

Owner's Manual
Page 40
... Belt Comfort Guides Rear shoulder belt comfort guides may provide added safety belt comfort for older children who have outgrown booster seats and for each outboard passenger position in the rear seat. Be sure that the belt is how to install a comfort guide to the shoulder belt: 1. Remove the guide from the... be under the belt and the guide on the interior body. 3. When installed on a shoulder belt, the comfort guide positions the belt away from its storage clip on top. 2. Place the guide over the belt and insert the two edges of the belt into the slots of the guide. 1-34 Here...
... Belt Comfort Guides Rear shoulder belt comfort guides may provide added safety belt comfort for older children who have outgrown booster seats and for each outboard passenger position in the rear seat. Be sure that the belt is how to install a comfort guide to the shoulder belt: 1. Remove the guide from the... be under the belt and the guide on the interior body. 3. When installed on a shoulder belt, the comfort guide positions the belt away from its storage clip on top. 2. Place the guide over the belt and insert the two edges of the belt into the slots of the guide. 1-34 Here...
Owner's Manual
Page 102
Section 2 Features and Controls Storage Areas ...2-81 Glove Box ...2-81 Cupholders ...2-81 Instrument Panel Storage ...2-81 Center Console Storage ...2-82 Luggage Carrier ...2-82 Rear Seat Armrest ...2-83 Cargo Management System ...2-83 Sunroof ...2-85 Park Tilt Mirrors ...2-60 Outside Convex Mirror ...2-61 Outside Heated Mirrors ...2-61 Object Detection Systems ...2-62 Ultrasonic Rear Parking Assist (URPA) ...2-62 Rear Vision Camera (RVC) ...2-65 OnStar® System ...2-71 Universal Home Remote System ...2-74 Universal Home Remote System Operation (With Three Round LED) ...2-75 2-2
Section 2 Features and Controls Storage Areas ...2-81 Glove Box ...2-81 Cupholders ...2-81 Instrument Panel Storage ...2-81 Center Console Storage ...2-82 Luggage Carrier ...2-82 Rear Seat Armrest ...2-83 Cargo Management System ...2-83 Sunroof ...2-85 Park Tilt Mirrors ...2-60 Outside Convex Mirror ...2-61 Outside Heated Mirrors ...2-61 Object Detection Systems ...2-62 Ultrasonic Rear Parking Assist (URPA) ...2-62 Rear Vision Camera (RVC) ...2-65 OnStar® System ...2-71 Universal Home Remote System ...2-74 Universal Home Remote System Operation (With Three Round LED) ...2-75 2-2

Owner's Manual
Page 181
...on the glove box lever to open it located above the glove box. Storage Areas Glove Box Lift up on the rear seat armrest to access the cupholders. Instrument Panel Storage Vehicles that have an instrument panel storage area, have them located on and behind the center console. Pull downward on... the exposed portion of the handle in the rear seat armrest. Press and hold the ...
...on the glove box lever to open it located above the glove box. Storage Areas Glove Box Lift up on the rear seat armrest to access the cupholders. Instrument Panel Storage Vehicles that have an instrument panel storage area, have them located on and behind the center console. Pull downward on... the exposed portion of the handle in the rear seat armrest. Press and hold the ...

Owner's Manual
Page 207
... state of the battery. If there is needed in the cargo area of charge. The battery can be spinning fast enough at high speed, heated seats, engine cooling fans, trailer loads, and loads plugged into accessory power outlets. When the battery's state of the following are fixed and cannot ... lamps, press the button located next to prevent overcharging. This is because the generator (alternator) may also have reading lamps in the top-box storage units. 3-21 A high electrical load occurs when several of charge is low, the voltage is lowered slightly to each lamp.
... state of the battery. If there is needed in the cargo area of charge. The battery can be spinning fast enough at high speed, heated seats, engine cooling fans, trailer loads, and loads plugged into accessory power outlets. When the battery's state of the following are fixed and cannot ... lamps, press the button located next to prevent overcharging. This is because the generator (alternator) may also have reading lamps in the top-box storage units. 3-21 A high electrical load occurs when several of charge is low, the voltage is lowered slightly to each lamp.
Owner's Manual
Page 504
Remove the wing nut used to retain the storage bag and tools by turning the wing nut counterclockwise. 3. Tool Kit C. Remove the wheel blocks and the wheel block retainer by turning it counterclockwise. You ... use the jack handle extensions and the wheel wrench to remove the underbody-mounted spare tire. Turn the knob on the shelf behind the passenger's seat. Extended Cab A. For extended and crew cab models, the equipment is behind the passenger's side second row...
Remove the wing nut used to retain the storage bag and tools by turning the wing nut counterclockwise. 3. Tool Kit C. Remove the wheel blocks and the wheel block retainer by turning it counterclockwise. You ... use the jack handle extensions and the wheel wrench to remove the underbody-mounted spare tire. Turn the knob on the shelf behind the passenger's seat. Extended Cab A. For extended and crew cab models, the equipment is behind the passenger's side second row...

Owner's Manual
Page 585
... ...5-116 Cargo Lamp ...3-21 Cargo Management System ...2-83 CD, MP3 ...3-108, 3-112 Center Console Storage ...2-82 Center High-Mounted Stoplamp (CHMSL) and Cargo Lamp ...5-59 Center Seat ...1-13 Chains, Tire ...5-90 Charging System Light ...3-41 Check Engine Lamp ...3-45 Checking Things Under ...Tethers for Children ...1-49 Older Children ...1-38 Securing a Child Restraint in a Rear Seat Position ...1-58 Securing a Child Restraint in the Center Front Seat Position ...1-61 Securing a Child Restraint in the Right Front Seat Position ...1-62, 1-66, 1-70 Systems ...1-45 Where to Put the Restraint ...
... ...5-116 Cargo Lamp ...3-21 Cargo Management System ...2-83 CD, MP3 ...3-108, 3-112 Center Console Storage ...2-82 Center High-Mounted Stoplamp (CHMSL) and Cargo Lamp ...5-59 Center Seat ...1-13 Chains, Tire ...5-90 Charging System Light ...3-41 Check Engine Lamp ...3-45 Checking Things Under ...Tethers for Children ...1-49 Older Children ...1-38 Securing a Child Restraint in a Rear Seat Position ...1-58 Securing a Child Restraint in the Center Front Seat Position ...1-61 Securing a Child Restraint in the Right Front Seat Position ...1-62, 1-66, 1-70 Systems ...1-45 Where to Put the Restraint ...
Owner's Manual
Page 596
..., Remote ...2-7 Starting the Engine ...2-23 Steering ...4-9 Steering Wheel Controls, Audio ...3-140 Steering Wheel, Tilt Wheel ...3-8 Storage Areas Cargo Management System ...2-83 Center Console ...2-82 Cupholders ...2-81 Glove Box ...2-81 Instrument Panel ...2-81 Luggage Carrier ...2-82 Rear Seat Armrest ...2-83 Stuck in Sand, Mud, Ice, or Snow ...4-30 Sun Visors ...2-17 Sunroof ...2-85...
..., Remote ...2-7 Starting the Engine ...2-23 Steering ...4-9 Steering Wheel Controls, Audio ...3-140 Steering Wheel, Tilt Wheel ...3-8 Storage Areas Cargo Management System ...2-83 Center Console ...2-82 Cupholders ...2-81 Glove Box ...2-81 Instrument Panel ...2-81 Luggage Carrier ...2-82 Rear Seat Armrest ...2-83 Stuck in Sand, Mud, Ice, or Snow ...4-30 Sun Visors ...2-17 Sunroof ...2-85...


