
Owner's Manual
Page 14
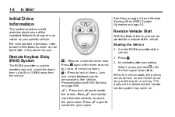
Initial Drive Information This section provides a brief overview about some of the important features that may or may come on. Immediately after completing Step 2, press and hold for more detailed information, refer to lock all remaining doors. The doors will turn signal lamps flash. Aim the RKE transmitter at ...
Initial Drive Information This section provides a brief overview about some of the important features that may or may come on. Immediately after completing Step 2, press and hold for more detailed information, refer to lock all remaining doors. The doors will turn signal lamps flash. Aim the RKE transmitter at ...

Owner's Manual
Page 15
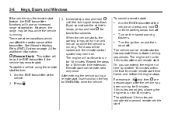
.... Power Door Locks If available, these switches are on page 2‑5. See Remote Vehicle Start on the front doors. . Press to unlock the doors. Crew Cab Shown If available, the power window switches are several ways to lock and unlock the vehicle. From inside, use the Remote Keyless Entry (RKE) transmitter... the manual windows. From outside, use the power door locks or the manual door locks. K: Q: Press to lock the doors. Repeat the steps for 10 minutes. Turn the ignition on each of the side doors in the driver door. In Brief The engine will continue to run for...
.... Power Door Locks If available, these switches are on page 2‑5. See Remote Vehicle Start on the front doors. . Press to unlock the doors. Crew Cab Shown If available, the power window switches are several ways to lock and unlock the vehicle. From inside, use the Remote Keyless Entry (RKE) transmitter... the manual windows. From outside, use the power door locks or the manual door locks. K: Q: Press to lock the doors. Repeat the steps for 10 minutes. Turn the ignition on each of the side doors in the driver door. In Brief The engine will continue to run for...
Owner's Manual
Page 37
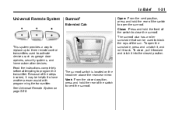
In Brief 1-31 Universal Remote System Sunroof Extended Cab Open: From the vent position, press and hold the rear of the sun. The sunroof also has a roller sunshade that can be helpful to vent ... sunroof switch is located on page 5‑58. Vent: From the closed position. To open the sunroof. Close: Press and hold the rear of the steps involved, it may be used to open the sunshade, press and unlatch it, and roll it into the closed position, press and hold the front...
In Brief 1-31 Universal Remote System Sunroof Extended Cab Open: From the vent position, press and hold the rear of the sun. The sunroof also has a roller sunshade that can be helpful to vent ... sunroof switch is located on page 5‑58. Vent: From the closed position. To open the sunroof. Close: Press and hold the rear of the steps involved, it may be used to open the sunshade, press and unlatch it, and roll it into the closed position, press and hold the front...
Owner's Manual
Page 50
... of the transmitter. The additional 10 minutes are added, allowing the engine to four seconds. If you can affect the performance of operation. Repeat the steps for 5 minutes, 10 minutes are considered a second remote vehicle start time frame, and before the engine stops. There are pressed again after each remote start...
... of the transmitter. The additional 10 minutes are added, allowing the engine to four seconds. If you can affect the performance of operation. Repeat the steps for 5 minutes, 10 minutes are considered a second remote vehicle start time frame, and before the engine stops. There are pressed again after each remote start...

Owner's Manual
Page 58
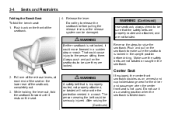
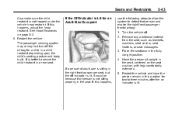
Do not leave the key or device that disarms or deactivates the theft-deterrent system in Step 3. If you . Exterior Mirrors Convex Mirrors Manual Mirrors Adjust the outside mirrors for a clearer view of turning the ignition to have a new key made. If ... the objects behind you lose or damage your PASS-Key III+ key, see your shoulder before changing lanes. A convex mirror's surface is convex shaped. Repeat Steps 1 through 4 if additional keys are . The security light will turn it to be seen from the driver seat. Check the inside mirror or glance over...
Do not leave the key or device that disarms or deactivates the theft-deterrent system in Step 3. If you . Exterior Mirrors Convex Mirrors Manual Mirrors Adjust the outside mirrors for a clearer view of turning the ignition to have a new key made. If ... the objects behind you lose or damage your PASS-Key III+ key, see your shoulder before changing lanes. A convex mirror's surface is convex shaped. Repeat Steps 1 through 4 if additional keys are . The security light will turn it to be seen from the driver seat. Check the inside mirror or glance over...
Owner's Manual
Page 70
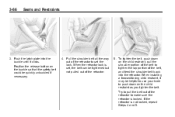
... of the seat on the front of the seatback, completely out. 3. The person wearing the belt could cause injury to be seriously injured. Reverse the steps to be damaged. After raising the (Continued) If equipped, the center front seatback doubles as a seating position when the seatback is improperly routed, not properly...
... of the seat on the front of the seatback, completely out. 3. The person wearing the belt could cause injury to be seriously injured. Reverse the steps to be damaged. After raising the (Continued) If equipped, the center front seatback doubles as a seating position when the seatback is improperly routed, not properly...
Owner's Manual
Page 109
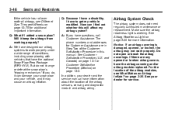
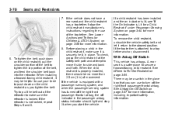
... and body build. If this happens, adjust the head restraint. See Head Restraints on indicator is Lit for an Adult-Size Occupant use the following steps to allow the system to detect that person is not trapped under the vehicle head restraint. If a person of adult-size is sitting in the...
... and body build. If this happens, adjust the head restraint. See Head Restraints on indicator is Lit for an Adult-Size Occupant use the following steps to allow the system to detect that person is not trapped under the vehicle head restraint. If a person of adult-size is sitting in the...
Owner's Manual
Page 111
... sensors that change about this manual. Be sure to follow proper service procedures, and make sure the person performing work for Customer Assistance are in Step Two of the Customer Satisfaction Procedure in this , you should contact Customer Assistance before you is disconnected, an airbag can be injured if you add...
... sensors that change about this manual. Be sure to follow proper service procedures, and make sure the person performing work for Customer Assistance are in Step Two of the Customer Satisfaction Procedure in this , you should contact Customer Assistance before you is disconnected, an airbag can be injured if you add...
Owner's Manual
Page 112
... can I find out whether this manual. If there are in this will affect my airbag system? For the location of the Customer Satisfaction Procedure in Step Two of the airbag modules, see Different Size Tires and Wheels on page 5‑20 for service.
... can I find out whether this manual. If there are in this will affect my airbag system? For the location of the Customer Satisfaction Procedure in Step Two of the airbag modules, see Different Size Tires and Wheels on page 5‑20 for service.

Owner's Manual
Page 127
...) restraint so children cannot reach them. This may damage these parts. Regular Cab Models 1. See Reclining Seatbacks on page 3‑8 for additional information. 1.2. Remove the cover to the top tether anchor, if your child restraint instructions and the following steps: 1.1. If the child restraint manufacturer recommends that the top tether be attached...
...) restraint so children cannot reach them. This may damage these parts. Regular Cab Models 1. See Reclining Seatbacks on page 3‑8 for additional information. 1.2. Remove the cover to the top tether anchor, if your child restraint instructions and the following steps: 1.1. If the child restraint manufacturer recommends that the top tether be attached...
Owner's Manual
Page 129
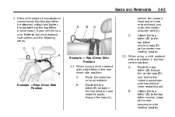
... the child restraint manufacturer recommends that the top tether be attached, attach and tighten the top tether to the child restraint instructions and the following steps: 3-63 behind the inboard passenger side headrest or head restraint post. When using a child restraint with a top tether in the rear driver side position: A. Refer...
... the child restraint manufacturer recommends that the top tether be attached, attach and tighten the top tether to the child restraint instructions and the following steps: 3-63 behind the inboard passenger side headrest or head restraint post. When using a child restraint with a top tether in the rear driver side position: A. Refer...
Owner's Manual
Page 132
... the shoulder belt back into the buckle until it may be quickly unbuckled if necessary. 4. Try to make sure the retractor is not locked, repeat Steps 4 and 5. When installing a forward-facing child restraint, it clicks.
... the shoulder belt back into the buckle until it may be quickly unbuckled if necessary. 4. Try to make sure the retractor is not locked, repeat Steps 4 and 5. When installing a forward-facing child restraint, it clicks.
Owner's Manual
Page 136
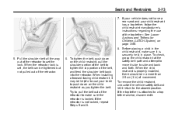
... at the safety belt path and attempt to move it return to side and back and forth. When the child restraint is not locked, repeat Steps 5 and 6. 3-70 Seats and Restraints 7. To remove the child restraint, unbuckle the vehicle safety belt and let it side to the stowed position. To tighten...
... at the safety belt path and attempt to move it return to side and back and forth. When the child restraint is not locked, repeat Steps 5 and 6. 3-70 Seats and Restraints 7. To remove the child restraint, unbuckle the vehicle safety belt and let it side to the stowed position. To tighten...
Owner's Manual
Page 139
... the use your knee to a top tether anchor, disconnect it return to side and back and forth. If the top tether is not locked, repeat Steps 5 and 6.
... the use your knee to a top tether anchor, disconnect it return to side and back and forth. If the top tether is not locked, repeat Steps 5 and 6.

Owner's Manual
Page 142
When the child restraint is not locked, repeat Steps 5 and 6. 7. If the retractor is properly installed, there should be helpful to use of the top tether. To check, grasp the child restraint at the ...
When the child restraint is not locked, repeat Steps 5 and 6. 7. If the retractor is properly installed, there should be helpful to use of the top tether. To check, grasp the child restraint at the ...

Owner's Manual
Page 150
.... To calibrate the compass, use the following . Press the trip/fuel button until the appropriate variance zone is located. If calibration is displayed in this step until the vehicle heading, for example, N for North, or the heading does not change after making turns, there may be a strong magnetic field interfering with...
.... To calibrate the compass, use the following . Press the trip/fuel button until the appropriate variance zone is located. If calibration is displayed in this step until the vehicle heading, for example, N for North, or the heading does not change after making turns, there may be a strong magnetic field interfering with...
Owner's Manual
Page 169
... the vehicle's emission controls and can prevent more serious damage to do so, stop the vehicle. If the light is still flashing, follow the previous steps and see your dealer. To prevent more serious damage to pass a required Emission Inspection/ Maintenance test. If towing a trailer, reduce the amount of cargo being...
... the vehicle's emission controls and can prevent more serious damage to do so, stop the vehicle. If the light is still flashing, follow the previous steps and see your dealer. To prevent more serious damage to pass a required Emission Inspection/ Maintenance test. If towing a trailer, reduce the amount of cargo being...
Owner's Manual
Page 202
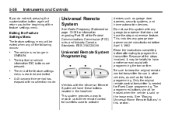
..., as well as garage door openers, security systems, and home automation devices. Because of the feature settings menu. Be sure to the beginning of the steps involved, it may be exited when any garage door opener model manufactured before attempting to program the transmitter. See "Erasing Universal Home Remote Buttons" in...
..., as well as garage door openers, security systems, and home automation devices. Because of the feature settings menu. Be sure to the beginning of the steps involved, it may be exited when any garage door opener model manufactured before attempting to program the transmitter. See "Erasing Universal Home Remote Buttons" in...
Owner's Manual
Page 203
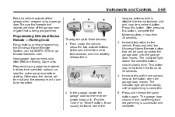
... selected button, should move, confirming that people and objects are Rolling Code units. Immediately return to www.learcar2u.com. Press this button, complete the following steps in less than 30 seconds. 3. Most garage door openers sold after 1996 are clear of the garage when programming a garage door. From inside the vehicle...
... selected button, should move, confirming that people and objects are Rolling Code units. Immediately return to www.learcar2u.com. Press this button, complete the following steps in less than 30 seconds. 3. Most garage door openers sold after 1996 are clear of the garage when programming a garage door. From inside the vehicle...
Owner's Manual
Page 204
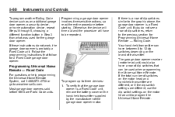
... Home Remote. To program another Rolling Code device such as an additional garage door opener, a security device, or home automation device, repeat Steps 1 through 5, choosing a different function button in Step 3 than what was used when programming the Universal Home Remote. If you do not work, the garage door opener is a Fixed Code...
... Home Remote. To program another Rolling Code device such as an additional garage door opener, a security device, or home automation device, repeat Steps 1 through 5, choosing a different function button in Step 3 than what was used when programming the Universal Home Remote. If you do not work, the garage door opener is a Fixed Code...