
Owner Manual
Page 41
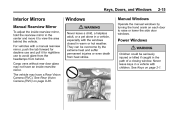
... injuries or even death from behind the vehicle. Never leave keys in the center and move it for daytime use to view the area behind . Cargo vans without rear door glass may have an inside rearview mirror, hold the rearview mirror in a vehicle with children. See Rear Vision Camera (RVC) on page...
... injuries or even death from behind the vehicle. Never leave keys in the center and move it for daytime use to view the area behind . Cargo vans without rear door glass may have an inside rearview mirror, hold the rearview mirror in a vehicle with children. See Rear Vision Camera (RVC) on page...
Owner Manual
Page 43
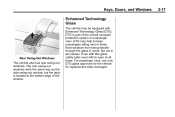
... passengers sitting next to these fixed windows from being ejected through the glass in some, but the latch is part of the window. For passenger vans, use only ETG glass approved for the vehicle for replacement when damaged. The rear swing-out windows work the same way as the side swing.... ETG may be equipped with this glass, safety belts must still be worn at the bottom edge of the overall occupant protection system on passenger vans.
... passengers sitting next to these fixed windows from being ejected through the glass in some, but the latch is part of the window. For passenger vans, use only ETG glass approved for the vehicle for replacement when damaged. The rear swing-out windows work the same way as the side swing.... ETG may be equipped with this glass, safety belts must still be worn at the bottom edge of the overall occupant protection system on passenger vans.
Owner Manual
Page 44
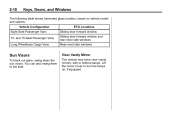
Vehicle Configuration Eight‐Seat Passenger Vans 12‐ and 15‐Seat Passenger Vans Long Wheelbase Cargo Vans ETG Locations Sliding door forward window Sliding door forward window and rear-most side windows Rear-most side windows Sun Visors To block out glare, ...
Vehicle Configuration Eight‐Seat Passenger Vans 12‐ and 15‐Seat Passenger Vans Long Wheelbase Cargo Vans ETG Locations Sliding door forward window Sliding door forward window and rear-most side windows Rear-most side windows Sun Visors To block out glare, ...

Owner Manual
Page 60
...front passenger roof-rail airbag and a sliding door, you will have the following airbag: . . A roof-rail airbag for the right front passenger position (cargo or passenger van equipped with a hinged door). A frontal airbag for the driver. . With roof-rail airbags, the word AIRBAG will appear on an attached label near ...of the airbags in the vehicle will also have the safety belt assemblies inspected or replaced. A roof-rail airbag for the driver (cargo van). If you are driving. See Airbag Readiness Light on after you start the vehicle or while you have a passenger...
...front passenger roof-rail airbag and a sliding door, you will have the following airbag: . . A roof-rail airbag for the right front passenger position (cargo or passenger van equipped with a hinged door). A frontal airbag for the driver. . With roof-rail airbags, the word AIRBAG will appear on an attached label near ...of the airbags in the vehicle will also have the safety belt assemblies inspected or replaced. A roof-rail airbag for the driver (cargo van). If you are driving. See Airbag Readiness Light on after you start the vehicle or while you have a passenger...
Owner Manual
Page 63
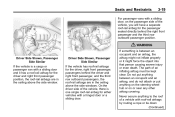
...passengers behind the right front passenger and the third row outboard passenger position. { WARNING Driver Side Shown, Passenger Side Similar If the vehicle is a cargo or passenger van with a hinged door or a sliding door. On the driver side of a vehicle with roof-rail airbags by routing a rope or tie down ... and the third row outboard passengers, the roof-rail airbags are in the ceiling above the side window. Seats and Restraints 3-19 For passenger vans with a sliding door, on or near any other airbag covering. The path of the vehicle, you will have a separate roof-rail airbag for...
...passengers behind the right front passenger and the third row outboard passenger position. { WARNING Driver Side Shown, Passenger Side Similar If the vehicle is a cargo or passenger van with a hinged door or a sliding door. On the driver side of a vehicle with roof-rail airbags by routing a rope or tie down ... and the third row outboard passengers, the roof-rail airbags are in the ceiling above the side window. Seats and Restraints 3-19 For passenger vans with a sliding door, on or near any other airbag covering. The path of the vehicle, you will have a separate roof-rail airbag for...

Owner Manual
Page 87
... Restraints Lower Anchor and Top Tether Anchor Locations Do not install three child restraints in the second-, third-, and fourth-row three-passenger seats. Passenger Van Front Passenger Position There are two top tether anchors in the same row at the same time and never install two top tethers using the...
... Restraints Lower Anchor and Top Tether Anchor Locations Do not install three child restraints in the second-, third-, and fourth-row three-passenger seats. Passenger Van Front Passenger Position There are two top tether anchors in the same row at the same time and never install two top tethers using the...
Owner Manual
Page 242
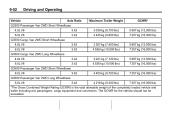
...,000 lbs) 7 257 kg (16,000 lbs) G2500 Passenger Van 2WD Short Wheelbase 4.8L V8 6.0L V8 G3500 Cargo Van 2WD Short Wheelbase 4.8L V8 6.0L V8 G3500 Cargo Van 2WD Long Wheelbase 4.8L V8 6.0L V8 G3500 Passenger Van 2WD Short Wheelbase 6.0L V8 G3500 Passenger Van 2WD Long Wheelbase 6.0L V8 *The Gross Combined Weight...
...,000 lbs) 7 257 kg (16,000 lbs) G2500 Passenger Van 2WD Short Wheelbase 4.8L V8 6.0L V8 G3500 Cargo Van 2WD Short Wheelbase 4.8L V8 6.0L V8 G3500 Cargo Van 2WD Long Wheelbase 4.8L V8 6.0L V8 G3500 Passenger Van 2WD Short Wheelbase 6.0L V8 G3500 Passenger Van 2WD Long Wheelbase 6.0L V8 *The Gross Combined Weight...
Owner Manual
Page 316
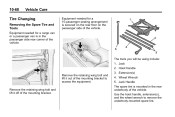
... side rear corner of the vehicle. The tools you will be using include: 1. Tire Changing Removing the Spare Tire and Tools Equipment needed for a cargo van or a passenger van is in the rear underbody of the vehicle. 10-68 Vehicle Care Equipment needed for a 15-passenger seating arrangement is secured on the rear...
... side rear corner of the vehicle. The tools you will be using include: 1. Tire Changing Removing the Spare Tire and Tools Equipment needed for a cargo van or a passenger van is in the rear underbody of the vehicle. 10-68 Vehicle Care Equipment needed for a 15-passenger seating arrangement is secured on the rear...
Owner Manual
Page 327
On your new vehicle. You do , you could be sure the right amount of fluid is there. If it in your van, use the unpainted radio antenna bracket as a remote negative (−) terminal. 10-79 WARNING (CONTINUED) Be sure the battery has enough water. Battery ... the negative (−) cable to the battery installed in your skin, flush the place with water and get medical help save the radio! 4. Keep your van, use the unpainted radio antenna bracket as a remote negative (−) terminal. Open the hoods and locate the positive (+) and negative (−) terminal locations ...
On your new vehicle. You do , you could be sure the right amount of fluid is there. If it in your van, use the unpainted radio antenna bracket as a remote negative (−) terminal. 10-79 WARNING (CONTINUED) Be sure the battery has enough water. Battery ... the negative (−) cable to the battery installed in your skin, flush the place with water and get medical help save the radio! 4. Keep your van, use the unpainted radio antenna bracket as a remote negative (−) terminal. Open the hoods and locate the positive (+) and negative (−) terminal locations ...
Owner Manual
Page 328
...cable out of the dead battery. 10-80 Vehicle Care 7. Now connect the black negative (−) cable to the fixed antenna bracket. On your van, use the unpainted radio antenna bracket as a remote negative (−) terminal. 6. Connect it to the negative (−) terminal location on the ... one . 8. Do not let the other end of the negative (−) cable to the positive (+) terminal of the good battery. On your van, use the unpainted radio antenna bracket as a remote negative (−) terminal. The other end touch metal. Avoid touching the negative cable clamp to...
...cable out of the dead battery. 10-80 Vehicle Care 7. Now connect the black negative (−) cable to the fixed antenna bracket. On your van, use the unpainted radio antenna bracket as a remote negative (−) terminal. 6. Connect it to the negative (−) terminal location on the ... one . 8. Do not let the other end of the negative (−) cable to the positive (+) terminal of the good battery. On your van, use the unpainted radio antenna bracket as a remote negative (−) terminal. The other end touch metal. Avoid touching the negative cable clamp to...
