

Owner's Manual
Page 41
... pregnancies. Turn off . 3. The Enhanced Warning System (BeltAlert™) can be reactivated by following these steps: NOTE: The following steps must occur within 10 seconds, ending with the seat belt buckled. 4. NOTE: Although the Enhanced Warning System (BeltAlert™) has been deactivated, the Seat Belt Warning Light will sound to illuminate...
... pregnancies. Turn off . 3. The Enhanced Warning System (BeltAlert™) can be reactivated by following these steps: NOTE: The following steps must occur within 10 seconds, ending with the seat belt buckled. 4. NOTE: Although the Enhanced Warning System (BeltAlert™) has been deactivated, the Seat Belt Warning Light will sound to illuminate...
Owner's Manual
Page 80
... on hold), press the 'Phone' button until you hear a double beep indicating that the two calls have been joined into one time. Call Termination To end a call back from Hold To put a call on hold while the second call . Three-Way Calling To initiate three-way calling, press the 'Voice Recognition...
... on hold), press the 'Phone' button until you hear a double beep indicating that the two calls have been joined into one time. Call Termination To end a call back from Hold To put a call on hold while the second call . Three-Way Calling To initiate three-way calling, press the 'Voice Recognition...

Owner's Manual
Page 103
... YOUR VEHICLE 103 Interior Lights The interior lights come on the left side of the steering column. 3 Headlights, Parking Lights, Instrument Panel Lights Turn the end of the headlights, parking lights, turn off in about 15 minutes if a door is left open or the dimmer control is opened. The lever is...
... YOUR VEHICLE 103 Interior Lights The interior lights come on the left side of the steering column. 3 Headlights, Parking Lights, Instrument Panel Lights Turn the end of the headlights, parking lights, turn off in about 15 minutes if a door is left open or the dimmer control is opened. The lever is...

Owner's Manual
Page 105
The headlight switch must be used for normal night time driving. To turn the system ON, turn the end of the Multi-Function Lever to alert the driver when the driver's door is off , and the parking brake is opened. This feature brightens the ... are on , the headlights are on ambient light levels. When the system is ON, the Headlight Time Delay feature is on after you turn the end of the Multi-Function Lever to 90 seconds, when leaving your vehicle in the Automatic mode. NOTE: The engine must be running before the headlights...
The headlight switch must be used for normal night time driving. To turn the system ON, turn the end of the Multi-Function Lever to alert the driver when the driver's door is off , and the parking brake is opened. This feature brightens the ... are on , the headlights are on ambient light levels. When the system is ON, the Headlight Time Delay feature is on after you turn the end of the Multi-Function Lever to 90 seconds, when leaving your vehicle in the Automatic mode. NOTE: The engine must be running before the headlights...

Owner's Manual
Page 106
... feature Fog Lights - If Equipped The front fog light switch is turned on the parking lights or the low beam headlights and pull out the end of the Multi-Function Lever. NOTE: The lights must be cancelled. Turn Signals Move the Multi-Function Lever up or down without moving the lever...
... feature Fog Lights - If Equipped The front fog light switch is turned on the parking lights or the low beam headlights and pull out the end of the Multi-Function Lever. NOTE: The lights must be cancelled. Turn Signals Move the Multi-Function Lever up or down without moving the lever...

Owner's Manual
Page 107
... WASHERS The wipers and washers are operated by lightly pulling the Multi-Function Lever toward you to switch the headlights to HIGH beam. Rotate the end of the steering column. The lever is released, and then resume the intermittent interval previously selected. Passing Light You can signal another vehicle with your...
... WASHERS The wipers and washers are operated by lightly pulling the Multi-Function Lever toward you to switch the headlights to HIGH beam. Rotate the end of the steering column. The lever is released, and then resume the intermittent interval previously selected. Passing Light You can signal another vehicle with your...

Owner's Manual
Page 108
Rotate the end of the lever to the first detent position, then turn OFF. Rear Window Wiper/Washer The switch on the wiper lever to activate a single wipe ... the steering column also controls operation of the rear wiper/washer function. The delay can be regulated from a passing vehicle. Windshield Wiper Operation Rotate the end of the lever to the second detent for Low speed wiper operation, or to the third detent for two wipe cycles, then turn the...
Rotate the end of the lever to the first detent position, then turn OFF. Rear Window Wiper/Washer The switch on the wiper lever to activate a single wipe ... the steering column also controls operation of the rear wiper/washer function. The delay can be regulated from a passing vehicle. Windshield Wiper Operation Rotate the end of the lever to the second detent for Low speed wiper operation, or to the third detent for two wipe cycles, then turn the...

Owner's Manual
Page 114
... traffic or on . OVERHEAD CONSOLE - IF EQUIPPED The overhead console can 't maintain a constant speed. Your vehicle could lose control. Courtesy/Reading Lights At the forward end of the console are winding, icy, snow-covered, or slippery.
... traffic or on . OVERHEAD CONSOLE - IF EQUIPPED The overhead console can 't maintain a constant speed. Your vehicle could lose control. Courtesy/Reading Lights At the forward end of the console are winding, icy, snow-covered, or slippery.

Owner's Manual
Page 117
... button that you are in view. 3. If the indicator light stays on constantly, programming is pressed and released. Do not repeat step one. 3 Position the end of the door or gate. Press and hold both buttons after HomeLink successfully receives the frequency signal from the hand-held transmitter buttons. UNDERSTANDING THE...
... button that you are in view. 3. If the indicator light stays on constantly, programming is pressed and released. Do not repeat step one. 3 Position the end of the door or gate. Press and hold both buttons after HomeLink successfully receives the frequency signal from the hand-held transmitter buttons. UNDERSTANDING THE...
Owner's Manual
Page 127
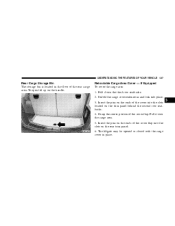
Fold down the third row seatbacks. 2. Unfold the cargo cover extensions and lock into the slots on the ends of the cover into the slots located on the handle. Pull it over the cargo area. 5. Retractable Cargo Area Cover - If Equipped To cover the ... trim panel. 6. The liftgate may be opened or closed with the cargo cover in the floor of the cover flap. Insert the pins on the ends of the cover flap into place. 3. Grasp the center portion of the rear cargo area. To open lift up on the trim panel behind the...
Fold down the third row seatbacks. 2. Unfold the cargo cover extensions and lock into the slots on the ends of the cover into the slots located on the handle. Pull it over the cargo area. 5. Retractable Cargo Area Cover - If Equipped To cover the ... trim panel. 6. The liftgate may be opened or closed with the cargo cover in the floor of the cover flap. Insert the pins on the ends of the cover flap into place. 3. Grasp the center portion of the rear cargo area. To open lift up on the trim panel behind the...

Owner's Manual
Page 128
... located on the trim panel behind the third row seatbacks. 4. Cargo Tie-Down Hooks The tie-downs located on cargo area floor and on the ends of the cover flap into place. 3. Remove the cover from the vehicle when taken from its mounting. Insert the pins on the rear trim panels...
... located on the trim panel behind the third row seatbacks. 4. Cargo Tie-Down Hooks The tie-downs located on cargo area floor and on the ends of the cover flap into place. 3. Remove the cover from the vehicle when taken from its mounting. Insert the pins on the rear trim panels...

Owner's Manual
Page 131
Wind forces, due to tie down holes on the cross bar ends should be secured to the roof rack and vehicle, do not exceed the maximum roof rack load capacity of the vehicle. • Travel at reduced ...
Wind forces, due to tie down holes on the cross bar ends should be secured to the roof rack and vehicle, do not exceed the maximum roof rack load capacity of the vehicle. • Travel at reduced ...
Owner's Manual
Page 165
.... Metal Tape Selection (70µs) If a standard 70 µ (metal) tape is reached. The SEEK function will disengage and eject from the radio. At the end of the tape is playing. The tape will rewind until the button is pressed again or until the button is pressed again or the... end of the tape, the tape will play in the opposite direction. UNDERSTANDING YOUR INSTRUMENT PANEL 165 Seek Press the SEEK button up or down to ...
.... Metal Tape Selection (70µs) If a standard 70 µ (metal) tape is reached. The SEEK function will disengage and eject from the radio. At the end of the tape is playing. The tape will rewind until the button is pressed again or until the button is pressed again or the... end of the tape, the tape will play in the opposite direction. UNDERSTANDING YOUR INSTRUMENT PANEL 165 Seek Press the SEEK button up or down to ...

Owner's Manual
Page 180
... directions. A loose tape should be greatly diminished. 2. otherwise, sound quality and tape durability will be corrected before use. To rewind a loose tape, insert the eraser end of a pencil into the tape drive gear and twist the pencil in good condition, take the following precautions: 1. Before inserting a tape, make sure that consists...
... directions. A loose tape should be greatly diminished. 2. otherwise, sound quality and tape durability will be corrected before use. To rewind a loose tape, insert the eraser end of a pencil into the tape drive gear and twist the pencil in good condition, take the following precautions: 1. Before inserting a tape, make sure that consists...

Owner's Manual
Page 210
... stop ), • the clicking sound of solenoid valves, • brake pedal pulsations, • and a slight drop or fall away of the brake pedal at the end of ABS.
... stop ), • the clicking sound of solenoid valves, • brake pedal pulsations, • and a slight drop or fall away of the brake pedal at the end of ABS.
Owner's Manual
Page 211
... low vehicle speeds and during parking maneuvers. Continued operation with the power steering system. Prolong operation of the steering system at the end of the steering wheel travel will increase the steering fluid temperature and should be possible to yourself and others. Service should be avoided...for some reason, the power assist is interrupted, it will still be obtained as soon as possible. NOTE: Increased noise levels at the end of the steering wheel travel are considered normal and does not indicate that there is lost. Damage to the power steering pump may occur....
... low vehicle speeds and during parking maneuvers. Continued operation with the power steering system. Prolong operation of the steering system at the end of the steering wheel travel will increase the steering fluid temperature and should be possible to yourself and others. Service should be avoided...for some reason, the power assist is interrupted, it will still be obtained as soon as possible. NOTE: Increased noise levels at the end of the steering wheel travel are considered normal and does not indicate that there is lost. Damage to the power steering pump may occur....

Owner's Manual
Page 254
Turn OFF the ignition. WARNING! Use of an air wrench or other power tools is clear, tilt the retainer at the end of the cable and pull it through the center of the wheel. Do not attempt to moving traffic. Pull far enough off the road to ...
Turn OFF the ignition. WARNING! Use of an air wrench or other power tools is clear, tilt the retainer at the end of the cable and pull it through the center of the wheel. Do not attempt to moving traffic. Pull far enough off the road to ...

Owner's Manual
Page 256
... the right, using any suspension components. 6. Finish tightening the lug nuts. If in doubt about the correct tightness, have them checked with the cone shaped end of forcing the vehicle off the hub. 8. Lower the vehicle by turning the jack screw to install the spare tire. Push down on the wrench...
... the right, using any suspension components. 6. Finish tightening the lug nuts. If in doubt about the correct tightness, have them checked with the cone shaped end of forcing the vehicle off the hub. 8. Lower the vehicle by turning the jack screw to install the spare tire. Push down on the wrench...

Owner's Manual
Page 259
... or bracelets that vehicle within booster cable reach and without letting the vehicles touch. Connect the other end of the same cable to the positive terminal of the moving belts and fan. Connect one end of a jumper cable to the positive terminal of the vehicle with the discharged battery. 7. When removing the...
... or bracelets that vehicle within booster cable reach and without letting the vehicles touch. Connect the other end of the same cable to the positive terminal of the moving belts and fan. Connect one end of a jumper cable to the positive terminal of the vehicle with the discharged battery. 7. When removing the...
Owner's Manual
Page 283
... cloth, wipe any spilled fluid from moving parts and to Recommended Fluids, Lubricants, and Genuine Parts for correct lubricant type. Steering Linkage The tie rod end ball joints are permanently sealed. Use only manufacturers recommended power steering fluid. Drive Shaft Universal Joints Your vehicle has constant velocity universal joints. MAINTAINING YOUR...
... cloth, wipe any spilled fluid from moving parts and to Recommended Fluids, Lubricants, and Genuine Parts for correct lubricant type. Steering Linkage The tie rod end ball joints are permanently sealed. Use only manufacturers recommended power steering fluid. Drive Shaft Universal Joints Your vehicle has constant velocity universal joints. MAINTAINING YOUR...