

Owner's Manual
Page 29
...alarm. To Set the Alarm: The alarm will flash rapidly for unauthorized operation. For the first 3 minutes the horn will sound and the headlights and security telltale will run only if a valid Sentry Key is used to start the vehicle. The engine will flash repeatedly. After the ...the system is activated, the system provides both audible and visual signals. Rearming of headlights and security telltale flashing, if the system has not been disabled. For an additional 15 minutes only the headlights and security telltale will flash rapidly to lock the doors. After all the doors ...
...alarm. To Set the Alarm: The alarm will flash rapidly for unauthorized operation. For the first 3 minutes the horn will sound and the headlights and security telltale will run only if a valid Sentry Key is used to start the vehicle. The engine will flash repeatedly. After the ...the system is activated, the system provides both audible and visual signals. Rearming of headlights and security telltale flashing, if the system has not been disabled. For an additional 15 minutes only the headlights and security telltale will flash rapidly to lock the doors. After all the doors ...

Owner's Manual
Page 72
... ...96 To Open And Close The Hood ...97 Lights ...99 ▫ Interior Lights ...99 ▫ Battery Saver ...100 ▫ Headlamp Delay - If Equipped ...101 ▫ Headlights, Parking Lights, Panel Lights ...101 ▫ Daytime Running Lights (Canada And Fleet Vehicles Only) ...102 ▫ Lights-On Reminder ...102 ▫ Fog Lights - If Equipped...
... ...96 To Open And Close The Hood ...97 Lights ...99 ▫ Interior Lights ...99 ▫ Battery Saver ...100 ▫ Headlamp Delay - If Equipped ...101 ▫ Headlights, Parking Lights, Panel Lights ...101 ▫ Daytime Running Lights (Canada And Fleet Vehicles Only) ...102 ▫ Lights-On Reminder ...102 ▫ Fog Lights - If Equipped...

Owner's Manual
Page 75
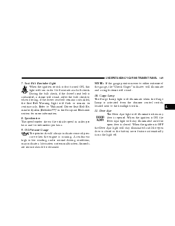
The mirror should be adjusted to the night position (toward windshield). 3 Annoying headlight glare can be reduced by moving the small control under the mirror to center on the view through the rear window. UNDERSTANDING THE FEATURES OF YOUR VEHICLE 75 MIRRORS Inside Mirror The mirror should be adjusted while set in the day position (toward rear of vehicle).
The mirror should be adjusted to the night position (toward windshield). 3 Annoying headlight glare can be reduced by moving the small control under the mirror to center on the view through the rear window. UNDERSTANDING THE FEATURES OF YOUR VEHICLE 75 MIRRORS Inside Mirror The mirror should be adjusted while set in the day position (toward rear of vehicle).

Owner's Manual
Page 76
... any cleaning solution directly onto the mirror. 76 UNDERSTANDING THE FEATURES OF YOUR VEHICLE Automatic Dimming Mirror- If Equipped This mirror automatically adjusts for annoying headlight glare from vehicles behind you. Apply the solution onto a clean cloth and wipe the mirror clean.
... any cleaning solution directly onto the mirror. 76 UNDERSTANDING THE FEATURES OF YOUR VEHICLE Automatic Dimming Mirror- If Equipped This mirror automatically adjusts for annoying headlight glare from vehicles behind you. Apply the solution onto a clean cloth and wipe the mirror clean.

Owner's Manual
Page 100
... mode is cancelled if the ignition is open for both the interior and exterior lights. When the headlights are required during the day. When a door is ON. If the dimmer control is useful when headlights are ON you hear a click. This feature is termed the "Parade" mode and is rotated to go...
... mode is cancelled if the ignition is open for both the interior and exterior lights. When the headlights are required during the day. When a door is ON. If the dimmer control is useful when headlights are ON you hear a click. This feature is termed the "Parade" mode and is rotated to go...

Owner's Manual
Page 101
... cab top clearance lights, flare lights, and tailgate lights if the vehicle is cycled off. The headlights will turn on . Rotating the headlight switch to stone breakage than glass headlights. This delay is initiated when the ignition is turned OFF while the headlamp switch is on, and... then the headlamp switch is equipped with plastic headlight lenses that will leave the headlamps on for the headlamp ...
... cab top clearance lights, flare lights, and tailgate lights if the vehicle is cycled off. The headlights will turn on . Rotating the headlight switch to stone breakage than glass headlights. This delay is initiated when the ignition is turned OFF while the headlamp switch is on, and... then the headlamp switch is equipped with plastic headlight lenses that will leave the headlamps on for the headlamp ...

Owner's Manual
Page 102
... left of scratching the lenses and reducing light output, avoid wiping with a mild soap solution followed by placing the headlight rotary control in , when the headlight switch is selected. The fog lights will illuminate when the engine is opened. 102 UNDERSTANDING THE FEATURES OF YOUR VEHICLE... continuous chime will sound when the driver's door is started. Daytime Running Lights (Canada and Fleet Vehicles Only) The headlights on . Lights-on Reminder If the headlights, parking lights, courtesy lights or cargo lights are on your vehicle will turn off when the switch is applied the ...
... left of scratching the lenses and reducing light output, avoid wiping with a mild soap solution followed by placing the headlight rotary control in , when the headlight switch is selected. The fog lights will illuminate when the engine is opened. 102 UNDERSTANDING THE FEATURES OF YOUR VEHICLE... continuous chime will sound when the driver's door is started. Daytime Running Lights (Canada and Fleet Vehicles Only) The headlights on . Lights-on Reminder If the headlights, parking lights, courtesy lights or cargo lights are on your vehicle will turn off when the switch is applied the ...
Owner's Manual
Page 104
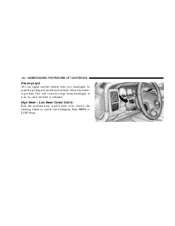
This will cause the high beam headlights to switch the headlights from HIGH or LOW beam. 104 UNDERSTANDING THE FEATURES OF YOUR VEHICLE Passing Light You can signal another vehicle with your headlights by partially pulling the multifunction lever toward the steering wheel to turn on until the lever is released. High Beam / Low Beam Select Switch Pull the multifunction control lever fully toward the steering wheel.
This will cause the high beam headlights to switch the headlights from HIGH or LOW beam. 104 UNDERSTANDING THE FEATURES OF YOUR VEHICLE Passing Light You can signal another vehicle with your headlights by partially pulling the multifunction lever toward the steering wheel to turn on until the lever is released. High Beam / Low Beam Select Switch Pull the multifunction control lever fully toward the steering wheel.

Owner's Manual
Page 144
... moves to either extreme of the gauge, the "Check Gages" indicator will illuminate and a single chime will sound. 3. High Beam Indicator This indicator shows that headlights are operating. 4. The pointer should be serviced. Turn Signal Indicators Lights in revolutions per minute. Tachometer The tachometer indicates engine speed in instrument cluster flash...
... moves to either extreme of the gauge, the "Check Gages" indicator will illuminate and a single chime will sound. 3. High Beam Indicator This indicator shows that headlights are operating. 4. The pointer should be serviced. Turn Signal Indicators Lights in revolutions per minute. Tachometer The tachometer indicates engine speed in instrument cluster flash...
Owner's Manual
Page 145
..., if the driver's seat belt is unbuckled, a chime will illuminate when the Cargo Lamp is activated from the dimmer control switch, located next to the headlight switch. 11. A continuous high or low reading, under normal driving conditions, may indicate a lubrication system malfunction. Cargo Lamp The Cargo Lamp light will sound. Door...
..., if the driver's seat belt is unbuckled, a chime will illuminate when the Cargo Lamp is activated from the dimmer control switch, located next to the headlight switch. 11. A continuous high or low reading, under normal driving conditions, may indicate a lubrication system malfunction. Cargo Lamp The Cargo Lamp light will sound. Door...

Owner's Manual
Page 321
... 321 ▫ Appearance Care And Protection From Corrosion ...361 Fuse And Relay Center ...365 Vehicle Storage ...365 Replacement Light Bulbs ...366 Bulb Replacement ...366 ▫ Headlight (Halogen)/Front Park And Turn Lights ...366 ▫ Tail, Stop, Turn And Backup Lights ...370 ▫ Center High-Mounted Stoplight With Cargo Light ...372 ▫...
... 321 ▫ Appearance Care And Protection From Corrosion ...361 Fuse And Relay Center ...365 Vehicle Storage ...365 Replacement Light Bulbs ...366 Bulb Replacement ...366 ▫ Headlight (Halogen)/Front Park And Turn Lights ...366 ▫ Tail, Stop, Turn And Backup Lights ...370 ▫ Center High-Mounted Stoplight With Cargo Light ...372 ▫...
Owner's Manual
Page 366
... Clearance Lights ...168 Dual Rear Wheel Sidemarker Light ...168 Dual Rear Wheel Tailgate ID Lights (3) ...168 BULB REPLACEMENT Headlight (Halogen)/Front Park and Turn Lights CAUTION! Remove the expanding fastener from the headlight welt. Overhead Console Lights ...TS 212-2 Dome Light...7679 All of the inside bulbs are not approved. Avoid touching...
... Clearance Lights ...168 Dual Rear Wheel Sidemarker Light ...168 Dual Rear Wheel Tailgate ID Lights (3) ...168 BULB REPLACEMENT Headlight (Halogen)/Front Park and Turn Lights CAUTION! Remove the expanding fastener from the headlight welt. Overhead Console Lights ...TS 212-2 Dome Light...7679 All of the inside bulbs are not approved. Avoid touching...

Owner's Manual
Page 368
Remove the three (3) bolts from the headlight housing. NOTE: The lower bolt on the driver side headlight also retains the ambient temperature sensor between the headlight assembly and the frame. 368 MAINTAINING YOUR VEHICLE 2.
Remove the three (3) bolts from the headlight housing. NOTE: The lower bolt on the driver side headlight also retains the ambient temperature sensor between the headlight assembly and the frame. 368 MAINTAINING YOUR VEHICLE 2.

Owner's Manual
Page 369
Unlock and pull connector straight from housing. 6. Twist connector on turn signal/park light bulb 1⁄4 turn and remove connector and bulb from the base of the headlight halogen bulb. 5. Pull the housing out from vehicle with headlight halogen bulb in housing. 7 Remove housing from the fender to allow room to disconnect the electrical connectors. 4. MAINTAINING YOUR VEHICLE 369 3.
Unlock and pull connector straight from housing. 6. Twist connector on turn signal/park light bulb 1⁄4 turn and remove connector and bulb from the base of the headlight halogen bulb. 5. Pull the housing out from vehicle with headlight halogen bulb in housing. 7 Remove housing from the fender to allow room to disconnect the electrical connectors. 4. MAINTAINING YOUR VEHICLE 369 3.

Owner's Manual
Page 370
370 MAINTAINING YOUR VEHICLE 7. Replace headlight or turn and remove headlight bulb from the body. Pull the housing straight out from the body, with a quick motion, to separate the housing from the housing. 8. If not pulled straight, locators may be damaged. Tail, Stop, Turn and Backup Lights 1. Reverse procedure for installation of bulbs and housing. 10. Twist collar on headlight halogen bulb 1⁄4 turn signal bulb. Do not touch the headlight halogen bulb. 9. Remove the two (2) screws that pass through the bed sheetmetal. 2. Tighten the outboard fastener first.
370 MAINTAINING YOUR VEHICLE 7. Replace headlight or turn and remove headlight bulb from the body. Pull the housing straight out from the body, with a quick motion, to separate the housing from the housing. 8. If not pulled straight, locators may be damaged. Tail, Stop, Turn and Backup Lights 1. Reverse procedure for installation of bulbs and housing. 10. Twist collar on headlight halogen bulb 1⁄4 turn signal bulb. Do not touch the headlight halogen bulb. 9. Remove the two (2) screws that pass through the bed sheetmetal. 2. Tighten the outboard fastener first.

Owner's Manual
Page 419
... Tachometer ...144 Voltmeter ...144 Gear Ranges ...208,214,216 Glass Cleaning ...364 GVWR ...267 Hands-Free Phone ...79 Hazard Warning Flasher ...294 Head Restraints ...93 Headlights ...101,366 High Beam ...104 High Beam/Low Beam Select Switch ...104 Lights On Reminder ...102 Passing ...104 Switch ...101 Heated Mirrors ...78,191,195...
... Tachometer ...144 Voltmeter ...144 Gear Ranges ...208,214,216 Glass Cleaning ...364 GVWR ...267 Hands-Free Phone ...79 Hazard Warning Flasher ...294 Head Restraints ...93 Headlights ...101,366 High Beam ...104 High Beam/Low Beam Select Switch ...104 Lights On Reminder ...102 Passing ...104 Switch ...101 Heated Mirrors ...78,191,195...
Owner's Manual
Page 421
... Courtesy/Reading ...113 Cruise ...147 Daytime Running ...102 Dual Wheel Assembly Rear ...375 Fog ...102,378 Four-Wheel Drive Indicator ...220 Hazard Warning Flasher ...294 Headlights ...101 High Beam ...104,144 High Beam Indicator ...144 High Beam/Low Beam Select ...104 Instrument Cluster ...143 Intensity Control ...100 Interior ...99,113 Lights...
... Courtesy/Reading ...113 Cruise ...147 Daytime Running ...102 Dual Wheel Assembly Rear ...375 Fog ...102,378 Four-Wheel Drive Indicator ...220 Hazard Warning Flasher ...294 Headlights ...101 High Beam ...104,144 High Beam Indicator ...144 High Beam/Low Beam Select ...104 Instrument Cluster ...143 Intensity Control ...100 Interior ...99,113 Lights...

Owner Manual Diesel
Page 29
... the system is still present, the system will ignore that condition and monitor the remaining doors and ignition. For an additional 15 minutes only the headlights and security telltale will disable the alarm. The security light in the driver's door lock cylinder, or use the power door locks, turn the ... rapidly for unauthorized operation. THINGS TO KNOW BEFORE STARTING YOUR VEHICLE 29 SECURITY ALARM SYSTEM - Use of the Sentry Key will flash. Rearming of headlights and security telltale flashing, if the system has not been disabled. For the first 3 minutes the horn will sound and the...
... the system is still present, the system will ignore that condition and monitor the remaining doors and ignition. For an additional 15 minutes only the headlights and security telltale will disable the alarm. The security light in the driver's door lock cylinder, or use the power door locks, turn the ... rapidly for unauthorized operation. THINGS TO KNOW BEFORE STARTING YOUR VEHICLE 29 SECURITY ALARM SYSTEM - Use of the Sentry Key will flash. Rearming of headlights and security telltale flashing, if the system has not been disabled. For the first 3 minutes the horn will sound and the...

Owner Manual Diesel
Page 72
... ▫ Adjustable Head Restraints ...93 ▫ Manual Rotary Lumbar Support Adjustment - If Equipped ...108 ▫ Adjustment ...108 Ⅵ Electronic Speed Control - If Equipped ...101 ▫ Headlights, Parking Lights, Panel Lights ...101 ▫ Daytime Running Lights (Canada And Fleet Vehicles Only) ...102 ▫ Lights-On Reminder ...102 ▫ Fog Lights - If Equipped...
... ▫ Adjustable Head Restraints ...93 ▫ Manual Rotary Lumbar Support Adjustment - If Equipped ...108 ▫ Adjustment ...108 Ⅵ Electronic Speed Control - If Equipped ...101 ▫ Headlights, Parking Lights, Panel Lights ...101 ▫ Daytime Running Lights (Canada And Fleet Vehicles Only) ...102 ▫ Lights-On Reminder ...102 ▫ Fog Lights - If Equipped...

Owner Manual Diesel
Page 75
Annoying headlight glare can be reduced by moving the small control under the mirror to center on the view through the rear window. UNDERSTANDING THE FEATURES OF YOUR VEHICLE 75 MIRRORS Inside Mirror The mirror should be adjusted while set in the day position (toward rear of vehicle). The mirror should be adjusted to the night position (toward windshield). 3
Annoying headlight glare can be reduced by moving the small control under the mirror to center on the view through the rear window. UNDERSTANDING THE FEATURES OF YOUR VEHICLE 75 MIRRORS Inside Mirror The mirror should be adjusted while set in the day position (toward rear of vehicle). The mirror should be adjusted to the night position (toward windshield). 3


