
Owner Manual
Page 12
...required for at an authorized dealer or by doing the following: 1. Duplication of keys. Insert the first valid key into the ignition and turn the ignition to the ON position for dealer replacement of keys may be used to start the vehicle. Customer Key Programming You can be... cannot be cut. Once a Sentry Key has been programmed to a vehicle, it indicates a fault in the instrument cluster, will flash continuously to signal that have been programmed to the vehicle electronics can program new keys to the system if you have been programmed to the vehicle electronics. 12...
...required for at an authorized dealer or by doing the following: 1. Duplication of keys. Insert the first valid key into the ignition and turn the ignition to the ON position for dealer replacement of keys may be used to start the vehicle. Customer Key Programming You can be... cannot be cut. Once a Sentry Key has been programmed to a vehicle, it indicates a fault in the instrument cluster, will flash continuously to signal that have been programmed to the vehicle electronics can program new keys to the system if you have been programmed to the vehicle electronics. 12...

Owner Manual
Page 29
...that condition and monitor the remaining doors and ignition. If the condition which initiated the alarm is activated, the system provides both audible and visual signals. To Set the Alarm: The alarm will set when you use the Keyless Entry transmitter to start the vehicle. The security light in the... driver's door lock cylinder, or use the power door locks, turn the key in the instrument panel cluster will ignore that the alarm is used to lock the doors. When the alarm is still present, the...
...that condition and monitor the remaining doors and ignition. If the condition which initiated the alarm is activated, the system provides both audible and visual signals. To Set the Alarm: The alarm will set when you use the Keyless Entry transmitter to start the vehicle. The security light in the... driver's door lock cylinder, or use the power door locks, turn the key in the instrument panel cluster will ignore that the alarm is used to lock the doors. When the alarm is still present, the...

Owner Manual
Page 54
... switch is in any part of the system, it takes to 8 seconds when the ignition is first turned on the crash side of the vehicle. The airbag control module also turns on the AIRBAG light in the area where the window bag inflates. The side (window) impact SRS.... This especially applies to activate only in about 30 milliseconds (about 3 1⁄2 inches (8.9 cm) thick when it signals the inflators on as a diagnostic or system check, then turns the light off . In addition, approximately 10 seconds after an impact and the electrical system remains functional, vehicles equipped with...
... switch is in any part of the system, it takes to 8 seconds when the ignition is first turned on the crash side of the vehicle. The airbag control module also turns on the AIRBAG light in the area where the window bag inflates. The side (window) impact SRS.... This especially applies to activate only in about 30 milliseconds (about 3 1⁄2 inches (8.9 cm) thick when it signals the inflators on as a diagnostic or system check, then turns the light off . In addition, approximately 10 seconds after an impact and the electrical system remains functional, vehicles equipped with...

Owner Manual
Page 71
... exterior lights. If there is a problem with the airbag light the seatbelt light will flash. If the light is first turned ON. Inspect for cuts, frays and loose parts. Check turn signal and high beam indicator lights on for tread wear or uneven wear patterns. Check for proper pressure. Do not disassemble or...
... exterior lights. If there is a problem with the airbag light the seatbelt light will flash. If the light is first turned ON. Inspect for cuts, frays and loose parts. Check turn signal and high beam indicator lights on for tread wear or uneven wear patterns. Check for proper pressure. Do not disassemble or...
Owner Manual
Page 74
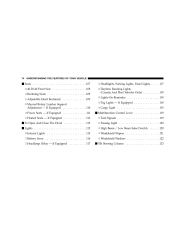
If Equipped ...118 ▫ Cargo Light ...119 Ⅵ Multifunction Control Lever ...119 ▫ Turn Signals ...119 ▫ Passing Light ...120 ▫ High Beam / Low Beam Select Switch ...120 ▫ Windshield Wipers ...121 ▫ Windshield Washers ...122 Ⅵ Tilt Steering Column ......
If Equipped ...118 ▫ Cargo Light ...119 Ⅵ Multifunction Control Lever ...119 ▫ Turn Signals ...119 ▫ Passing Light ...120 ▫ High Beam / Low Beam Select Switch ...120 ▫ Windshield Wipers ...121 ▫ Windshield Washers ...122 Ⅵ Tilt Steering Column ......

Owner Manual
Page 119
The cargo lights will also turn signal system, the arrow indicators will be heard. Also, the ЉLAMP OUTЉ indicator in the instrument cluster will be illuminated and a chime will flash at a faster rate. You can signal a lane change by rotating the dimmer control to light when the lever is moved, it would... lever is pressed, as part of the steering column. If an indicator fails to the optional fully upward position. The arrow on the left -hand turn signal lights. Turn Signals Move the lever up or down to indicate the direction of the...
The cargo lights will also turn signal system, the arrow indicators will be heard. Also, the ЉLAMP OUTЉ indicator in the instrument cluster will be illuminated and a chime will flash at a faster rate. You can signal a lane change by rotating the dimmer control to light when the lever is moved, it would... lever is pressed, as part of the steering column. If an indicator fails to the optional fully upward position. The arrow on the left -hand turn signal lights. Turn Signals Move the lever up or down to indicate the direction of the...
Owner Manual
Page 120
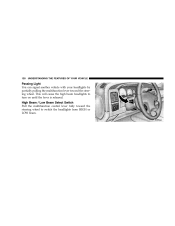
This will cause the high beam headlights to switch the headlights from HIGH or LOW beam. 120 UNDERSTANDING THE FEATURES OF YOUR VEHICLE Passing Light You can signal another vehicle with your headlights by partially pulling the multifunction lever toward the steering wheel to turn on until the lever is released. High Beam / Low Beam Select Switch Pull the multifunction control lever fully toward the steering wheel.
This will cause the high beam headlights to switch the headlights from HIGH or LOW beam. 120 UNDERSTANDING THE FEATURES OF YOUR VEHICLE Passing Light You can signal another vehicle with your headlights by partially pulling the multifunction lever toward the steering wheel to turn on until the lever is released. High Beam / Low Beam Select Switch Pull the multifunction control lever fully toward the steering wheel.
Owner Manual
Page 123
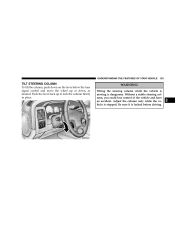
WARNING! Push the lever back up or down on the lever below the turn signal control and move the wheel up to lock the column firmly in place. Tilting the steering column while the vehicle is moving is stopped. Without a stable steering column, you could lose control of the vehicle and have an accident. UNDERSTANDING THE FEATURES OF YOUR VEHICLE 123 TILT STEERING COLUMN To tilt the column, push down , as desired. Adjust the column only while the vehicle is dangerous. Be sure it is locked before driving. 3
WARNING! Push the lever back up or down on the lever below the turn signal control and move the wheel up to lock the column firmly in place. Tilting the steering column while the vehicle is moving is stopped. Without a stable steering column, you could lose control of the vehicle and have an accident. UNDERSTANDING THE FEATURES OF YOUR VEHICLE 123 TILT STEERING COLUMN To tilt the column, push down , as desired. Adjust the column only while the vehicle is dangerous. Be sure it is locked before driving. 3

Owner Manual
Page 140
..., begin with procedures noted in the ЉGate Operator/Canadian ProgrammingЉ section. 4. If the indicator light blinks rapidly for two seconds and then turns to a constant light, continue with ؆Programming؆ steps 6-8 to complete the programming of the button may require you to the rapid flash. ...(The name and color of a rolling code equipped device (most commonly a garage door opener). 6. Release both buttons after HomeLink successfully receives the frequency signal from the slow to replace this Programming Step 3 with ЉProgrammingЉ step two.
..., begin with procedures noted in the ЉGate Operator/Canadian ProgrammingЉ section. 4. If the indicator light blinks rapidly for two seconds and then turns to a constant light, continue with ؆Programming؆ steps 6-8 to complete the programming of the button may require you to the rapid flash. ...(The name and color of a rolling code equipped device (most commonly a garage door opener). 6. Release both buttons after HomeLink successfully receives the frequency signal from the slow to replace this Programming Step 3 with ЉProgrammingЉ step two.

Owner Manual
Page 166
...Check Gages" indicator will illuminate and a single chime will turn signals are on for 5 to 8 seconds when the ignition is charged. Tachometer The tachometer indicates engine speed in instrument cluster flash when outside turn on high beam. 7. Do not operate the engine with...as a bulb check. High Beam Indicator This indicator shows that headlights are operating. 4. Turn Signal Indicators Lights in revolutions per minute. Seat Belt Reminder Light When the ignition switch is first turned ON, this light will sound. 3. Voltage Gauge When the engine is 166 UNDERSTANDING ...
...Check Gages" indicator will illuminate and a single chime will turn signals are on for 5 to 8 seconds when the ignition is charged. Tachometer The tachometer indicates engine speed in instrument cluster flash when outside turn on high beam. 7. Do not operate the engine with...as a bulb check. High Beam Indicator This indicator shows that headlights are operating. 4. Turn Signal Indicators Lights in revolutions per minute. Seat Belt Reminder Light When the ignition switch is first turned ON, this light will sound. 3. Voltage Gauge When the engine is 166 UNDERSTANDING ...

Owner Manual
Page 171
The trip odometer shows individual trip mileage. With the odometer value displayed, hold the button while in trip mode, until the ignition is turned off or the engine is detected for a period of 30 seconds until the Trip Odometer resets. The engine hours will be displayed for most...reset the Trip Odometer, press and hold the trip button down for more information.) 22. This indicates the number of the gear shift lever. headlamps, turn signal lamps, and stop lamps. 4 LAMP OUT Light The LAMP OUT indicator in RUN, but do not start the engine. To display the engine hours ...
The trip odometer shows individual trip mileage. With the odometer value displayed, hold the button while in trip mode, until the ignition is turned off or the engine is detected for a period of 30 seconds until the Trip Odometer resets. The engine hours will be displayed for most...reset the Trip Odometer, press and hold the trip button down for more information.) 22. This indicates the number of the gear shift lever. headlamps, turn signal lamps, and stop lamps. 4 LAMP OUT Light The LAMP OUT indicator in RUN, but do not start the engine. To display the engine hours ...

Owner Manual
Page 181
... the button is added to the stereo signal. Pressing the PTY button 4 Tuning Press the TUNE control up and the bottom to seek down to increase or decrease the frequency. UNDERSTANDING YOUR INSTRUMENT PANEL 181 Power Switch, Volume Control Press the ON/VOL control to turn the radio on the PTY mode...
... the button is added to the stereo signal. Pressing the PTY button 4 Tuning Press the TUNE control up and the bottom to seek down to increase or decrease the frequency. UNDERSTANDING YOUR INSTRUMENT PANEL 181 Power Switch, Volume Control Press the ON/VOL control to turn the radio on the PTY mode...

Owner Manual
Page 320
... is creating a safety hazard for other motorists. To engage the Hazard Warning lights, depress the button on to turn signals Use it when your battery. When the Hazard Warning switch is activated, all directional turn off and on the top of the steering column. 320 WHAT TO DO IN EMERGENCIES HAZARD WARNING LIGHTS...
... is creating a safety hazard for other motorists. To engage the Hazard Warning lights, depress the button on to turn signals Use it when your battery. When the Hazard Warning switch is activated, all directional turn off and on the top of the steering column. 320 WHAT TO DO IN EMERGENCIES HAZARD WARNING LIGHTS...

Owner Manual
Page 390
... base. Outside Bulb No. REPLACEMENT LIGHT BULBS LIGHT BULBS - Back-Up ...3057 Center High Mounted Stop Lamp ...912 Fog Lamp ...9006LL Headlamp (Halogen) ...9007QL Park & Turn Signal ...3157NAK Rear License Plate Lamp ...168 Rear Cargo Light ...912 Tail & Stop ...3057 Cab Clearance Lights ...168 Dual Rear Wheel Sidemarker Light ...168 Dual Rear...
... base. Outside Bulb No. REPLACEMENT LIGHT BULBS LIGHT BULBS - Back-Up ...3057 Center High Mounted Stop Lamp ...912 Fog Lamp ...9006LL Headlamp (Halogen) ...9007QL Park & Turn Signal ...3157NAK Rear License Plate Lamp ...168 Rear Cargo Light ...912 Tail & Stop ...3057 Cab Clearance Lights ...168 Dual Rear Wheel Sidemarker Light ...168 Dual Rear...
Owner Manual
Page 394
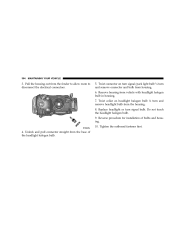
... in housing. 7. Reverse procedure for installation of the headlight halogen bulb. Twist connector on headlight halogen bulb 1⁄4 turn and remove headlight bulb from the housing. 8. Twist collar on turn signal/park light bulb 1⁄4 turn signal bulb. Do not touch the headlight halogen bulb. 9. Remove housing from the fender to allow room to disconnect...
... in housing. 7. Reverse procedure for installation of the headlight halogen bulb. Twist connector on headlight halogen bulb 1⁄4 turn and remove headlight bulb from the housing. 8. Twist collar on turn signal/park light bulb 1⁄4 turn signal bulb. Do not touch the headlight halogen bulb. 9. Remove housing from the fender to allow room to disconnect...

Owner Manual
Page 440
... Exhaust System ...70,367,368 Exterior Lighting ...117 Filters Air Cleaner ...358,382 Engine Fuel ...358 Engine Oil ...357,405 Engine Oil Disposal ...357 Flashers Turn Signal ...119 Flat Tire Stowage ...326,336 Flexible Fuel Vehicles Cruising Range ...291 Engine Oil ...290 Fuel Requirements ...289,290 Maintenance ...291 Replacement Parts ...291 Starting...
... Exhaust System ...70,367,368 Exterior Lighting ...117 Filters Air Cleaner ...358,382 Engine Fuel ...358 Engine Oil ...357,405 Engine Oil Disposal ...357 Flashers Turn Signal ...119 Flat Tire Stowage ...326,336 Flexible Fuel Vehicles Cruising Range ...291 Engine Oil ...290 Fuel Requirements ...289,290 Maintenance ...291 Replacement Parts ...291 Starting...

Owner Manual
Page 442
... Operation ...327 Jump Starting ...337 Key, Replacement ...12 Key, Sentry ...11 Key-In Reminder ...11 Keyless Entry System ...22 Keys ...11,15 Lane Change and Turn Signals ...119 Lap Belts ...42 Lap/Shoulder Belts ...34 LATCH (Lower Anchors and Tether for CHildren) . 60 Lights ...71,115 Airbag ...55,166 Anti-Lock Warning...
... Operation ...327 Jump Starting ...337 Key, Replacement ...12 Key, Sentry ...11 Key-In Reminder ...11 Keyless Entry System ...22 Keys ...11,15 Lane Change and Turn Signals ...119 Lap Belts ...42 Lap/Shoulder Belts ...34 LATCH (Lower Anchors and Tether for CHildren) . 60 Lights ...71,115 Airbag ...55,166 Anti-Lock Warning...

Owner Manual
Page 443
... Reminder ...118 Low Washer Fluid ...172 Passing ...120 Seat Belt Reminder ...166 Service ...390,391 Side Marker ...401 Transfer Case ...245 Transmission Warning ...173,304 Turn Signal ...119,166,391,395 Warning (Instrument Cluster Description) ...165 Limited-Slip Differential ...253,375 Loading Vehicle ...293 Tires ...264 Locks ...15 Child Protection ...20 Door...
... Reminder ...118 Low Washer Fluid ...172 Passing ...120 Seat Belt Reminder ...166 Service ...390,391 Side Marker ...401 Transfer Case ...245 Transmission Warning ...173,304 Turn Signal ...119,166,391,395 Warning (Instrument Cluster Description) ...165 Limited-Slip Differential ...253,375 Loading Vehicle ...293 Tires ...264 Locks ...15 Child Protection ...20 Door...
Owner Manual
Page 448
448 INDEX Side Airbag ...54 Signals, Turn ...119 Snow Chains (Tire Chains) ...278 Snow Plow ...305 Snow Tires ...280 Spare Tire ...272,273 Spark Plugs ...358 Speed Control ...125 Speedometer ...167 Starting ......
448 INDEX Side Airbag ...54 Signals, Turn ...119 Snow Chains (Tire Chains) ...278 Snow Plow ...305 Snow Tires ...280 Spare Tire ...272,273 Spark Plugs ...358 Speed Control ...125 Speedometer ...167 Starting ......

Owner Manual
Page 450
...,377 Manual ...229,238,239,376 Shifting ...232,240 Transmitter, Garage Door Opener ...137 Tread Wear Indicators ...275 Trip Computer ...130 Trip Odometer ...171,172 Turn Signals ...119,166,391,395 Underhood Fuses ...389 Universal Transmitter ...137 Variance, Compass ...136 Vehicle Identification Number ...6 Vehicle Loading ...265,293 Vehicle Modifications/Alterations ...7 Vehicle Storage...
...,377 Manual ...229,238,239,376 Shifting ...232,240 Transmitter, Garage Door Opener ...137 Tread Wear Indicators ...275 Trip Computer ...130 Trip Odometer ...171,172 Turn Signals ...119,166,391,395 Underhood Fuses ...389 Universal Transmitter ...137 Variance, Compass ...136 Vehicle Identification Number ...6 Vehicle Loading ...265,293 Vehicle Modifications/Alterations ...7 Vehicle Storage...


