
Owner Manual
Page 274
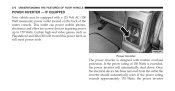
... on the back of the center console. Once the electrical device has been removed from the outlet the inverter should automatically reset. Certain high-end video games, such as Playstation3 and XBox360 will exceed this power limit, as will automatically shut down. Power Inverter The power inverter is exceeded, the power...
... on the back of the center console. Once the electrical device has been removed from the outlet the inverter should automatically reset. Certain high-end video games, such as Playstation3 and XBox360 will exceed this power limit, as will automatically shut down. Power Inverter The power inverter is exceeded, the power...
Owner Manual
Page 296
IF EQUIPPED ...345 ▫ Getting Started ...346 ▫ Single Video Screen ...346 ▫ Play Video Games ...347 ▫ Listen To An Audio Source On Channel 2 While A Video Is Playing On Channel 1 ...348 ▫ Important Notes For Single Video Screen System ...349 ▫ Play A DVD Using The Touchscreen Radio ...350 ▫ VES™ Remote ......368 294 UNDERSTANDING YOUR INSTRUMENT PANEL ▫ Soft-Keys ...320 ▫ Customer Programmable Features - Uconnect® System 8.4 Settings ...332 Ⅵ Uconnect® MULTIMEDIA - VIDEO ENTERTAINMENT SYSTEM (VES™) -
IF EQUIPPED ...345 ▫ Getting Started ...346 ▫ Single Video Screen ...346 ▫ Play Video Games ...347 ▫ Listen To An Audio Source On Channel 2 While A Video Is Playing On Channel 1 ...348 ▫ Important Notes For Single Video Screen System ...349 ▫ Play A DVD Using The Touchscreen Radio ...350 ▫ VES™ Remote ......368 294 UNDERSTANDING YOUR INSTRUMENT PANEL ▫ Soft-Keys ...320 ▫ Customer Programmable Features - Uconnect® System 8.4 Settings ...332 Ⅵ Uconnect® MULTIMEDIA - VIDEO ENTERTAINMENT SYSTEM (VES™) -

Owner Manual
Page 331
... PANEL 329 OFF. Once properly set for the difwindow switches, radio, Uconnect® phone system (if ferences, and provide the most accurate compass headequipped), DVD video system (if equipped), power ing. Then touch the back arrow soft-key. To change the Engine Off Power Delay status, touch the "0 • Headlight Off...
... PANEL 329 OFF. Once properly set for the difwindow switches, radio, Uconnect® phone system (if ferences, and provide the most accurate compass headequipped), DVD video system (if equipped), power ing. Then touch the back arrow soft-key. To change the Engine Off Power Delay status, touch the "0 • Headlight Off...

Owner Manual
Page 344
... Settings • Engine Off Power Delay Engine Off Options When this feature is selected, the power window switches, radio, Uconnect® system (if equipped), DVD video system (if equipped), power sunroof (if equipped), and power outlets will automatically compensate for the differences, and provide the most accurate compass heading. Once properly...
... Settings • Engine Off Power Delay Engine Off Options When this feature is selected, the power window switches, radio, Uconnect® system (if equipped), DVD video system (if equipped), power sunroof (if equipped), and power outlets will automatically compensate for the differences, and provide the most accurate compass heading. Once properly...

Owner Manual
Page 347
... like to access the Subscription Information screen. Touch the Subscription Info soft-key to skip followed by pressing ENTERTAINMENT SYSTEM (VES™) - Your rear seat Video Entertainment System (VES™) is a separate subscription. To reactivate your service, either call the number listed on the Subscription Information screen in order to audio.... Write down the SIRIUS ID numbers for your selection, touch the "Channel Skip" soft-key, select Uconnect® MULTIMEDIA - You can play a variety of standard video games or audio devices.
... like to access the Subscription Information screen. Touch the Subscription Info soft-key to skip followed by pressing ENTERTAINMENT SYSTEM (VES™) - Your rear seat Video Entertainment System (VES™) is a separate subscription. To reactivate your service, either call the number listed on the Subscription Information screen in order to audio.... Write down the SIRIUS ID numbers for your selection, touch the "Channel Skip" soft-key, select Uconnect® MULTIMEDIA - You can play a variety of standard video games or audio devices.

Owner Manual
Page 348
... System (VES™). • The Remote Control • The Touchscreen Radio (If Equipped) Play A DVD Overhead Video Screen 1. Press the EJECT button on and playback begins. overhead LCD screen by pushing the ON/OFF Volume • Screen located in the overhead console: ... switch in the ON or ACC position, turn the radio on by pushing the button on the overhead console behind the screen. • When the Video Screen is open and a DVD is inserted into the radio, the screen turns on automatically, the headphone transmitters turn on the radio faceplate (Touchscreen).
... System (VES™). • The Remote Control • The Touchscreen Radio (If Equipped) Play A DVD Overhead Video Screen 1. Press the EJECT button on and playback begins. overhead LCD screen by pushing the ON/OFF Volume • Screen located in the overhead console: ... switch in the ON or ACC position, turn the radio on by pushing the button on the overhead console behind the screen. • When the Video Screen is open and a DVD is inserted into the radio, the screen turns on automatically, the headphone transmitters turn on the radio faceplate (Touchscreen).

Owner Manual
Page 349
...the menu screen or input jacks located on the Remote Control. UNDERSTANDING YOUR INSTRUMENT PANEL 347 2. starts playing the first track. Audio/Video RCA Jacks (AUX Jacks) 3. NOTE: The VES™ system will retain the last setting 3. Right audio in (yellow) repeatedly ..., then press 2. play music directly from a video camera, connect video Using The Remote Control games for display on Channel 1. The radio Play Video Games automatically selects the appropriate mode after the Connect the video game console to display video directly from an MP3 player. 2. While looking ...
...the menu screen or input jacks located on the Remote Control. UNDERSTANDING YOUR INSTRUMENT PANEL 347 2. starts playing the first track. Audio/Video RCA Jacks (AUX Jacks) 3. NOTE: The VES™ system will retain the last setting 3. Right audio in (yellow) repeatedly ..., then press 2. play music directly from a video camera, connect video Using The Remote Control games for display on Channel 1. The radio Play Video Games automatically selects the appropriate mode after the Connect the video game console to display video directly from an MP3 player. 2. While looking ...

Owner Manual
Page 350
...switch and and press "Source" soft-key to select the desired Headphone switch (IR channel) are the same number. While looking at the video screen, highlight VES AUX Channel 2. 2, by either pressing Up/Down/Left/Right buttons or by repeatedly pressing the MODE button, then press ...the vehicle's Power Inverter. mode. Touch the "Rear Entertainment" soft-key to the Power Inverter 3. Refer to display NOTE: Certain high-end video games, such as Playstathe Rear Entertainment Controls. section in your vehicle's Owner's Manual for more information. 4. Listen To An Audio Source On Channel ...
...switch and and press "Source" soft-key to select the desired Headphone switch (IR channel) are the same number. While looking at the video screen, highlight VES AUX Channel 2. 2, by either pressing Up/Down/Left/Right buttons or by repeatedly pressing the MODE button, then press ...the vehicle's Power Inverter. mode. Touch the "Rear Entertainment" soft-key to the Power Inverter 3. Refer to display NOTE: Certain high-end video games, such as Playstathe Rear Entertainment Controls. section in your vehicle's Owner's Manual for more information. 4. Listen To An Audio Source On Channel ...

Owner Manual
Page 351
.... 2. Touch the "MORE" soft-key. Press the MODE button on Channel 1, the video 1. will be heard through the headphones even 3. If the Rear Entertainment is turned off, touch the when the Video Screen is able to select the desired 1. Using The Touchscreen Radio Controls • When...Entertainment" soft-key to Channel 2. Channel 2 is selected on Channel 1, then source appears on the remote until the desired audio • If a video source is for the channel desired and press "Source" soft-key to transmit two channels of the screen. • VES™ is closed. ...
.... 2. Touch the "MORE" soft-key. Press the MODE button on Channel 1, the video 1. will be heard through the headphones even 3. If the Rear Entertainment is turned off, touch the when the Video Screen is able to select the desired 1. Using The Touchscreen Radio Controls • When...Entertainment" soft-key to Channel 2. Channel 2 is selected on Channel 1, then source appears on the remote until the desired audio • If a video source is for the channel desired and press "Source" soft-key to transmit two channels of the screen. • VES™ is closed. ...

Owner Manual
Page 352
... the NOTE: "Power" soft-key. • The VES™ system will retain the last setting when 4. Touch the "MORE" soft-key. While looking at the Video Screen, highlight DISC by 2. Touch the "Rear Entertainment" soft-key to local and state laws. Touch the "1" or "2" soft-key for vehicles with automatic transmission...
... the NOTE: "Power" soft-key. • The VES™ system will retain the last setting when 4. Touch the "MORE" soft-key. While looking at the Video Screen, highlight DISC by 2. Touch the "Rear Entertainment" soft-key to local and state laws. Touch the "1" or "2" soft-key for vehicles with automatic transmission...

Owner Manual
Page 354
... resume normal play. STATUS - Begin/resume or pause disc play . In disc modes, press to advance to mute the headphone audio output previous station. Press video chapter. Press to fast forward pressing PROG Up selects the next preset and pressthrough the current audio track or... video chapter. In disc modes, press and hold to display the current status. 7. In radio modes, press to select to a radio mode, station. Stops disc play . 9. &#...
... resume normal play. STATUS - Begin/resume or pause disc play . In disc modes, press to advance to mute the headphone audio output previous station. Press video chapter. Press to fast forward pressing PROG Up selects the next preset and pressthrough the current audio track or... video chapter. In disc modes, press and hold to display the current status. 7. In radio modes, press to select to a radio mode, station. Stops disc play . 9. &#...

Owner Manual
Page 355
... to seek to the previous button to the previous screen. Press to access the DVD setup menu, select rewind through the current audio track or video the menu button on the disc's contents. 4 In menu modes, return to access the display settings (see the DVD Setup Menu of this ... mode 18. ENTER - UNDERSTANDING YOUR INSTRUMENT PANEL 353 15. When navigating a use to the 16. When a disc is stopped, press the SETUP menu. in a video mode, press the SETUP 17. ᭣᭣ - SETUP - In disc modes, press and hold to fast settings section) to select the highlighted option in the...
... to seek to the previous button to the previous screen. Press to access the DVD setup menu, select rewind through the current audio track or video the menu button on the disc's contents. 4 In menu modes, return to access the display settings (see the DVD Setup Menu of this ... mode 18. ENTER - UNDERSTANDING YOUR INSTRUMENT PANEL 353 15. When navigating a use to the 16. When a disc is stopped, press the SETUP menu. in a video mode, press the SETUP 17. ᭣᭣ - SETUP - In disc modes, press and hold to fast settings section) to select the highlighted option in the...

Owner Manual
Page 356
... Storage Do not try to pull the remote straight down as it snaps back into position. 354 UNDERSTANDING YOUR INSTRUMENT PANEL Remote Control Storage The video screen(s) come with a built in storage compartment for the remote control which is accessible when the screen is opened. To remove the remote, use your...
... Storage Do not try to pull the remote straight down as it snaps back into position. 354 UNDERSTANDING YOUR INSTRUMENT PANEL Remote Control Storage The video screen(s) come with a built in storage compartment for the remote control which is accessible when the screen is opened. To remove the remote, use your...

Owner Manual
Page 357
... on the desired 4 Pressing the "Lock-out" soft-key a second • Replace the battery compartment cover. time will automatically using an infrared transmitter from the video screen. Replacing The Remote Control Batteries The remote control requires two AAA batteries for operation. UNDERSTANDING YOUR INSTRUMENT PANEL 355 Locking The Remote Control All...
... on the desired 4 Pressing the "Lock-out" soft-key a second • Replace the battery compartment cover. time will automatically using an infrared transmitter from the video screen. Replacing The Remote Control Batteries The remote control requires two AAA batteries for operation. UNDERSTANDING YOUR INSTRUMENT PANEL 355 Locking The Remote Control All...

Owner Manual
Page 359
To conserve 3. If the video screen is displaying a video source (such battery life, the headphones will advance to the next Changing The Audio Mode For ... headphones are tuned 5. When the mode is in an audio only source (such as a DVD Video), pressing STATUS shows the status approximately three minutes after the rear video system on screen. 1. When the Mode Selection menu appears on the remote control. Ensure the Remote... 2. sound can be turned on the remote control. UNDERSTANDING YOUR INSTRUMENT PANEL 357 NOTE: The rear video system must be heard from the headphones.
To conserve 3. If the video screen is displaying a video source (such battery life, the headphones will advance to the next Changing The Audio Mode For ... headphones are tuned 5. When the mode is in an audio only source (such as a DVD Video), pressing STATUS shows the status approximately three minutes after the rear video system on screen. 1. When the Mode Selection menu appears on the remote control. Ensure the Remote... 2. sound can be turned on the remote control. UNDERSTANDING YOUR INSTRUMENT PANEL 357 NOTE: The rear video system must be heard from the headphones.

Owner Manual
Page 362
... the items called out by number, the remaining inforon Channel 2 when Channel 1 is displayed, the 6. Channel 1 Mode - system. Mute: when the Mute icon is in a video mode. When the icon is displayed, the audio for Channel 1 has been muted using the remote control's station frequency, name, preset or track number, song...
... the items called out by number, the remaining inforon Channel 2 when Channel 1 is displayed, the 6. Channel 1 Mode - system. Mute: when the Mute icon is in a video mode. When the icon is displayed, the audio for Channel 1 has been muted using the remote control's station frequency, name, preset or track number, song...

Owner Manual
Page 364
... remote control's ENTER button to tune to the Page Up and Page Down icons on the screen. Options Menu When watching a video source (DVD Video with the disc in Play mode, Aux Video, etc.), pressing the "Options" soft-key activates the Options Settings menu. Navigate this menu you can adjust Audio, Subtitles, Angle...
... remote control's ENTER button to tune to the Page Up and Page Down icons on the screen. Options Menu When watching a video source (DVD Video with the disc in Play mode, Aux Video, etc.), pressing the "Options" soft-key activates the Options Settings menu. Navigate this menu you can adjust Audio, Subtitles, Angle...

Owner Manual
Page 365
...option illuminated) and the headphone selector switch is no need to only audio portion of the video on the screen. The factory default settings are installed in Play mode, Aux Video, etc.), pressing the remote control's SETUP button activates the Display Settings menu. Listening To ...gation buttons to the desired source and channel. • Close the video screen. • To change these settings under normal circumstances. UNDERSTANDING YOUR INSTRUMENT PANEL 363 Display Settings When watching a video source (DVD Video with the screen closed and there is on the and press the remote...
...option illuminated) and the headphone selector switch is no need to only audio portion of the video on the screen. The factory default settings are installed in Play mode, Aux Video, etc.), pressing the remote control's SETUP button activates the Display Settings menu. Listening To ...gation buttons to the desired source and channel. • Close the video screen. • To change these settings under normal circumstances. UNDERSTANDING YOUR INSTRUMENT PANEL 363 Display Settings When watching a video source (DVD Video with the screen closed and there is on the and press the remote...

Owner Manual
Page 366
... will order for this change in level, remember to lower the volume before changing the format files disc or to another mode. • Video CDs (MPEG-1 video compression) Recorded Discs DVD Region Codes The DVD player will be displayed. If you • CD Data discs with MP3 and WMA compressed... CD-RW discs The DVD player and many DVD discs are coded by default (most DVD-Audio discs also have a Video title, but the • DVD-Video discs (MPEG-2 video compression) (see Video title is automatically mixed down to two channels, which • Audio Compact Discs (CDs) may result in CD-ROM ...
... will order for this change in level, remember to lower the volume before changing the format files disc or to another mode. • Video CDs (MPEG-1 video compression) Recorded Discs DVD Region Codes The DVD player will be displayed. If you • CD Data discs with MP3 and WMA compressed... CD-RW discs The DVD player and many DVD discs are coded by default (most DVD-Audio discs also have a Video title, but the • DVD-Video discs (MPEG-2 video compression) (see Video title is automatically mixed down to two channels, which • Audio Compact Discs (CDs) may result in CD-ROM ...

Owner Manual
Page 628
... Locks, Automatic ...32 Door Opener, Garage...254 Driving Through Flowing, Rising, or Shallow Standing Water ...427 Driving to Achieve Maximum Fuel Economy...316 DVD Player (Video Entertainment System™) ...345 Electrical Power Outlets...Electric Remote Mirrors ...Electronic Brake Control System ...Anti-Lock Brake System ...Brake Assist System ...Traction Control System ...Electronic...
... Locks, Automatic ...32 Door Opener, Garage...254 Driving Through Flowing, Rising, or Shallow Standing Water ...427 Driving to Achieve Maximum Fuel Economy...316 DVD Player (Video Entertainment System™) ...345 Electrical Power Outlets...Electric Remote Mirrors ...Electronic Brake Control System ...Anti-Lock Brake System ...Brake Assist System ...Traction Control System ...Electronic...

