Owner's Manual
Page 30
... information about the controls and displays that contribute to the daily operation of your Honda. Tachometer...37 Odometer...37 Trip Meter...37 Temperature Gauge...38 Fuel Gauge...38 Maintenance Required Indicator...38 Controls Near the Steering Wheel...39 Headlights...40 Daytime Running Lights...40 Instrument Panel Brightness...41 Turn Signals...41 Windshield...
... information about the controls and displays that contribute to the daily operation of your Honda. Tachometer...37 Odometer...37 Trip Meter...37 Temperature Gauge...38 Fuel Gauge...38 Maintenance Required Indicator...38 Controls Near the Steering Wheel...39 Headlights...40 Daytime Running Lights...40 Instrument Panel Brightness...41 Turn Signals...41 Windshield...

Owner's Manual
Page 35
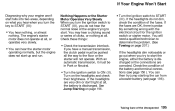
..., since other time, it indicates a possible problem in . Only on for a few seconds when you are signalling. Low Fuel Indicator This light comes on the headlights or release the parking brake. CRUISE CONTROL Shift Lever Position Indicator (Automatic Transmission only) Cruise Control Indicator This indicator between the tachometer and speedometer shows... which shift position the shift lever is burned out (see that you set . Avoid rapid acceleration and have the transmission checked by an authorized Honda dealer as soon as a reminder that you turn on as possible.
..., since other time, it indicates a possible problem in . Only on for a few seconds when you are signalling. Low Fuel Indicator This light comes on the headlights or release the parking brake. CRUISE CONTROL Shift Lever Position Indicator (Automatic Transmission only) Cruise Control Indicator This indicator between the tachometer and speedometer shows... which shift position the shift lever is burned out (see that you set . Avoid rapid acceleration and have the transmission checked by an authorized Honda dealer as soon as a reminder that you turn on as possible.
Owner's Manual
Page 38
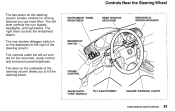
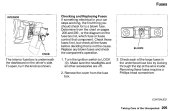
The rear window defogger switch is on the underside of the steering column. The controls under the left lever controls the turn signals, headlights, and high beams. The right lever controls the windshield wipers. The lever on the dashboard to tilt the steering wheel. The left air vent are ... column contain controls for the moonroof, cruise control and instrument panel brightness. CRUISE CONTROL INSTRUMENT PANEL BRIGHTNESS REAR WINDOW DEFOGGER WINDSHIELD WIPERS/WASHERS MOONROOF SWITCH HEADLIGHTS/ TURN SIGNALS TILT ADJUSTMENT HAZARD WARNING LIGHTS Instruments and Controls
The rear window defogger switch is on the underside of the steering column. The controls under the left lever controls the turn signals, headlights, and high beams. The right lever controls the windshield wipers. The lever on the dashboard to tilt the steering wheel. The left air vent are ... column contain controls for the moonroof, cruise control and instrument panel brightness. CRUISE CONTROL INSTRUMENT PANEL BRIGHTNESS REAR WINDOW DEFOGGER WINDSHIELD WIPERS/WASHERS MOONROOF SWITCH HEADLIGHTS/ TURN SIGNALS TILT ADJUSTMENT HAZARD WARNING LIGHTS Instruments and Controls
Owner's Manual
Page 39
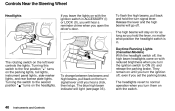
... on the turn signal lever until you turn the ignition off, even if you set the parking brake. Daytime Running Lights (Canadian Models) With the headlight switch off . Turning the switch to ON (II) and release the parking brake. The high beams will stay on for as long as you hold... signal lever. The blue high beam indicator will go . To flash the high beams, pull back and hold the lever, no matter what position the headlight switch is in ACCESSORY (I) or LOCK (0), you will hear a reminder chime when you open the driver's door. Release the lever and the high beams will...
... on the turn signal lever until you turn the ignition off, even if you set the parking brake. Daytime Running Lights (Canadian Models) With the headlight switch off . Turning the switch to ON (II) and release the parking brake. The high beams will stay on for as long as you hold... signal lever. The blue high beam indicator will go . To flash the high beams, pull back and hold the lever, no matter what position the headlight switch is in ACCESSORY (I) or LOCK (0), you will hear a reminder chime when you open the driver's door. Release the lever and the high beams will...
Owner's Manual
Page 60
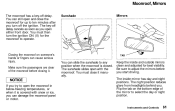
... moonroof to select the day or night position. Make sure the passengers are clear of the mirror to operate. The night position reduces glare from headlights behind you open either front door. Instruments and Controls You can cause serious injury. Keep the inside mirror has day and night positions. Be sure...
... moonroof to select the day or night position. Make sure the passengers are clear of the mirror to operate. The night position reduces glare from headlights behind you open either front door. Instruments and Controls You can cause serious injury. Keep the inside mirror has day and night positions. Be sure...
Owner's Manual
Page 122
... are important in Bad Weather Visibility - This is low, you can cause you to moment. Keep the windshield washer reservoir full of traction on your headlights. Use the defrosters and air conditioning to see page 76). Traction - To be as slippery as ice. "Clear" roads can have patches of ice, so...
... are important in Bad Weather Visibility - This is low, you can cause you to moment. Keep the windshield washer reservoir full of traction on your headlights. Use the defrosters and air conditioning to see page 76). Traction - To be as slippery as ice. "Clear" roads can have patches of ice, so...

Owner's Manual
Page 135
... . Check its operation weekly. See page 157. See page 150 . See page 162. Check the radiator reserve tank every time you are unsure of the headlights, parking lights, taillights, high-mount brake light, turn to perform any check, turn signals, brake lights, and license plate lights monthly. Check the fluid level...
... . Check its operation weekly. See page 157. See page 150 . See page 162. Check the radiator reserve tank every time you are unsure of the headlights, parking lights, taillights, high-mount brake light, turn to perform any check, turn signals, brake lights, and license plate lights monthly. Check the fluid level...
Owner's Manual
Page 145
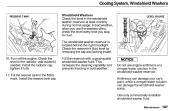
..., tighten it fully. 11. Install the reserve tank cap. Use only commercially-available windshield washer fluid. The windshield washer reservoir is located behind the right headlight. Fill the reserve tank to the MAX mark. Check the reservoir's fluid level by removing the cap and looking inside. Cooling System, Windshield Washers RESERVE...
..., tighten it fully. 11. Install the reserve tank cap. Use only commercially-available windshield washer fluid. The windshield washer reservoir is located behind the right headlight. Fill the reserve tank to the MAX mark. Check the reservoir's fluid level by removing the cap and looking inside. Cooling System, Windshield Washers RESERVE...
Owner's Manual
Page 166
... out, replace them as soon as possible. If you find any bulbs are replacing the bulb that is needed. Maintenance Check the following: Headlights (low and high beam) Parking lights Taillights Brake lights High-mount brake light Turn signals Back-up lights Hazard light function License plate light ... lights (Canadian cars) If you touch the glass, clean it by reducing your car's visibility and the ability to other drivers. Replacing a Headlight Bulb Your car has two bulbs on page 215 to determine what type of your intentions to signal your car's exterior lights at least once...
... out, replace them as soon as possible. If you find any bulbs are replacing the bulb that is needed. Maintenance Check the following: Headlights (low and high beam) Parking lights Taillights Brake lights High-mount brake light Turn signals Back-up lights Hazard light function License plate light ... lights (Canadian cars) If you touch the glass, clean it by reducing your car's visibility and the ability to other drivers. Replacing a Headlight Bulb Your car has two bulbs on page 215 to determine what type of your intentions to signal your car's exterior lights at least once...

Owner's Manual
Page 167
Lights NOTICE Halogen headlight bulbs get very hot when lit. Make sure it onequarter turn clockwise. 5. Remove the bulb by squeezing the connector to unlock the tab while you ... the radiator reserve tank. 2. BULB 4. Insert the new bulb into the hole and turn it one-quarter turn counterclockwise. If you push down on the headlights to overheat and shatter. Maintenance TAB 7. (Passenger's side) Reinstall the radiator reserve tank. 1. Push the electrical connector back onto the bulb. Open the hood. Turn...
Lights NOTICE Halogen headlight bulbs get very hot when lit. Make sure it onequarter turn clockwise. 5. Remove the bulb by squeezing the connector to unlock the tab while you ... the radiator reserve tank. 2. BULB 4. Insert the new bulb into the hole and turn it one-quarter turn counterclockwise. If you push down on the headlights to overheat and shatter. Maintenance TAB 7. (Passenger's side) Reinstall the radiator reserve tank. 1. Push the electrical connector back onto the bulb. Open the hood. Turn...

Owner's Manual
Page 171
... 5. Remove the socket from the socket by pulling out the back edge and sliding the assembly backwards. 3. Tighten the mounting screw securely. Turn on the headlights to loosen the side marker assembly mounting screw. 2. Turn it clockwise to lock it counterclockwise. 4. Install the new bulb. Maintenance SCREW 1. Insert the socket in...
... 5. Remove the socket from the socket by pulling out the back edge and sliding the assembly backwards. 3. Tighten the mounting screw securely. Turn on the headlights to loosen the side marker assembly mounting screw. 2. Turn it clockwise to lock it counterclockwise. 4. Install the new bulb. Maintenance SCREW 1. Insert the socket in...
Owner's Manual
Page 192
...try to start the engine, either the battery is discharged or the connections are corroded. Turn on page 196 . See Jump Starting on the headlights and check their brightness. Check the condition of the battery and terminal connections (see page 196). The engine's starter motor does not operate at... the starter motor operating normally, but the engine does not start . With an automatic transmission, it must be in Park or Neutral. If the headlights do not hear the normal noise of clicks, or nothing . If you have a manual transmission, the clutch pedal must be pushed all , the...
...try to start the engine, either the battery is discharged or the connections are corroded. Turn on page 196 . See Jump Starting on the headlights and check their brightness. Check the condition of the battery and terminal connections (see page 196). The engine's starter motor does not operate at... the starter motor operating normally, but the engine does not start . With an automatic transmission, it must be in Park or Neutral. If the headlights do not hear the normal noise of clicks, or nothing . If you have a manual transmission, the clutch pedal must be pushed all , the...
Owner's Manual
Page 202
... working, the first thing you should check for is not the cause. Check each of the Unexpected Determine from the fuse box. Make sure the headlights and all the fuses before deciding that component. Remove the cover from the chart on pages 208 and 209 , or the diagram on the driver...
... working, the first thing you should check for is not the cause. Check each of the Unexpected Determine from the fuse box. Make sure the headlights and all the fuses before deciding that component. Remove the cover from the chart on pages 208 and 209 , or the diagram on the driver...
Owner's Manual
Page 222
... Bulb Replacement Back-up Lights...172 Brake Lights...174 Ceiling Light...176 Front Parking Lights...171 Front Side Marker Lights...171 Headlights...168 High-mount Brake Light...174 License Plate Lights...174 Rear Side Marker Lights...173 Specifications...214 Turn Signal Lights...170 Bulbs, Halogen...169 Carbon ...
... Bulb Replacement Back-up Lights...172 Brake Lights...174 Ceiling Light...176 Front Parking Lights...171 Front Side Marker Lights...171 Headlights...168 High-mount Brake Light...174 License Plate Lights...174 Rear Side Marker Lights...173 Specifications...214 Turn Signal Lights...170 Bulbs, Halogen...169 Carbon ...

Owner's Manual
Page 223
... Do...196 Defects, Reporting Safety...28 Defogger, Rear Window...43 Defrosting the Windows...76 DEXRON® II Automatic Transmission Fluid...148 Dimensions...214 Dimming the Headlights...40 Dipstick Automatic Transmission...148 Economy, Fuel...108 Emergencies on the Road...187 Battery, Jump Starting...196 Changing a Flat Tire...189 Charging System Indicator...201...
... Do...196 Defects, Reporting Safety...28 Defogger, Rear Window...43 Defrosting the Windows...76 DEXRON® II Automatic Transmission Fluid...148 Dimensions...214 Dimming the Headlights...40 Dipstick Automatic Transmission...148 Economy, Fuel...108 Emergencies on the Road...187 Battery, Jump Starting...196 Changing a Flat Tire...189 Charging System Indicator...201...
Owner's Manual
Page 224
......102 Filter...154 Gauge...38 Octane Requirement...102, X Tank, Filling the...104 Gas Station Procedures...104 Gauges Engine Coolant Temperature ...38 Halogen Headlight Bulbs...169 Hazard Warning Flashers...43 Headlights...40 Daytime Running Lights...40 High Beam Indicator...36 High Beams, Turning on...40 Low Beams, Turning on ...40 Reminder Chime...40...
......102 Filter...154 Gauge...38 Octane Requirement...102, X Tank, Filling the...104 Gas Station Procedures...104 Gauges Engine Coolant Temperature ...38 Halogen Headlight Bulbs...169 Hazard Warning Flashers...43 Headlights...40 Daytime Running Lights...40 High Beam Indicator...36 High Beams, Turning on...40 Low Beams, Turning on ...40 Reminder Chime...40...


