Owner's Manual
Page 13
... keep you during any additional impacts that can hurt you if you of a possible problem with the system. They offer no protection in a crash. Emergency power backup in case your car's electrical system is disconnected in rear impacts, side impacts, rollovers, or moderate frontal collisions. An airbag opens with an airbag...
... keep you during any additional impacts that can hurt you if you of a possible problem with the system. They offer no protection in a crash. Emergency power backup in case your car's electrical system is disconnected in rear impacts, side impacts, rollovers, or moderate frontal collisions. An airbag opens with an airbag...
Owner's Manual
Page 30
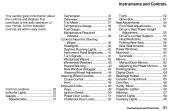
... Window Defogger...43 Steering Wheel Adjustment...44 Steering Wheel Controls ...46 Cruise Control...46 Horn...49 Keys and Locks...49 Keys...49 Ignition Switch...50 Power Door Locks...51 Childproof Door Locks...52 Trunk...52 Glove Box...53 Seat Adjustments...54 Front Seat Adjustments...54 Driver's Seat......33 Gauges...37 Speedometer...37 Instruments and Controls This section gives information about the controls and displays that contribute to the daily operation of your Honda. All the essential controls are within easy reach.
... Window Defogger...43 Steering Wheel Adjustment...44 Steering Wheel Controls ...46 Cruise Control...46 Horn...49 Keys and Locks...49 Keys...49 Ignition Switch...50 Power Door Locks...51 Childproof Door Locks...52 Trunk...52 Glove Box...53 Seat Adjustments...54 Front Seat Adjustments...54 Driver's Seat......33 Gauges...37 Speedometer...37 Instruments and Controls This section gives information about the controls and displays that contribute to the daily operation of your Honda. All the essential controls are within easy reach.

Owner's Manual
Page 31
Control Locations MIRROR CONTROLS (P.62) DOOR LOCK SWITCH (P.51) POWER WINDOW SWITCH (P.59) DIGITAL CLOCK (P.64) HEATING/COOLING CONTROL (P.70) AUDIO SYSTEM (P.77) FUEL FILL DOOR RELEASE (P.104) TRUNK RELEASE HANDLE (P.52) HOOD RELEASE HANDLE (P.105) Instruments and Controls
Control Locations MIRROR CONTROLS (P.62) DOOR LOCK SWITCH (P.51) POWER WINDOW SWITCH (P.59) DIGITAL CLOCK (P.64) HEATING/COOLING CONTROL (P.70) AUDIO SYSTEM (P.77) FUEL FILL DOOR RELEASE (P.104) TRUNK RELEASE HANDLE (P.52) HOOD RELEASE HANDLE (P.105) Instruments and Controls
Owner's Manual
Page 50
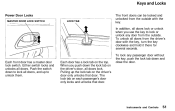
..., and up the lock tab on the top. Either switch locks and unlocks all doors from the driver's door with the key. Keys and Locks Power Door Locks MASTER DOOR LOCK SWITCH LOCK TAB The front doors can be locked and unlocked from the outside .
..., and up the lock tab on the top. Either switch locks and unlocks all doors from the driver's door with the key. Keys and Locks Power Door Locks MASTER DOOR LOCK SWITCH LOCK TAB The front doors can be locked and unlocked from the outside .

Owner's Manual
Page 54
Seat Adjustments Driver's Seat Power Height Adjustment Reclining the seat-back can decrease the protection you can slide under the seat belt and be seriously injured. Pull up the switch ... seat belt in the seat. Doing this several times adjusts the lumbar support through its full range. You can get from your driver's seat is power adjustable. Adjust the seat-back to an upright position and sit well back in a crash.
Seat Adjustments Driver's Seat Power Height Adjustment Reclining the seat-back can decrease the protection you can slide under the seat belt and be seriously injured. Pull up the switch ... seat belt in the seat. Doing this several times adjusts the lumbar support through its full range. You can get from your driver's seat is power adjustable. Adjust the seat-back to an upright position and sit well back in a crash.

Owner's Manual
Page 58
... only partially, push the window switch down on the window switch. To open any window. DRIVER'S WINDOW SWITCH MAIN SWITCH The driver's armrest has a master power window control panel. The AUTO function only works to raise or lower any of the passengers' windows, push down lightly and hold it... . Power Windows Only on LX and EX models in the U.S., and EX and EX-R models in Canada Your car's windows are electricallypowered. Release the switch when ...
... only partially, push the window switch down on the window switch. To open any window. DRIVER'S WINDOW SWITCH MAIN SWITCH The driver's armrest has a master power window control panel. The AUTO function only works to raise or lower any of the passengers' windows, push down lightly and hold it... . Power Windows Only on LX and EX models in the U.S., and EX and EX-R models in Canada Your car's windows are electricallypowered. Release the switch when ...

Owner's Manual
Page 59
...you can cause serious injury. The MAIN switch does not affect the driver's window. With this switch off the ignition. Moonroof Closing a power window on the dashboard to ten minutes after you have children in the car so they do not injure themselves by operating the windows ...unintentionally. The ignition must turn off , the passengers' windows cannot be ON (II). Power Windows, Moonroof The MAIN switch controls power to open and close the moonroof, press and hold the switch. Keep the MAIN switch off when you turn the ignition...
...you can cause serious injury. The MAIN switch does not affect the driver's window. With this switch off the ignition. Moonroof Closing a power window on the dashboard to ten minutes after you have children in the car so they do not injure themselves by operating the windows ...unintentionally. The ignition must turn off , the passengers' windows cannot be ON (II). Power Windows, Moonroof The MAIN switch controls power to open and close the moonroof, press and hold the switch. Keep the MAIN switch off when you turn the ignition...

Owner's Manual
Page 61
... down. 4. Move the selector switch to move a mirror out of the adjustment switch to L (driver's side) or R (passenger's side). 3. Mirrors Manual Door Mirrors Adjusting the Power Mirrors SELECTOR SWITCH ADJUSTMENT SWITCH Only on the driver's door armrest: 1. Turn the ignition switch ON (II). 2. Instruments and Controls On U.S. When you can be...
... down. 4. Move the selector switch to move a mirror out of the adjustment switch to L (driver's side) or R (passenger's side). 3. Mirrors Manual Door Mirrors Adjusting the Power Mirrors SELECTOR SWITCH ADJUSTMENT SWITCH Only on the driver's door armrest: 1. Turn the ignition switch ON (II). 2. Instruments and Controls On U.S. When you can be...

Owner's Manual
Page 98
.... Use the Preset buttons to enter the correct code. Complete the five-digit sequence, then enter the correct code. Your original settings were lost when power was disconnected. Comfort and Convenience Features EX and Canadian EX-R models Your car's audio system will need the system's serial number. If you should happen... this Owner's Manual. If you will have three tries to enter the five-digit code. If you are hundreds of number combinations possible from electrical power for one of a card that lists your Honda dealer contact American...
.... Use the Preset buttons to enter the correct code. Complete the five-digit sequence, then enter the correct code. Your original settings were lost when power was disconnected. Comfort and Convenience Features EX and Canadian EX-R models Your car's audio system will need the system's serial number. If you should happen... this Owner's Manual. If you will have three tries to enter the five-digit code. If you are hundreds of number combinations possible from electrical power for one of a card that lists your Honda dealer contact American...

Owner's Manual
Page 117
... D3 when towing a trailer in hilly terrain, or to Second, press the release button on a slippery surface or in the lower gear. Whenever you more power when climbing, and increased engine braking when going down steep hills. To shift from cycling between third and fourth gears in second gear.
... D3 when towing a trailer in hilly terrain, or to Second, press the release button on a slippery surface or in the lower gear. Whenever you more power when climbing, and increased engine braking when going down steep hills. To shift from cycling between third and fourth gears in second gear.

Owner's Manual
Page 119
... indicators. Apply the brakes moderately to stop with front disc brakes. If you will begin screeching all the time. The Braking System Your Honda is connected with the right-rear brake, etc.). Each circuit works diagonally across the car (the left-front brake is equipped with wet brakes... lightly, causing them gently and frequently until they do not have the brake pads replaced, they feel normal. Since a longer distance is power-assisted to reduce the effort needed to see if they will still have audible brake wear indicators. It also keeps your foot on all ...
... indicators. Apply the brakes moderately to stop with front disc brakes. If you will begin screeching all the time. The Braking System Your Honda is connected with the right-rear brake, etc.). Each circuit works diagonally across the car (the left-front brake is equipped with wet brakes... lightly, causing them gently and frequently until they do not have the brake pads replaced, they feel normal. Since a longer distance is power-assisted to reduce the effort needed to see if they will still have audible brake wear indicators. It also keeps your foot on all ...

Owner's Manual
Page 129
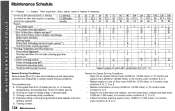
......148 5-speed Manual Transmission...149 Brake and Clutch Fluid...149 Brake System...150 Anti-lock Brake System...150 Clutch System...151 Power Steering...151 Air Cleaner...152 Fuel Filter...154 Spark Plugs...154 Replacement...154 Specification...156 Battery...156 Windshield Wipers...159 Air Conditioning...driving. See page 227 for normal and severe driving conditions show you can do yourself. The maintenance schedules for information on your Honda, you when these things need to be rewarded with safer, more complex maintenance on how to check them. You will be checked...
......148 5-speed Manual Transmission...149 Brake and Clutch Fluid...149 Brake System...150 Anti-lock Brake System...150 Clutch System...151 Power Steering...151 Air Cleaner...152 Fuel Filter...154 Spark Plugs...154 Replacement...154 Specification...156 Battery...156 Windshield Wipers...159 Air Conditioning...driving. See page 227 for normal and severe driving conditions show you can do yourself. The maintenance schedules for information on your Honda, you when these things need to be rewarded with safer, more complex maintenance on how to check them. You will be checked...
Owner's Manual
Page 132
... at slow speeds, such as a delivery vehicle. Replace engine oil and oil filter every 6,000 km (3,750 miles) or 3 months under condition D or E. Inspect the power steering system every 12,000 km (7,500 miles) or 6 months under condition B or C. Replace I - Maintenance Service for Severe Driving Conditions Clean the air cleaner element...
... at slow speeds, such as a delivery vehicle. Replace engine oil and oil filter every 6,000 km (3,750 miles) or 3 months under condition D or E. Inspect the power steering system every 12,000 km (7,500 miles) or 6 months under condition B or C. Replace I - Maintenance Service for Severe Driving Conditions Clean the air cleaner element...

Owner's Manual
Page 135
... check the following items at the specified intervals. If weather conditions cause you stop for fuel. See page 162. See page 107. Brakes, clutch and power steering - Lights -
... check the following items at the specified intervals. If weather conditions cause you stop for fuel. See page 162. See page 107. Brakes, clutch and power steering - Lights -
Owner's Manual
Page 136
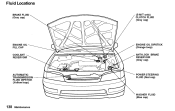
Fluid Locations BRAKE FLUID (Gray cap) (5-M/T only) CLUTCH FLUID (Gray cap) ENGINE OIL FILL CAP COOLANT RESERVOIR ENGINE OIL DIPSTICK (Orange loop) ANTI-LOCK BRAKE RESERVOIR (Gray cap) AUTOMATIC TRANSMISSION FLUID DIPSTICK (Yellow loop) POWER STEERING FLUID (Red cap) WASHER FLUID (Blue cap) Maintenance
Fluid Locations BRAKE FLUID (Gray cap) (5-M/T only) CLUTCH FLUID (Gray cap) ENGINE OIL FILL CAP COOLANT RESERVOIR ENGINE OIL DIPSTICK (Orange loop) ANTI-LOCK BRAKE RESERVOIR (Gray cap) AUTOMATIC TRANSMISSION FLUID DIPSTICK (Yellow loop) POWER STEERING FLUID (Red cap) WASHER FLUID (Blue cap) Maintenance
Owner's Manual
Page 149
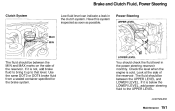
...sealed container specified for the brake system. If it up to the UPPER LEVEL. Brake and Clutch Fluid, Power Steering Clutch System Low fluid level can indicate a leak in the power steering reservoir monthly. Have this system inspected as soon as possible. CONTINUED Maintenance Check the level when the... engine is below the LOWER LEVEL, add power steering fluid to that level. Look at the side of the reservoir. You should be between the M I N and MAX marks on ...
...sealed container specified for the brake system. If it up to the UPPER LEVEL. Brake and Clutch Fluid, Power Steering Clutch System Low fluid level can indicate a leak in the power steering reservoir monthly. Have this system inspected as soon as possible. CONTINUED Maintenance Check the level when the... engine is below the LOWER LEVEL, add power steering fluid to that level. Look at the side of the reservoir. You should be between the M I N and MAX marks on ...

Owner's Manual
Page 150
... compressed air through it in the system. If you do not have the system inspected as soon as a gas station), ask your Honda dealer to normal air flow. NOTICE Turning the steering wheel to full left or right lock and holding it should be cleaned every 12...should also be replaced every 2 years or 48,000 km (30,000 miles), whichever comes first. Use only GENUINE HONDA Power Steering Fluid-V. A low power steering fluid level can damage the power steering pump. Under severe driving conditions, it there can indicate a leak in the opposite direction to do this service.
... compressed air through it in the system. If you do not have the system inspected as soon as a gas station), ask your Honda dealer to normal air flow. NOTICE Turning the steering wheel to full left or right lock and holding it should be cleaned every 12...should also be replaced every 2 years or 48,000 km (30,000 miles), whichever comes first. Use only GENUINE HONDA Power Steering Fluid-V. A low power steering fluid level can damage the power steering pump. Under severe driving conditions, it there can indicate a leak in the opposite direction to do this service.

Owner's Manual
Page 160
... let air out to match the specified cold pressure. Examine the edges of each belt by pushing on it with A / C ) 8.0-10.5 mm (0.31-0.41 in) Power steering belt: 13.0-16.0 mm (0.51-0.63 in the tires when they are hot (the car has been driven several miles), you will be considered... of the two engine belts. ALTERNATOR BELT Check the condition of wear or looseness, have the following "play" or deflection. Engine Belts, Tires Engine Belts POWER STEERING BELT Alternator belt: (On cars without A/C) 10.5-12.5 mm (0.41- 0.49 in) (On cars with your dealer adjust or replace the belts...
... let air out to match the specified cold pressure. Examine the edges of each belt by pushing on it with A / C ) 8.0-10.5 mm (0.31-0.41 in) Power steering belt: 13.0-16.0 mm (0.51-0.63 in the tires when they are hot (the car has been driven several miles), you will be considered... of the two engine belts. ALTERNATOR BELT Check the condition of wear or looseness, have the following "play" or deflection. Engine Belts, Tires Engine Belts POWER STEERING BELT Alternator belt: (On cars without A/C) 10.5-12.5 mm (0.41- 0.49 in) (On cars with your dealer adjust or replace the belts...

Owner's Manual
Page 176
This section gives you can do to clean and preserve your Honda helps to keep it "new" looking. Also included are several things you hints on how to help prevent corrosion. Exterior Care...180 Washing...180 Power Antenna Cleaning...180 Waxing...181 Aluminum Wheels...181 Paint Touch-up...182 Interior Care...183 Carpeting...
This section gives you can do to clean and preserve your Honda helps to keep it "new" looking. Also included are several things you hints on how to help prevent corrosion. Exterior Care...180 Washing...180 Power Antenna Cleaning...180 Waxing...181 Aluminum Wheels...181 Paint Touch-up...182 Interior Care...183 Carpeting...

Owner's Manual
Page 177
... not need waxing. Fill a bucket with a dry cloth and mild detergent. Remove these areas, even if the rest of the car does not need lubricating. Power Antenna Cleaning Twice a year, clean the antenna mast with cool water. Exterior Care Washing Frequent washing helps preserve your way down before you have washed...
... not need waxing. Fill a bucket with a dry cloth and mild detergent. Remove these areas, even if the rest of the car does not need lubricating. Power Antenna Cleaning Twice a year, clean the antenna mast with cool water. Exterior Care Washing Frequent washing helps preserve your way down before you have washed...


