
Owner's Manual
Page 33
Instruments and Controls This section gives information about the controls and displays that contribute to the daily operation of your Honda. All the essential controls are within easy reach. Tachometer...39 Odometer...39 Trip Meter...39 Temperature Gauge...40 Fuel Gauge...Manual Adjustments...58 Driver's Lumbar Support...59 Head Restraints...59 Folding Rear Seat...60 Rear Seat Armrest...62 Trunk Pass-through Cover...62 Power Windows...63 Moonroof...64 Mirrors...65 Adjusting the Power Mirrors...66 Parking Brake...67 Digital Clock...68 Beverage Holder...69 Vanity Mirror...69 Cigarette Lighter...
Instruments and Controls This section gives information about the controls and displays that contribute to the daily operation of your Honda. All the essential controls are within easy reach. Tachometer...39 Odometer...39 Trip Meter...39 Temperature Gauge...40 Fuel Gauge...Manual Adjustments...58 Driver's Lumbar Support...59 Head Restraints...59 Folding Rear Seat...60 Rear Seat Armrest...62 Trunk Pass-through Cover...62 Power Windows...63 Moonroof...64 Mirrors...65 Adjusting the Power Mirrors...66 Parking Brake...67 Digital Clock...68 Beverage Holder...69 Vanity Mirror...69 Cigarette Lighter...

Owner's Manual
Page 42
... off , even if you turn them on with the switch. Instruments and Controls Turning this switch to ON (II) and release the parking brake. They remain on until you turn the ignition switch to the first position turns on the left lever controls the lights. The rotating switch on... the parking lights, taillights, instrument panel lights, side-marker lights, and rear license plate lights. To flash the high beams, pull back and hold the lever, no matter what position the headlight switch is in. The ...
... off , even if you turn them on with the switch. Instruments and Controls Turning this switch to ON (II) and release the parking brake. They remain on until you turn the ignition switch to the first position turns on the left lever controls the lights. The rotating switch on... the parking lights, taillights, instrument panel lights, side-marker lights, and rear license plate lights. To flash the high beams, pull back and hold the lever, no matter what position the headlight switch is in. The ...

Owner's Manual
Page 61
...-back whenever the seat-back is in its upright position. To release the seat-back from inside the trunk, pull the release loop under the rear shelf. Never drive with the seat-back folded down . See Carbon Monoxide Hazard on page 111. Pull Instruments and Controls To lock the seat-back... back seat, are positioned in front of the seat. Make sure it firmly against the rear shelf. See Loading Cargo on page 29. Loose items can fly forward and cause injury if you have to brake hard. Seat Adjustments Make sure both rear shoulder belts are tied down and the trunk lid open.
...-back whenever the seat-back is in its upright position. To release the seat-back from inside the trunk, pull the release loop under the rear shelf. Never drive with the seat-back folded down . See Carbon Monoxide Hazard on page 111. Pull Instruments and Controls To lock the seat-back... back seat, are positioned in front of the seat. Make sure it firmly against the rear shelf. See Loading Cargo on page 29. Loose items can fly forward and cause injury if you have to brake hard. Seat Adjustments Make sure both rear shoulder belts are tied down and the trunk lid open.

Owner's Manual
Page 67
If you try to drive the car without releasing the parking brake, the ABS cannot work properly. Instruments and Controls PARKING BRAKE LEVER To apply the parking brake, pull the lever up slightly, push the button, and lower the lever. Parking Brake NOTICE Driving the car with the parking brake applied can damage the rear brakes and axles. The parking brake light on the instrument panel should go out when the parking brake is fully released (see page 36). To release it, pull up fully.
If you try to drive the car without releasing the parking brake, the ABS cannot work properly. Instruments and Controls PARKING BRAKE LEVER To apply the parking brake, pull the lever up slightly, push the button, and lower the lever. Parking Brake NOTICE Driving the car with the parking brake applied can damage the rear brakes and axles. The parking brake light on the instrument panel should go out when the parking brake is fully released (see page 36). To release it, pull up fully.

Owner's Manual
Page 121
... their effectiveness. When the brake pads need replacing, you apply the brakes. If you do . Check your foot on the rear brakes of the brakes when going down a long hill builds up heat. If not, apply them lightly. Do not confuse this with front disc brakes. The Braking System Your Honda is equipped with the brake wear indicators. Constant...
... their effectiveness. When the brake pads need replacing, you apply the brakes. If you do . Check your foot on the rear brakes of the brakes when going down a long hill builds up heat. If not, apply them lightly. Do not confuse this with front disc brakes. The Braking System Your Honda is equipped with the brake wear indicators. Constant...
Owner's Manual
Page 126
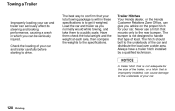
...is within these specifications is improperly installed, can cause damage to the underside of your car and trailer can seriously affect its steering and braking performance, causing a crash in which you normally would while towing, and take them check the total weight and the weight at each axle..., or the Honda Customer Relations Zone Office, can give you advice on the proper hitch for the size of load. Never use a hitch that mounts only to the rear bumper. Always have a trailer hitch installed by a qualified technician. Driving Towing a Trailer The best way to confirm that your...
...is within these specifications is improperly installed, can cause damage to the underside of your car and trailer can seriously affect its steering and braking performance, causing a crash in which you normally would while towing, and take them check the total weight and the weight at each axle..., or the Honda Customer Relations Zone Office, can give you advice on the proper hitch for the size of load. Never use a hitch that mounts only to the rear bumper. Always have a trailer hitch installed by a qualified technician. Driving Towing a Trailer The best way to confirm that your...

Owner's Manual
Page 128
...: Measure the trailer's tongue load. GROUND (BLACK) BACK-UP LIGHT (GREEN/BLACK) LEFT TURN SIGNAL (GREEN/BLUE) RIGHT TURN SIGNAL (GREEN/YELLOW) BRAKE LIGHT (GREEN/WHITE) TAILLIGHT (RED/BLACK) Your car has a trailer lighting connector in the car. Check that all tires on the car and trailer ...be different for the lights to work correctly. Towing a Trailer Before Starting Out As you are preparing to tow your car. Verify that the rear of each connector pin. Check the condition and air pressure of trailers, have a technician who is not sagging. Since the lighting and wiring...
...: Measure the trailer's tongue load. GROUND (BLACK) BACK-UP LIGHT (GREEN/BLACK) LEFT TURN SIGNAL (GREEN/BLUE) RIGHT TURN SIGNAL (GREEN/YELLOW) BRAKE LIGHT (GREEN/WHITE) TAILLIGHT (RED/BLACK) Your car has a trailer lighting connector in the car. Check that all tires on the car and trailer ...be different for the lights to work correctly. Towing a Trailer Before Starting Out As you are preparing to tow your car. Verify that the rear of each connector pin. Check the condition and air pressure of trailers, have a technician who is not sagging. Since the lighting and wiring...

Owner's Manual
Page 188
Lights Replacing a High-mount Brake Light Bulb 3. Remove the lens from the light assembly by pulling it straight out of its socket. Remove the burned-out bulb by turning it ... the trunk and remove the socket from the rubber seal and the metal cover. 3. Remove the two screws and remove the license light assembly. 2. Replacing a Rear License Bulb BULB 1. Make sure the new bulb is working. Maintenance
Lights Replacing a High-mount Brake Light Bulb 3. Remove the lens from the light assembly by pulling it straight out of its socket. Remove the burned-out bulb by turning it ... the trunk and remove the socket from the rubber seal and the metal cover. 3. Remove the two screws and remove the license light assembly. 2. Replacing a Rear License Bulb BULB 1. Make sure the new bulb is working. Maintenance

Owner's Manual
Page 192
... and trunk seals. If you store your car for 12 months or longer, have your Honda dealer perform the inspections called for in the maintenance schedule are several things you should be ...page 138). The replacements called for in Reverse (manual) or Park (automatic). Clean the interior. Block the rear wheels. Leave one made from a porous material such as cotton. Cover the car with a "breathable" car... they do to prepare it for storage. Leave the parking brake off the ground. Proper preparation helps prevent deterioration and makes it easier to the painted surfaces that ...
... and trunk seals. If you store your car for 12 months or longer, have your Honda dealer perform the inspections called for in the maintenance schedule are several things you should be ...page 138). The replacements called for in Reverse (manual) or Park (automatic). Clean the interior. Block the rear wheels. Leave one made from a porous material such as cotton. Cover the car with a "breathable" car... they do to prepare it for storage. Leave the parking brake off the ground. Proper preparation helps prevent deterioration and makes it easier to the painted surfaces that ...

Owner's Manual
Page 223
...towing service or, if you cannot shift the transmission or start the engine (automatic transmission), your Honda cannot be towed with hooks on the ground. Sling-type Equipment - If your car must be transported... with the front wheels on the ground, do the following: 5-speed Manual Transmission Release the parking brake. Shift to D4, then to Neutral. Shift the transmission to N. If you belong to lift or...of the frame or suspension and the cables lift that go under the tires (front or rear) and lift them off the engine. Your car's suspension and body can be transported on...
...towing service or, if you cannot shift the transmission or start the engine (automatic transmission), your Honda cannot be towed with hooks on the ground. Sling-type Equipment - If your car must be transported... with the front wheels on the ground, do the following: 5-speed Manual Transmission Release the parking brake. Shift to D4, then to Neutral. Shift the transmission to N. If you belong to lift or...of the frame or suspension and the cables lift that go under the tires (front or rear) and lift them off the engine. Your car's suspension and body can be transported on...

Owner's Manual
Page 230
... Canada. During braking, the ABS...slower than the others (on . The brakes then work like a conventional system without...and solenoids. There are turning during braking and comparing their speeds. When that...energizes the appropriate solenoid in the brake line going to that is pressurized...V-6 models in the brake pedal. The ABS works by a piston-type accumulator that wheel's brake caliper. The pulse ... have brake fluid under high pressure. Technical Information For...of the reduced braking effort, the .../solenoid unit. Anti-lock Brake System The Anti-lock Brake System (ABS) is standard...
... Canada. During braking, the ABS...slower than the others (on . The brakes then work like a conventional system without...and solenoids. There are turning during braking and comparing their speeds. When that...energizes the appropriate solenoid in the brake line going to that is pressurized...V-6 models in the brake pedal. The ABS works by a piston-type accumulator that wheel's brake caliper. The pulse ... have brake fluid under high pressure. Technical Information For...of the reduced braking effort, the .../solenoid unit. Anti-lock Brake System The Anti-lock Brake System (ABS) is standard...

Owner's Manual
Page 244
......187 Ceiling Light...194 Front Parking Lights...190 Front Side Marker Lights...190 Headlights...187 High-mount Brake Light...193 License Plate Lights...193 Rear Side Marker Lights...192 Specifications...235 Turn Signal Lights...189 Bulbs, Halogen...187 CAUTION, Explanation of...ii CD ...205 Changing Engine Coolant...153 Charging System Indicator...36, 217 Check Engine Light...37 Checking Automatic Transmission Fluid...159 Battery Condition...171 Brake Fluid...162 Clutch Fluid...163 Drive Belts...177 Engine Coolant...151 Engine Oil...145 Fuses...220 Manual Transmission Fluid...161 Power Steering...
......187 Ceiling Light...194 Front Parking Lights...190 Front Side Marker Lights...190 Headlights...187 High-mount Brake Light...193 License Plate Lights...193 Rear Side Marker Lights...192 Specifications...235 Turn Signal Lights...189 Bulbs, Halogen...187 CAUTION, Explanation of...ii CD ...205 Changing Engine Coolant...153 Charging System Indicator...36, 217 Check Engine Light...37 Checking Automatic Transmission Fluid...159 Battery Condition...171 Brake Fluid...162 Clutch Fluid...163 Drive Belts...177 Engine Coolant...151 Engine Oil...145 Fuses...220 Manual Transmission Fluid...161 Power Steering...

Owner's Manual
Page 246
..., Shifting the...117 Flashers, Hazard Warning...45 Flat Tire, Changing a...205 Fluids Automatic Transmission ..159, 160 Brake...161 Clutch...163 Manual Transmission...161 Power Steering...163 Windshield Washer...158 FM Stereo Radio Reception...91 Folding Rear Seat...60 Foreign Countries, Driving in...103 Four-way Flashers...45 Front End, Towing by Emergency...
..., Shifting the...117 Flashers, Hazard Warning...45 Flat Tire, Changing a...205 Fluids Automatic Transmission ..159, 160 Brake...161 Clutch...163 Manual Transmission...161 Power Steering...163 Windshield Washer...158 FM Stereo Radio Reception...91 Folding Rear Seat...60 Foreign Countries, Driving in...103 Four-way Flashers...45 Front End, Towing by Emergency...

Owner's Manual
Page 248
Index NOTICE, Explanation of...ii Numbers, Identification...228 Parking Brake...67 Parking Eights...36 Parking Over Things that Burn...239 PGM-FI System...238 Polishing and Waxing...197 Power Door Eocks...53 Mirrors...66 ...Overheating, Engine...214 Panel Brightness Control...43 Park Gear Position...120 Radiator Overheating...214 Radio/Cassette Sound System...81 Rear End Towing...225 Rear Eights, Bulb Replacement...191 Rear Seat, Folding...60 Rear View Mirror...65 Rear Window Defogger...45 Reclining the Seat Backs...57, 58 Recommended Shift Speeds ...117 Reminder Eights...35 Safety Belts...
Index NOTICE, Explanation of...ii Numbers, Identification...228 Parking Brake...67 Parking Eights...36 Parking Over Things that Burn...239 PGM-FI System...238 Polishing and Waxing...197 Power Door Eocks...53 Mirrors...66 ...Overheating, Engine...214 Panel Brightness Control...43 Park Gear Position...120 Radiator Overheating...214 Radio/Cassette Sound System...81 Rear End Towing...225 Rear Eights, Bulb Replacement...191 Rear Seat, Folding...60 Rear View Mirror...65 Rear Window Defogger...45 Reclining the Seat Backs...57, 58 Recommended Shift Speeds ...117 Reminder Eights...35 Safety Belts...


