
Owner's Manual
Page 1
...use dashboard and steering column controls. Instruments and Controls ...31 Instrument panel indicator and gauge, and how to navigate through this reference. Driving ...99 The proper way to ...the fuel pump. Appearance Care ...173 Tips on authorized manuals or go to www.helminc.com. 1997 Civic Coupe Online Reference Owner's Manual Contents Owner's Identification Introduction ...i A Few Words About Safety ...... gasoline to use and care of information you need when you need to take your new Honda, and how to order manuals and other technical literature. Things to start the engine, shift...
...use dashboard and steering column controls. Instruments and Controls ...31 Instrument panel indicator and gauge, and how to navigate through this reference. Driving ...99 The proper way to ...the fuel pump. Appearance Care ...173 Tips on authorized manuals or go to www.helminc.com. 1997 Civic Coupe Online Reference Owner's Manual Contents Owner's Identification Introduction ...i A Few Words About Safety ...... gasoline to use and care of information you need when you need to take your new Honda, and how to order manuals and other technical literature. Things to start the engine, shift...
Owner's Manual
Page 31
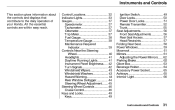
... Speedometer...37 Tachometer...37 Odometer...37 Trip Meter...37 Fuel Gauge...38 Temperature Gauge...38 Maintenance Required Indicator...39 Controls Near the Steering Wheel...40 Headlights...41 Daytime Running Lights...41 Instrument Panel Brightness...42 Turn Signals...42 Windshield ... controls are within easy reach. Instruments and Controls This section gives information about the controls and displays that contribute to the daily operation of your Honda.
... Speedometer...37 Tachometer...37 Odometer...37 Trip Meter...37 Fuel Gauge...38 Temperature Gauge...38 Maintenance Required Indicator...39 Controls Near the Steering Wheel...40 Headlights...41 Daytime Running Lights...41 Instrument Panel Brightness...42 Turn Signals...42 Windshield ... controls are within easy reach. Instruments and Controls This section gives information about the controls and displays that contribute to the daily operation of your Honda.
Owner's Manual
Page 37
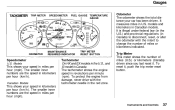
... regulations (in Canada) to disconnect, reset, or alter the odometer with the tachometer needle in the red zone. This shows your car has been driven. Gauges Odometer The odometer shows the total distance your speed in kilometers per hour (km/h). To reset it . TACHOMETER TRIP METER SPEEDOMETER FUEL...
... regulations (in Canada) to disconnect, reset, or alter the odometer with the tachometer needle in the red zone. This shows your car has been driven. Gauges Odometer The odometer shows the total distance your speed in kilometers per hour (km/h). To reset it . TACHOMETER TRIP METER SPEEDOMETER FUEL...

Owner's Manual
Page 38
In severe driving conditions, such as very hot weather or a long period of the road. Turn to the upper blue zone. The gauge stays at the same fuel level reading after you turn off the ignition. If it reaches the red (Hot) mark, pull safely to the side ... pointer may show slightly more or less than the actual amount when you turn the ignition back ON (II). Instruments and Controls Gauges Temperature Gauge This shows the temperature of the gauge. During normal operation, the pointer should rise from the bottom white mark to the new reading after you are driving on...
In severe driving conditions, such as very hot weather or a long period of the road. Turn to the upper blue zone. The gauge stays at the same fuel level reading after you turn off the ignition. If it reaches the red (Hot) mark, pull safely to the side ... pointer may show slightly more or less than the actual amount when you turn the ignition back ON (II). Instruments and Controls Gauges Temperature Gauge This shows the temperature of the gauge. During normal operation, the pointer should rise from the bottom white mark to the new reading after you are driving on...
Owner's Manual
Page 39
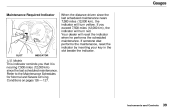
Models This indicator reminds you exceed 7,500 miles (12,000 km), the indicator will turn yellow. Gauges Maintenance Required Indicator When the distance driven since the last scheduled maintenance. Instruments and Controls Your dealer will turn red. SLOT INDICATOR U.S. Refer to the ...
Models This indicator reminds you exceed 7,500 miles (12,000 km), the indicator will turn yellow. Gauges Maintenance Required Indicator When the distance driven since the last scheduled maintenance. Instruments and Controls Your dealer will turn red. SLOT INDICATOR U.S. Refer to the ...
Owner's Manual
Page 45
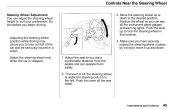
... can operate them safely. 2. The lever to lose control of the car and be seriously injured in a crash. Do this lever all the instrument panel gauges and warning lights.
... can operate them safely. 2. The lever to lose control of the car and be seriously injured in a crash. Do this lever all the instrument panel gauges and warning lights.

Owner's Manual
Page 72
... engine. Select and Fresh Air mode. 4. The light in the sun, you can cool it moves near the red zone, turn off the A/C until the gauge reads normally. Select and Recirculation mode. If it down to the desired speed. If the interior is all the way to maximum speed. 4. Open the... Cooling To Cool with A/C MODE BUTTONS RECIRCULATION BUTTON AIR CONDITIONING BUTTON 1. Start the engine. 2. Set the fan to the left , 3. Watch the engine coolant temperature gauge (see page 38) when driving in stop-and-go traffic or climbing a long, steep hill.
... engine. Select and Fresh Air mode. 4. The light in the sun, you can cool it moves near the red zone, turn off the A/C until the gauge reads normally. Select and Recirculation mode. If it down to the desired speed. If the interior is all the way to maximum speed. 4. Open the... Cooling To Cool with A/C MODE BUTTONS RECIRCULATION BUTTON AIR CONDITIONING BUTTON 1. Start the engine. 2. Set the fan to the left , 3. Watch the engine coolant temperature gauge (see page 38) when driving in stop-and-go traffic or climbing a long, steep hill.
Owner's Manual
Page 100
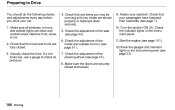
... the indicator lights in the instrument panel. 11.Start the engine (see page 101). 12.Check the gauges and indicator lights in the instrument panel (see page 61). 7. If a tire looks low, use a gauge to Drive You should do the following checks and adjustments every day before you inside and outside lights...
... the indicator lights in the instrument panel. 11.Start the engine (see page 101). 12.Check the gauges and indicator lights in the instrument panel (see page 61). 7. If a tire looks low, use a gauge to Drive You should do the following checks and adjustments every day before you inside and outside lights...
Owner's Manual
Page 140
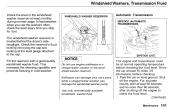
..., check the level every time you stop for fuel. For accurate results, wait at normal operating temperature before checking. 1. Drive the car at the level gauge attached to check the fluid level. Check the reservoir's fluid level by removing the cap and looking at least 10 miles (16 kilometers) before checking...
..., check the level every time you stop for fuel. For accurate results, wait at normal operating temperature before checking. 1. Drive the car at the level gauge attached to check the fluid level. Check the reservoir's fluid level by removing the cap and looking at least 10 miles (16 kilometers) before checking...
Owner's Manual
Page 155
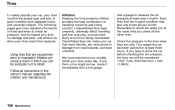
...can be seriously hurt or killed. Using tires that are excessively worn or improperly inflated can cause a crash in good condition with a tire gauge. Maintenance Inflation Keeping the tires properly inflated provides the best combination of handling, tread life and riding comfort. Even tires that you think a.... If you drive less than 1 mile (1.6km). Overinflated tires can make your tires every day. Follow all the other tires. Use a gauge to inspect your tires for at least once a month. Check the pressure in good condition may lose one to two psi per month. If...
...can be seriously hurt or killed. Using tires that are excessively worn or improperly inflated can cause a crash in good condition with a tire gauge. Maintenance Inflation Keeping the tires properly inflated provides the best combination of handling, tread life and riding comfort. Even tires that you think a.... If you drive less than 1 mile (1.6km). Overinflated tires can make your tires every day. Follow all the other tires. Use a gauge to inspect your tires for at least once a month. Check the pressure in good condition may lose one to two psi per month. If...
Owner's Manual
Page 156
... due to a tire problem and not due to self-seal if they are punctured. This will make it whenever you check your own tire pressure gauge and use it easier for high speed driving are shown on the driver's doorjamb. Tubeless tires have some ability to a variation between... gauges. The tire will be underinflated. These pressures are also given on the tire information label on page 207. Do not let air out to 40 ...
... due to a tire problem and not due to self-seal if they are punctured. This will make it whenever you check your own tire pressure gauge and use it easier for high speed driving are shown on the driver's doorjamb. Tubeless tires have some ability to a variation between... gauges. The tire will be underinflated. These pressures are also given on the tire information label on page 207. Do not let air out to 40 ...
Owner's Manual
Page 162
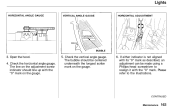
Lights HORIZONTAL ANGLE GAUGE VERTICAL ANGLE GAUGE HORIZONTAL ADJUSTMENT BUBBLE 3. CONTINUED Maintenance Open the hood. 4. The bubble should line up with its "0" mark as described, an adjustment can be centered underneath the longest scribe mark on the gauge. 5. Please refer to realign it with the "0" mark. The line on the adjustment screw indicator should be made using a Phillips-head screwdriver to the illustrations. Check the vertical angle gauge. Check the horizontal angle gauge. If either indicator is not aligned with the "0" mark on the gauge. 6.
Lights HORIZONTAL ANGLE GAUGE VERTICAL ANGLE GAUGE HORIZONTAL ADJUSTMENT BUBBLE 3. CONTINUED Maintenance Open the hood. 4. The bubble should line up with its "0" mark as described, an adjustment can be centered underneath the longest scribe mark on the gauge. 5. Please refer to realign it with the "0" mark. The line on the adjustment screw indicator should be made using a Phillips-head screwdriver to the illustrations. Check the vertical angle gauge. Check the horizontal angle gauge. If either indicator is not aligned with the "0" mark on the gauge. 6.
Owner's Manual
Page 186
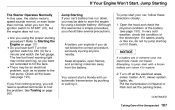
Do you do not try jump starting procedure? To jump start a Honda with a frozen battery can freeze. Open the hood and check the physical condition of the battery (see page 195). You cannot start your car's battery ... inside can cause it seems slushy or like a simple procedure, you should take several precautions. Refer to ON (II) for a minute and watch (he fuel gauge. CONTINUED Taking Care of the electrolyte. Although this case, the starter motor's speed sounds normal, or even faster than normal, when you turn the ignition...
Do you do not try jump starting procedure? To jump start a Honda with a frozen battery can freeze. Open the hood and check the physical condition of the battery (see page 195). You cannot start your car's battery ... inside can cause it seems slushy or like a simple procedure, you should take several precautions. Refer to ON (II) for a minute and watch (he fuel gauge. CONTINUED Taking Care of the electrolyte. Although this case, the starter motor's speed sounds normal, or even faster than normal, when you turn the ignition...
Owner's Manual
Page 188
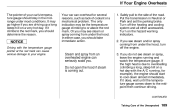
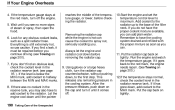
... for several reasons, such as lack of the Unexpected If you should determine the reason. Your car can cause serious damage to your car's temperature gauge should start to cool down to the midpoint then continue driving. In either case, you do not see steam or spray coming from under the... hood if steam is due to or above the red mark. If Your Engine Overheats The pointer of your engine. It may be the temperature gauge climbing to overloading (climbing a long, steep hill on the hazard warning indicators. 2. If it climbs to the side of the road. If you should...
... for several reasons, such as lack of the Unexpected If you should determine the reason. Your car can cause serious damage to your car's temperature gauge should start to cool down to the midpoint then continue driving. In either case, you do not see steam or spray coming from under the... hood if steam is due to or above the red mark. If Your Engine Overheats The pointer of your engine. It may be the temperature gauge climbing to overloading (climbing a long, steep hill on the hazard warning indicators. 2. If it climbs to the side of the road. If you should...
Owner's Manual
Page 189
... engine is hot can cause the coolant to spray out, seriously scalding you may also have to add coolant to the base of the temperature gauge, or lower, before removing the radiator cap. 9. After the pressure releases, push down , to halfway between the MIN and MAX marks. 8.... Run the engine and watch the temperature gauge. Using gloves or a large heavy cloth, turn the radiator cap counterclockwise, without pushing down on tightly. If the level is still extremely hot, ...
... engine is hot can cause the coolant to spray out, seriously scalding you may also have to add coolant to the base of the temperature gauge, or lower, before removing the radiator cap. 9. After the pressure releases, push down , to halfway between the MIN and MAX marks. 8.... Run the engine and watch the temperature gauge. Using gloves or a large heavy cloth, turn the radiator cap counterclockwise, without pushing down on tightly. If the level is still extremely hot, ...
Owner's Manual
Page 217
...109 Shift Lever Positions...109 Controls, Instruments and...31 Coolant Adding...136 Checking...95 Proper Solution...136 Replacing...138 Temperature Gauge...38 Corrosion Protection...177 Crankcase Emission Control System...209 Cruise Control Operation...46 Customer Relations Office...215 Defog and Defrost...73...Lamp...193 Manually Closing Moonroof...194 Overheated Engine...189 Emergency Brake...62 Emergency Flashers...44 Emission Controls...209 Engine Coolant Temperature Gauge ...38 Malfunction Indicator Lamp...35, 193 Oil Pressure Indicator...35, 191 Oil, What Kind to Use...132 Overheating...189...
...109 Shift Lever Positions...109 Controls, Instruments and...31 Coolant Adding...136 Checking...95 Proper Solution...136 Replacing...138 Temperature Gauge...38 Corrosion Protection...177 Crankcase Emission Control System...209 Cruise Control Operation...46 Customer Relations Office...215 Defog and Defrost...73...Lamp...193 Manually Closing Moonroof...194 Overheated Engine...189 Emergency Brake...62 Emergency Flashers...44 Emission Controls...209 Engine Coolant Temperature Gauge ...38 Malfunction Indicator Lamp...35, 193 Oil Pressure Indicator...35, 191 Oil, What Kind to Use...132 Overheating...189...
Owner's Manual
Page 218
..., Driving in...91 Four-way Flashers...44 Front End, Towing by Emergency Wrecker...200 Fuel...90 Fill Door and Cap...92 Gauge...38 Octane Requirement...90 Oxygenated...90 Reserve Indicator...36 Tank, Filling the...92 Fuses, Checking the...196 Tank, Filling the...92...Automatic Transmission...141 Brake...144 Clutch...144 Manual Transmission...143 Gas Mileage, Improving...96 Gasohol...91 Gasoline...90 Fuel Reserve Indicator...36 Gauge...38 Octane Requirement...90 Halogen Headlight Bulbs...164 Hazard Warning Flashers...44 Headlights Aiming...162 Daytime Running Lights...41 High Beam Indicator...
..., Driving in...91 Four-way Flashers...44 Front End, Towing by Emergency Wrecker...200 Fuel...90 Fill Door and Cap...92 Gauge...38 Octane Requirement...90 Oxygenated...90 Reserve Indicator...36 Tank, Filling the...92 Fuses, Checking the...196 Tank, Filling the...92...Automatic Transmission...141 Brake...144 Clutch...144 Manual Transmission...143 Gas Mileage, Improving...96 Gasohol...91 Gasoline...90 Fuel Reserve Indicator...36 Gauge...38 Octane Requirement...90 Halogen Headlight Bulbs...164 Hazard Warning Flashers...44 Headlights Aiming...162 Daytime Running Lights...41 High Beam Indicator...
Owner's Manual
Page 220
Index Maintenance Safety...122 Schedule...126-127 Malfunction Indicator Lamp . 35, 193 Manual Transmission...102 Manual Transmission Fluid ...143 Maximum Shift Speeds...103, 107 Meters, Gauges...37 Methanol in Gasoline...91 Mirrors, Adjusting...61 Moonroof...61 Closing Manually...194 Operation...61 Odometer...37 Odometer, Trip...37 Oil Change, How to...134 ...
Index Maintenance Safety...122 Schedule...126-127 Malfunction Indicator Lamp . 35, 193 Manual Transmission...102 Manual Transmission Fluid ...143 Maximum Shift Speeds...103, 107 Meters, Gauges...37 Methanol in Gasoline...91 Mirrors, Adjusting...61 Moonroof...61 Closing Manually...194 Operation...61 Odometer...37 Odometer, Trip...37 Oil Change, How to...134 ...
Owner's Manual
Page 222
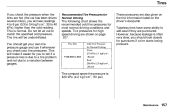
......167 Taking Care of the Unexpected ..179 Tape Player...82 Technical Descriptions Emission Control Systems...209 Three Way Catalytic Converter...211 Tire Information...206 Temperature Gauge...38 Tether Attachment Points...25 Three Way Catalytic Converter...211 Time, Setting the...81 Timing Belt...155 Tire Chains...161 Underside, Cleaning...177 Unexpected, Taking...
......167 Taking Care of the Unexpected ..179 Tape Player...82 Technical Descriptions Emission Control Systems...209 Three Way Catalytic Converter...211 Tire Information...206 Temperature Gauge...38 Tether Attachment Points...25 Three Way Catalytic Converter...211 Time, Setting the...81 Timing Belt...155 Tire Chains...161 Underside, Cleaning...177 Unexpected, Taking...


