Owner's Manual
Page 31
... Speedometer...37 Tachometer...37 Odometer...37 Trip Meter...37 Fuel Gauge...38 Temperature Gauge...38 Maintenance Required Indicator...39 Controls Near the Steering Wheel...40 Headlights...41 Daytime Running Lights...41 Instrument Panel Brightness...42 Turn Signals...42 Windshield Wipers...43 Windshield Washers...43 Hazard Warning...44 Rear Window Defogger...44... Light...66 Instruments and Controls Instruments and Controls This section gives information about the controls and displays that contribute to the daily operation of your Honda. All the essential controls are within easy reach.
... Speedometer...37 Tachometer...37 Odometer...37 Trip Meter...37 Fuel Gauge...38 Temperature Gauge...38 Maintenance Required Indicator...39 Controls Near the Steering Wheel...40 Headlights...41 Daytime Running Lights...41 Instrument Panel Brightness...42 Turn Signals...42 Windshield Wipers...43 Windshield Washers...43 Hazard Warning...44 Rear Window Defogger...44... Light...66 Instruments and Controls Instruments and Controls This section gives information about the controls and displays that contribute to the daily operation of your Honda. All the essential controls are within easy reach.

Owner's Manual
Page 35
... is a problem in the ABS. For complete information, see page 191. Driving with the high beam headlights. If this happens, take the car to your dealer check the braking system for information on the headlight controls. Malfunction Indicator Lamp See page 193. If this light comes on at any other time, there...
... is a problem in the ABS. For complete information, see page 191. Driving with the high beam headlights. If this happens, take the car to your dealer check the braking system for information on the headlight controls. Malfunction Indicator Lamp See page 193. If this light comes on at any other time, there...
Owner's Manual
Page 40
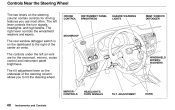
WINDSHIELD WIPERS/ WASHERS REAR WINDOW DEFOGGER CRUISE CONTROL INSTRUMENT PANEL BRIGHTNESS HAZARD WARNING LIGHTS MOONROOF MIRROR CONTROLS HEADLIGHTS/ TURN SIGNALS TILT ADJUSTMENT HORN Instruments and Controls The tilt adjustment lever on the underside of the center air vents. Controls Near the...features you to the right of the steering column allows you use most often. The controls under the left lever controls the turn signals, headlights, and high beams. The right lever controls the windshield washers and wipers. The rear window defogger switch is on the dashboard to tilt the...
WINDSHIELD WIPERS/ WASHERS REAR WINDOW DEFOGGER CRUISE CONTROL INSTRUMENT PANEL BRIGHTNESS HAZARD WARNING LIGHTS MOONROOF MIRROR CONTROLS HEADLIGHTS/ TURN SIGNALS TILT ADJUSTMENT HORN Instruments and Controls The tilt adjustment lever on the underside of the center air vents. Controls Near the...features you to the right of the steering column allows you use most often. The controls under the left lever controls the turn signals, headlights, and high beams. The right lever controls the windshield washers and wipers. The rear window defogger switch is on the dashboard to tilt the...

Owner's Manual
Page 41
... and go . They remain on until you hear a click, then let go off , even if you set the parking brake. Controls Near the Steering Wheel Headlights If you leave the lights on with the ignition switch in ACCESSORY (I) or LOCK (0), you will stay on for as long as you hold the... lever back, no matter what position the headlight switch is in. The high beams will light (see page 35). To flash the high beams, pull the turn the ignition off . To change between...
... and go . They remain on until you hear a click, then let go off , even if you set the parking brake. Controls Near the Steering Wheel Headlights If you leave the lights on with the ignition switch in ACCESSORY (I) or LOCK (0), you will stay on for as long as you hold the... lever back, no matter what position the headlight switch is in. The high beams will light (see page 35). To flash the high beams, pull the turn the ignition off . To change between...
Owner's Manual
Page 61
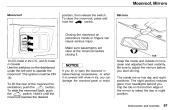
... under the left vent to operate the moonroof. To close the moonroof, press and hold the switch. Hold it . The night position reduces glare from headlights behind you start driving. Be sure to select the day or night position. The inside and outside mirrors clean and adjusted for ventilation, push the...
... under the left vent to operate the moonroof. To close the moonroof, press and hold the switch. Hold it . The night position reduces glare from headlights behind you start driving. Be sure to select the day or night position. The inside and outside mirrors clean and adjusted for ventilation, push the...
Owner's Manual
Page 118
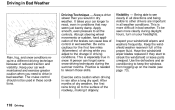
... snow-driving techniques during daylight hours, turn on the inside (see clearly in all directions and being visible to drive in dry weather. Keep your headlights. After months of dry weather, the first rains bring oil to the surface of driving while you adjust to react, even in bad weather. Driving...
... snow-driving techniques during daylight hours, turn on the inside (see clearly in all directions and being visible to drive in dry weather. Keep your headlights. After months of dry weather, the first rains bring oil to the surface of driving while you adjust to react, even in bad weather. Driving...
Owner's Manual
Page 120
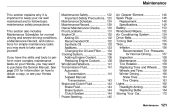
... Winter Driving...160 Snow Tires...161 Tire Chains...161 Lights...162 Headlight Aiming...162 Replacing Bulbs...164 Storing Your Car...172 Maintenance Maintenance This section explains why it is important to keep your Honda dealer. Maintenance Safety...122 Important Safety Precautions.. 123 Maintenance Schedule...152 Air Conditioning System...154 Drive Belts...155 Timing Belt...155 Tires...156 Inflation...156 Recommended Tire Pressures for information on your Honda, you may want to follow basic maintenance safety precautions. If you have the skills and tools to perform more complex ...
... Winter Driving...160 Snow Tires...161 Tire Chains...161 Lights...162 Headlight Aiming...162 Replacing Bulbs...164 Storing Your Car...172 Maintenance Maintenance This section explains why it is important to keep your Honda dealer. Maintenance Safety...122 Important Safety Precautions.. 123 Maintenance Schedule...152 Air Conditioning System...154 Drive Belts...155 Timing Belt...155 Tires...156 Inflation...156 Recommended Tire Pressures for information on your Honda, you may want to follow basic maintenance safety precautions. If you have the skills and tools to perform more complex ...
Owner's Manual
Page 129
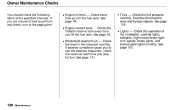
Tires - Owner Maintenance Checks You should check the following items at the specified intervals. If you are unsure of the headlights, parking lights, taillights, high-mount brake light, turn to use the washers frequently, check the reservoir each time you to the page given. See page ...
Tires - Owner Maintenance Checks You should check the following items at the specified intervals. If you are unsure of the headlights, parking lights, taillights, high-mount brake light, turn to use the washers frequently, check the reservoir each time you to the page given. See page ...
Owner's Manual
Page 140
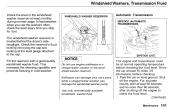
The windshield washer reservoir is located behind the driver's side headlight. This increases the cleaning capability and prevents freezing in the windshield washer reservoir. Check the reservoir's fluid level by removing the cap and looking at ...
The windshield washer reservoir is located behind the driver's side headlight. This increases the cleaning capability and prevents freezing in the windshield washer reservoir. Check the reservoir's fluid level by removing the cap and looking at ...
Owner's Manual
Page 161
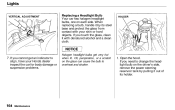
...level ground. 2. Load the trunk with the items you regularly carry heavy items in the driver's seat for all checks and adjustments. Headlight Aiming The headlights were properly aimed when your intentions to signal your car was new. A burned out bulb can create an unsafe condition by reducing ...ability to other drivers. To check these settings: 1. The driver or someone who weighs the same should check their "0" positions after the headlights are burned out, replace them as soon as possible. Lights Check the operation of replacement bulb is full. Check the following...
...level ground. 2. Load the trunk with the items you regularly carry heavy items in the driver's seat for all checks and adjustments. Headlight Aiming The headlights were properly aimed when your intentions to signal your car was new. A burned out bulb can create an unsafe condition by reducing ...ability to other drivers. To check these settings: 1. The driver or someone who weighs the same should check their "0" positions after the headlights are burned out, replace them as soon as possible. Lights Check the operation of replacement bulb is full. Check the following...
Owner's Manual
Page 163
... Your car has halogen headlight bulbs, one on the glass can cause the bulb to overheat and shatter. 1. Oil, perspiration, or a scratch on each side. Maintenance If you touch the ... 7. If you cannot get very hot when lit. When replacing a bulb, handle it by pulling it with your Honda dealer inspect the car for body damage or suspension problems. Halogen headlight bulbs get an indicator to change the headlight bulb on the driver's side, remove the power steering reservoir tank by its holder.
... Your car has halogen headlight bulbs, one on the glass can cause the bulb to overheat and shatter. 1. Oil, perspiration, or a scratch on each side. Maintenance If you touch the ... 7. If you cannot get very hot when lit. When replacing a bulb, handle it by pulling it with your Honda dealer inspect the car for body damage or suspension problems. Halogen headlight bulbs get an indicator to change the headlight bulb on the driver's side, remove the power steering reservoir tank by its holder.

Owner's Manual
Page 164
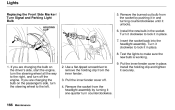
Install the rubber seal over the back of the new bulb. Push the electrical connector onto the tabs of the headlight assembly. Pull the connector straight off. Insert the new bulb into the slot. 6. Pivot the hold -down wire back in place and clip the end ... way and remove the bulb. 5. it is marked "TOP". 7. Make sure it out of the hold -down wire from the bulb by pulling on the headlights to unlock the tab. Lights 3. Pivot it locks in their slots. Remove the rubber weather seal by squeezing the connector on both sides to test...
Install the rubber seal over the back of the new bulb. Push the electrical connector onto the tabs of the headlight assembly. Pull the connector straight off. Insert the new bulb into the slot. 6. Pivot the hold -down wire back in place and clip the end ... way and remove the bulb. 5. it is marked "TOP". 7. Make sure it out of the hold -down wire from the bulb by pulling on the headlights to unlock the tab. Lights 3. Pivot it locks in their slots. Remove the rubber weather seal by squeezing the connector on both sides to test...
Owner's Manual
Page 165
... in place. Put the inner fender cover in place. 7. Install the holding clip from the inner fender. 3. Insert the socket back into the headlight assembly. If you are changing the bulb on the passenger's side, turn off . 4. Use a flat-tipped screwdriver to the right, and turn... If you are changing the bulb on the driver's side, start the engine, turn counterclockwise. 9. Remove the burned out bulb from the headlight assembly by pushing it in and turning counterclockwise until it clockwise to make sure the new bulb is working. 1. Maintenance Install the new bulb...
... in place. Put the inner fender cover in place. 7. Install the holding clip from the inner fender. 3. Insert the socket back into the headlight assembly. If you are changing the bulb on the passenger's side, turn off . 4. Use a flat-tipped screwdriver to the right, and turn... If you are changing the bulb on the driver's side, start the engine, turn counterclockwise. 9. Remove the burned out bulb from the headlight assembly by pushing it in and turning counterclockwise until it clockwise to make sure the new bulb is working. 1. Maintenance Install the new bulb...
Owner's Manual
Page 185
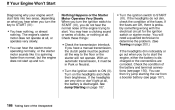
... connections are OK, there is spinning faster than normal, but the engine does not start falls into two areas, depending on page 200.) If the headlights dim noticeably or go out when you turn the key to START (III): You hear nothing, or almost nothing at all . See Jump Starting on... the headlights and check their brightness. The engine's starter motor does not operate at all the way to the floor or the starter will need a qualified technician...
... connections are OK, there is spinning faster than normal, but the engine does not start falls into two areas, depending on page 200.) If the headlights dim noticeably or go out when you turn the key to START (III): You hear nothing, or almost nothing at all . See Jump Starting on... the headlights and check their brightness. The engine's starter motor does not operate at all the way to the floor or the starter will need a qualified technician...

Owner's Manual
Page 195
Check those fuses first, but check all other accessories are off. 2. Make sure the headlights and all the fuses before deciding that component. ABS FUSE BOX FUSE BLOWN Cars equipped with ABS have a third fuse box for is in the ...
Check those fuses first, but check all other accessories are off. 2. Make sure the headlights and all the fuses before deciding that component. ABS FUSE BOX FUSE BLOWN Cars equipped with ABS have a third fuse box for is in the ...

Owner's Manual
Page 215
......18 Door Locks...19 Driving with Pets...19 Head Restraint Position...18 Seat-back Position...18 Storing Cargo Safely ...19 Additives, Engine Oil...133 Adjustments Headlights...162 Battery Charging System Indicator...35, 192 Jump Starting...187 Maintenance...150 Specifications...205 Before Driving...89 Belts, Seat...5 Beverage Holder...64 Body Repair...178...
......18 Door Locks...19 Driving with Pets...19 Head Restraint Position...18 Seat-back Position...18 Storing Cargo Safely ...19 Additives, Engine Oil...133 Adjustments Headlights...162 Battery Charging System Indicator...35, 192 Jump Starting...187 Maintenance...150 Specifications...205 Before Driving...89 Belts, Seat...5 Beverage Holder...64 Body Repair...178...
Owner's Manual
Page 216
......35 Wear Indicators...114 Brakes, ABS Operation...115 System Indicator...35, 117 Braking System...114 Break-in, New Car...90 Brightness Control, Instruments...42 Blights, Headlights...41 Bulb Replacement Back-up Lights...168 Brake Lights...167 Front Parking Lights...166 Front Side Marker Lights...166... Headlights...164 High-mount Brake Light...169 Interior Light...170 License Plate Lights...170 Rear Side Marker Lights...167 Specifications...205 Trunk Light...171 Turn Signal ...
......35 Wear Indicators...114 Brakes, ABS Operation...115 System Indicator...35, 117 Braking System...114 Break-in, New Car...90 Brightness Control, Instruments...42 Blights, Headlights...41 Bulb Replacement Back-up Lights...168 Brake Lights...167 Front Parking Lights...166 Front Side Marker Lights...166... Headlights...164 High-mount Brake Light...169 Interior Light...170 License Plate Lights...170 Rear Side Marker Lights...167 Specifications...205 Trunk Light...171 Turn Signal ...
Owner's Manual
Page 217
... Office...215 Defog and Defrost...73 Defogger, Rear Window...44 Defrosting the Windows...73 DEXRON® III Automatic Transmission Fluid...142 Dimensions...204 Dimming the Headlights...41 Dipstick Automatic Transmission...142 Engine Oil...94 Directional Signals...42 Disabled, Towing Your Car If...200 Disc Brake Wear Indicators...114 Disposal of Used...
... Office...215 Defog and Defrost...73 Defogger, Rear Window...44 Defrosting the Windows...73 DEXRON® III Automatic Transmission Fluid...142 Dimensions...204 Dimming the Headlights...41 Dipstick Automatic Transmission...142 Engine Oil...94 Directional Signals...42 Disabled, Towing Your Car If...200 Disc Brake Wear Indicators...114 Disposal of Used...
Owner's Manual
Page 218
......144 Manual Transmission...143 Gas Mileage, Improving...96 Gasohol...91 Gasoline...90 Fuel Reserve Indicator...36 Gauge...38 Octane Requirement...90 Halogen Headlight Bulbs...164 Hazard Warning Flashers...44 Headlights Aiming...162 Daytime Running Lights...41 High Beam Indicator...35 High Beams, Turning on...41 Low Beams, Turning on ...41 Reminder Beeper...
......144 Manual Transmission...143 Gas Mileage, Improving...96 Gasohol...91 Gasoline...90 Fuel Reserve Indicator...36 Gauge...38 Octane Requirement...90 Halogen Headlight Bulbs...164 Hazard Warning Flashers...44 Headlights Aiming...162 Daytime Running Lights...41 High Beam Indicator...35 High Beams, Turning on...41 Low Beams, Turning on ...41 Reminder Beeper...
Owner's Manual
Page 223
and Canada only Warning Beepers Headlights on...41 Key in Ignition...50 Seat Belts...34 WARNING, Explanation of...ii Warning Labels, Location of...29 Warranty Coverages*...217 Washer, Windshield Checking the ...
and Canada only Warning Beepers Headlights on...41 Key in Ignition...50 Seat Belts...34 WARNING, Explanation of...ii Warning Labels, Location of...29 Warranty Coverages*...217 Washer, Windshield Checking the ...


