Owner's Manual
Page 6
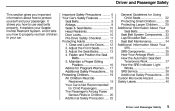
...26 Protecting Larger Children...29 Additional Information About Your Seat Belts...33 Seat Belt System Components...33 Lap/Shoulder Belt...33 Seat Belt Maintenance...34 Additional Information About Your SRS...35 SRS Components...35 How Your Airbags Work...35 How the Automatic Seat Belt Tensioners Work...37... How the SRS Indicator Light Works...37 SRS Service...38 Additional Safety Precautions...38 Carbon Monoxide Hazard...39 Safety Labels...40 Driver and Passenger Safety Adjust the ...
...26 Protecting Larger Children...29 Additional Information About Your Seat Belts...33 Seat Belt System Components...33 Lap/Shoulder Belt...33 Seat Belt Maintenance...34 Additional Information About Your SRS...35 SRS Components...35 How Your Airbags Work...35 How the Automatic Seat Belt Tensioners Work...37... How the SRS Indicator Light Works...37 SRS Service...38 Additional Safety Precautions...38 Carbon Monoxide Hazard...39 Safety Labels...40 Driver and Passenger Safety Adjust the ...
Owner's Manual
Page 39
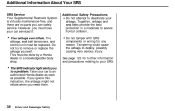
...car serviced if: Your airbags ever inflate. Driver and Passenger Safety Do not try to deploy, possibly causing very serious injury. The SRS indicator light alerts you need them. airbags, seat belt tensioners, and control unit must have your airbags. The Additional Safety Precautions Do not attempt to a... problem. Additional Information About Your SRS SRS Service Your Supplemental Restraint System is virtually maintenance-free, and there are no parts you must be done by a Honda dealer or a knowledgeable body shop.
...car serviced if: Your airbags ever inflate. Driver and Passenger Safety Do not try to deploy, possibly causing very serious injury. The SRS indicator light alerts you need them. airbags, seat belt tensioners, and control unit must have your airbags. The Additional Safety Precautions Do not attempt to a... problem. Additional Information About Your SRS SRS Service Your Supplemental Restraint System is virtually maintenance-free, and there are no parts you must be done by a Honda dealer or a knowledgeable body shop.
Owner's Manual
Page 42
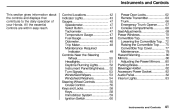
......47 Tachometer...47 Temperature Gauge...47 Fuel Gauge...48 Odometer...48 Trip Meter...48 Maintenance Required Indicator...49 Controls Near the Steering Wheel...50 Headlights...51 Daytime Running Lights...52 Instrument Panel Brightness...52 Turn Signals...53 Windshield Wipers...53 Windshield Washers...54 ......82 Accessory Power Socket...82 Audio Panel...82 Interior Lights...83 Instruments and Controls Instruments and Controls This section gives information about the controls and displays that contribute to the daily operation of your Honda. All the essential controls are within easy reach.
......47 Tachometer...47 Temperature Gauge...47 Fuel Gauge...48 Odometer...48 Trip Meter...48 Maintenance Required Indicator...49 Controls Near the Steering Wheel...50 Headlights...51 Daytime Running Lights...52 Instrument Panel Brightness...52 Turn Signals...53 Windshield Wipers...53 Windshield Washers...54 ......82 Accessory Power Socket...82 Audio Panel...82 Interior Lights...83 Instruments and Controls Instruments and Controls This section gives information about the controls and displays that contribute to the daily operation of your Honda. All the essential controls are within easy reach.
Owner's Manual
Page 44
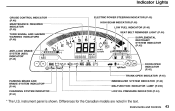
... models are noted in the text. Instruments and Controls Indicator Lights CRUISE CONTROL INDICATOR (P.46) MAINTENANCE REQUIRED INDICATOR (P.49) TURN SIGNAL AND HAZARD WARNING INDICATORS (P.46) ELECTRIC POWER STEERING INDICATOR (P.45) HIGH BEAM INDICATOR (P.46) LOW FUEL INDICATOR (P.46) SEAT BELT REMINDER LIGHT (P.44) SUPPLEMENTAL RESTRAINT SYSTEM INDICATOR (P.45) ANTI-LOCK BRAKE SYSTEM...
... models are noted in the text. Instruments and Controls Indicator Lights CRUISE CONTROL INDICATOR (P.46) MAINTENANCE REQUIRED INDICATOR (P.49) TURN SIGNAL AND HAZARD WARNING INDICATORS (P.46) ELECTRIC POWER STEERING INDICATOR (P.45) HIGH BEAM INDICATOR (P.46) LOW FUEL INDICATOR (P.46) SEAT BELT REMINDER LIGHT (P.44) SUPPLEMENTAL RESTRAINT SYSTEM INDICATOR (P.45) ANTI-LOCK BRAKE SYSTEM...
Owner's Manual
Page 50
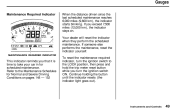
... indicator yourself. Instruments and Controls Gauges Maintenance Required Indicator When the distance driven since the last scheduled maintenance reaches 6,000 miles (9,600 km), the indicator starts blinking. Continue holding the button until the indicator resets (the indicator light goes out). Refer to take your ...car in for Normal and Severe Driving Conditions on . Your dealer will reset the indicator when they perform the scheduled maintenance. If you exceed 7,500 miles (12,000 km...
... indicator yourself. Instruments and Controls Gauges Maintenance Required Indicator When the distance driven since the last scheduled maintenance reaches 6,000 miles (9,600 km), the indicator starts blinking. Continue holding the button until the indicator resets (the indicator light goes out). Refer to take your ...car in for Normal and Severe Driving Conditions on . Your dealer will reset the indicator when they perform the scheduled maintenance. If you exceed 7,500 miles (12,000 km...

Owner's Manual
Page 141
... Wheels and Tires...190 Winter Driving...190 Snow Tires...191 Tire Chains...191 Lights...192 Replacing Bulbs...194 Storing Your Car...202 Maintenance This section also includes Maintenance Schedules for normal driving and severe driving conditions, a Maintenance Record, and instructions for information on your Honda dealer. If you may want to take care of yourself.
... Wheels and Tires...190 Winter Driving...190 Snow Tires...191 Tire Chains...191 Lights...192 Replacing Bulbs...194 Storing Your Car...202 Maintenance This section also includes Maintenance Schedules for normal driving and severe driving conditions, a Maintenance Record, and instructions for information on your Honda dealer. If you may want to take care of yourself.
Owner's Manual
Page 153
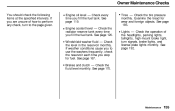
... 119. See page 120. Check the level in the reservoir monthly. If weather conditions cause you to perform any check, turn signals, brake lights, and license plate lights monthly. Maintenance Check every time you fill the fuel tank. Check the fluid level monthly. Check the tire pressure monthly. If you stop for wear...
... 119. See page 120. Check the level in the reservoir monthly. If weather conditions cause you to perform any check, turn signals, brake lights, and license plate lights monthly. Maintenance Check every time you fill the fuel tank. Check the fluid level monthly. Check the tire pressure monthly. If you stop for wear...
Owner's Manual
Page 158
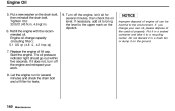
... does not, turn off the engine, let it to a recycling center. NOTICE Improper disposal of the used oil properly. Let the engine run for leaks. 9. Maintenance Turn off the engine and reinspect your own oil, please dispose of engine oil can be harmful to the upper mark on the dipstick. If... the drain bolt and oil filter for several minutes, then check the oil level. Refill the engine with the recommended oil. The oil pressure indicator light should go out within five seconds. Engine Oil 5. Put it in a trash bin or dump it to : 33 lbf.ft (45 N.m, 4.6 kgf.m) 6. Put a new ...
... does not, turn off the engine, let it to a recycling center. NOTICE Improper disposal of the used oil properly. Let the engine run for leaks. 9. Maintenance Turn off the engine and reinspect your own oil, please dispose of engine oil can be harmful to the upper mark on the dipstick. If... the drain bolt and oil filter for several minutes, then check the oil level. Refill the engine with the recommended oil. The oil pressure indicator light should go out within five seconds. Engine Oil 5. Put it in a trash bin or dump it to : 33 lbf.ft (45 N.m, 4.6 kgf.m) 6. Put a new ...
Owner's Manual
Page 180
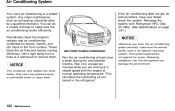
... at least once a week during the cold weather months. AIR CONDITIONING CONDENSER NOTICE The condenser and radiator fins bend easily. Any major maintenance, such as before, have the air conditioning system serviced, make sure the air conditioning works efficiently. If the air conditioning does not ... a ref rigerant recycling system. This system captures the ref rigerant for leaves, insects, and dirt stuck to remove them . Use a light spray from a hose or a soft brush to the front surface. Maintenance Air Conditioning System Your car's air conditioning is a sealed system.
... at least once a week during the cold weather months. AIR CONDITIONING CONDENSER NOTICE The condenser and radiator fins bend easily. Any major maintenance, such as before, have the air conditioning system serviced, make sure the air conditioning works efficiently. If the air conditioning does not ... a ref rigerant recycling system. This system captures the ref rigerant for leaves, insects, and dirt stuck to remove them . Use a light spray from a hose or a soft brush to the front surface. Maintenance Air Conditioning System Your car's air conditioning is a sealed system.
Owner's Manual
Page 190
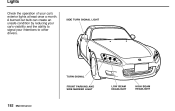
Lights Check the operation of your intentions to signal your car's exterior lights at least once a month. SIDE TURN SIGNAL LIGHT TURN SIGNAL FRONT PARKING AND SIDE MARKER LIGHT LOW BEAM HEADLIGHT HIGH BEAM HEADLIGHT Maintenance A burned out bulb can create an unsafe condition by reducing your car's visibility and the ability to other drivers.
Lights Check the operation of your intentions to signal your car's exterior lights at least once a month. SIDE TURN SIGNAL LIGHT TURN SIGNAL FRONT PARKING AND SIDE MARKER LIGHT LOW BEAM HEADLIGHT HIGH BEAM HEADLIGHT Maintenance A burned out bulb can create an unsafe condition by reducing your car's visibility and the ability to other drivers.
Owner's Manual
Page 191
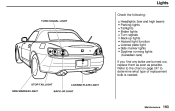
STOP/TAILLIGHT SIDE MARKER LIGHT LICENSE PLATE LIGHT BACK-UP LIGHT Maintenance Refer to the chart on page 247 to determine what type of replacement bulb is needed. Lights Check the following: TURN SIGNAL LIGHT Headlights (low and high beam) Parking lights Taillights Brake lights Turn signals Back-up lights Hazard light function License plate light Side marker lights Daytime running lights (Canadian cars) If you find any bulbs are burned out, replace them as soon as possible.
STOP/TAILLIGHT SIDE MARKER LIGHT LICENSE PLATE LIGHT BACK-UP LIGHT Maintenance Refer to the chart on page 247 to determine what type of replacement bulb is needed. Lights Check the following: TURN SIGNAL LIGHT Headlights (low and high beam) Parking lights Taillights Brake lights Turn signals Back-up lights Hazard light function License plate light Side marker lights Daytime running lights (Canadian cars) If you find any bulbs are burned out, replace them as soon as possible.
Owner's Manual
Page 192
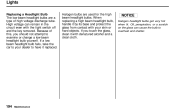
... bulbs are a type of this, you touch the glass, clean it by its base and protect the glass from contact with the light switch off and the key removed. Maintenance Lights Replacing a Headlight Bulb The low beam headlight bulbs are used for the high beam headlight bulbs. When replacing a high beam headlight bulb...
... bulbs are a type of this, you touch the glass, clean it by its base and protect the glass from contact with the light switch off and the key removed. Maintenance Lights Replacing a Headlight Bulb The low beam headlight bulbs are used for the high beam headlight bulbs. When replacing a high beam headlight bulb...
Owner's Manual
Page 193
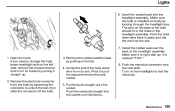
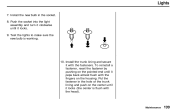
... bulb. If you need to unlock the tab, then slide the connector off the bulb. 3. Remove the rubber weather seal by pulling it straight up ; Lights 6. Pivot the holddown wire back in the headlight assembly. Install the rubber seal over the back of the hold-down wire from the bulb by... hood. Pull the bulb straight out of the way and remove the bulb socket. 5. Insert the socket back into the headlight assembly. Pivot it bottoms. Maintenance Turn on the tab. 4. Unclip the end of the headlight assembly.
... bulb. If you need to unlock the tab, then slide the connector off the bulb. 3. Remove the rubber weather seal by pulling it straight up ; Lights 6. Pivot the holddown wire back in the headlight assembly. Install the rubber seal over the back of the hold-down wire from the bulb by... hood. Pull the bulb straight out of the way and remove the bulb socket. 5. Insert the socket back into the headlight assembly. Pivot it bottoms. Maintenance Turn on the tab. 4. Unclip the end of the headlight assembly.
Owner's Manual
Page 194
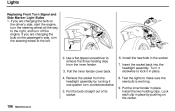
... the bulb straight out of its socket. 6. Install the new bulb in place. Lights Replacing Front Turn Signal and Side Marker Light Bulbs 1. Remove the socket from the inner fender. 3. Insert the socket back into the headlight assembly. Maintenance Turn it clockwise to remove the three holding clips. If you are changing the...
... the bulb straight out of its socket. 6. Install the new bulb in place. Lights Replacing Front Turn Signal and Side Marker Light Bulbs 1. Remove the socket from the inner fender. 3. Insert the socket back into the headlight assembly. Maintenance Turn it clockwise to remove the three holding clips. If you are changing the...
Owner's Manual
Page 195
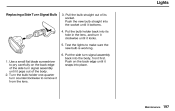
... pry carefully on the back edge until it locks. 5. Lights Replacing a Side Turn Signal Bulb 3. Put the bulb holder back into its socket. Push on the back edge of the side turn counterclockwise to remove it from the lens. Maintenance Push the new bulb straight into the socket until it pops out...
... pry carefully on the back edge until it locks. 5. Lights Replacing a Side Turn Signal Bulb 3. Put the bulb holder back into its socket. Push on the back edge of the side turn counterclockwise to remove it from the lens. Maintenance Push the new bulb straight into the socket until it pops out...
Owner's Manual
Page 196
...in and turn signal, or side marker. 5. Determine which of the four bulbs is burned out: stop /taillight, back-up or side marker light bulb, pull the bulb straight out of the head until it unlocks. Open the trunk. 2. To remove a fastener, push on the center of...its socket. Pull the lining back. 4. To remove the turn signal light bulb, push it one-quarter turn counterclockwise. 6. Remove the socket by turning it in . Remove the burned out bulb. Maintenance To remove the stop /taillight, backup light, turn it counterclockwise until it out. 3. Remove the fasteners from ...
...in and turn signal, or side marker. 5. Determine which of the four bulbs is burned out: stop /taillight, back-up or side marker light bulb, pull the bulb straight out of the head until it unlocks. Open the trunk. 2. To remove a fastener, push on the center of...its socket. Pull the lining back. 4. To remove the turn signal light bulb, push it one-quarter turn counterclockwise. 6. Remove the socket by turning it in . Remove the burned out bulb. Maintenance To remove the stop /taillight, backup light, turn it counterclockwise until it out. 3. Remove the fasteners from ...
Owner's Manual
Page 197
Install the trunk lining and secure it locks. 9. Maintenance Push the socket into the light assembly and turn it clockwise until it locks (the center is working. 10. To reinstall a fastener, reset the fastener by pushing on the pointed end until it pops back almost flush with the fingers on the center until it with the head). Test the lights to make sure the new bulb is flush with the fasteners. Put the fastener in the socket. 8. Install the new bulb in the hole of the trunk lining and push on the housing. Lights 7.
Install the trunk lining and secure it locks. 9. Maintenance Push the socket into the light assembly and turn it clockwise until it locks (the center is working. 10. To reinstall a fastener, reset the fastener by pushing on the pointed end until it pops back almost flush with the fingers on the center until it with the head). Test the lights to make sure the new bulb is flush with the fasteners. Put the fastener in the socket. 8. Install the new bulb in the hole of the trunk lining and push on the housing. Lights 7.
Owner's Manual
Page 198
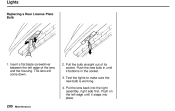
Pull the bulb straight out of the lens and the housing. Push on the left edge of its socket. Lights Replacing a Rear License Plate Bulb 1. Test the lights to make sure the new bulb is working. 4. Maintenance Push the new bulb in until it bottoms in the socket. 3. Put the lens back into place. The lens will come down. 2. Insert a flat blade screwdriver between the left edge until it snaps into the light assembly, right side first.
Pull the bulb straight out of the lens and the housing. Push on the left edge of its socket. Lights Replacing a Rear License Plate Bulb 1. Test the lights to make sure the new bulb is working. 4. Maintenance Push the new bulb in until it bottoms in the socket. 3. Put the lens back into place. The lens will come down. 2. Insert a flat blade screwdriver between the left edge until it snaps into the light assembly, right side first.
Owner's Manual
Page 199
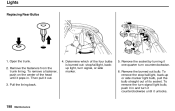
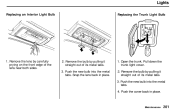
Lights Replacing an Interior Light Bulb Replacing the Trunk Light Bulb 1. Remove the lens by carefully prying on the front edge of its metal tabs. 3. Snap the lens back in place. Open the trunk. Push the new bulb into the metal tabs. 4. Remove the bulb by pulling it straight out of the lens near both sides. 2. Remove the bulb by pulling it straight out of its metal tabs. 3. Push the new bulb into the metal tabs. Push the cover back in place. 1. Pull down the trunk light cover. 2. Maintenance
Lights Replacing an Interior Light Bulb Replacing the Trunk Light Bulb 1. Remove the lens by carefully prying on the front edge of its metal tabs. 3. Snap the lens back in place. Open the trunk. Push the new bulb into the metal tabs. 4. Remove the bulb by pulling it straight out of the lens near both sides. 2. Remove the bulb by pulling it straight out of its metal tabs. 3. Push the new bulb into the metal tabs. Push the cover back in place. 1. Pull down the trunk light cover. 2. Maintenance
Owner's Manual
Page 262
......158 Airbag (SRS)...9 Air Cleaner Element...172 Air Conditioning...86 Maintenance...182 Usage...86 Air Outlets (Vents)...88 Air Pressure, Tires...185 Alarm, Anti-theft...114 Alcohol in Gasoline...250 Aluminum Wheels, Cleaning...206 Antifreeze...161 Anti-lock Brakes (ABS) Indicator Light...45, 139 Operation...137 Anti-theft Steering Column Lock .. 60...
......158 Airbag (SRS)...9 Air Cleaner Element...172 Air Conditioning...86 Maintenance...182 Usage...86 Air Outlets (Vents)...88 Air Pressure, Tires...185 Alarm, Anti-theft...114 Alcohol in Gasoline...250 Aluminum Wheels, Cleaning...206 Antifreeze...161 Anti-lock Brakes (ABS) Indicator Light...45, 139 Operation...137 Anti-theft Steering Column Lock .. 60...

